
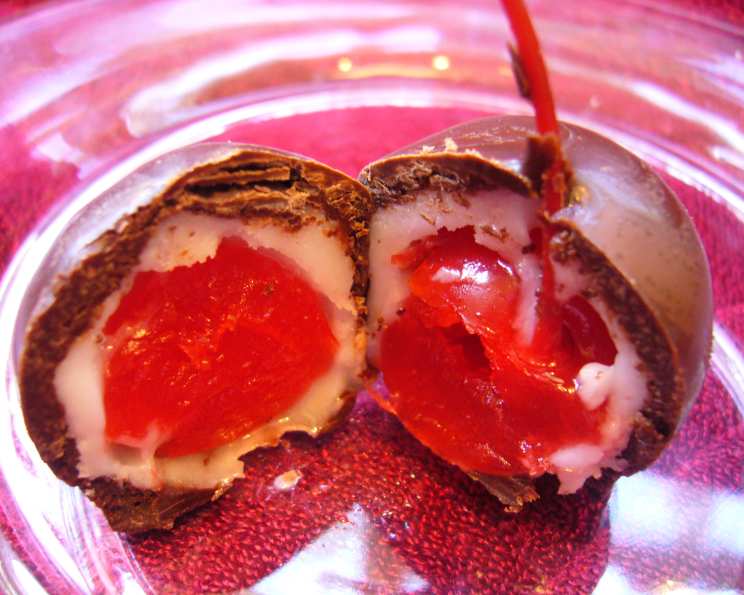
Homemade Chocolate Covered Cherries: A Timeless Indulgence
There’s something magical about biting into a chocolate-covered cherry. For me, it’s a vivid flashback to childhood Christmases. My grandmother, a woman who could coax flavor out of anything, always had a pristine box of them sitting on her sideboard. I remember sneaking one when I thought no one was looking, the burst of sweet cherry contrasting with the rich, dark chocolate. Recreating that simple joy has become a cherished tradition, and now I’m excited to share my take on this classic confection with you.
Recipe Overview
- Prep Time: 30 minutes
- Cook Time: 5 minutes
- Total Time: 35 minutes (plus chilling time)
- Servings: 60
- Yield: 60 candies
- Dietary Type: Not Gluten-Free
Ingredients
- 60 maraschino cherries, with stems
- 3 tablespoons butter, softened
- 3 tablespoons corn syrup
- 2 cups sifted confectioners’ sugar
- 1 lb semisweet chocolate, coating
Equipment Needed
- Paper towels
- Medium bowl
- Heavy saucepan
- Waxed paper
- Sheets/trays
Instructions
-
Begin by preparing the cherries. Carefully drain them from their syrup and arrange them on several layers of paper towels to dry thoroughly. Pat them gently to remove any excess moisture. This step is crucial for ensuring the chocolate adheres properly.
-
In a medium bowl, combine the softened butter and corn syrup. Mix them together until smooth and well incorporated. A hand mixer can speed up this process, but it’s not strictly necessary.
-
Gradually stir in the sifted confectioners’ sugar into the butter and corn syrup mixture. Continue mixing until a dough begins to form. At first, it may seem dry, but as you work the ingredients together, it will come together into a cohesive dough.
-
Knead the dough with your hands until it forms a smooth ball. If the dough is too soft to handle, chill it in the refrigerator for about 15-20 minutes to stiffen. This will make it easier to wrap around the cherries.
-
Take a teaspoon of the dough and wrap it around each cherry, completely enclosing the cherry within the dough. Gently shape the dough around the cherry to form a smooth, even coating.
-
Place the dough-covered cherries on a plate or tray lined with waxed paper. Chill them in the refrigerator until they are firm. This will help the chocolate adhere evenly and prevent the cherries from falling apart during the dipping process.
-
Melt the semisweet chocolate in a heavy saucepan over low heat. Stir frequently to prevent the chocolate from burning. Alternatively, you can melt the chocolate in a double boiler or in the microwave in 30-second intervals, stirring in between, until smooth. Be careful not to overheat the chocolate, as this can cause it to seize up.
-
Holding each cherry by its stem, dip it into the melted chocolate, ensuring it is completely coated. Gently shake off any excess chocolate.
-
Place the chocolate-covered cherries on waxed paper lined sheets.
-
Chill the chocolate-covered cherries in the refrigerator until the chocolate is completely set. This may take about 30 minutes to an hour, depending on the temperature of your refrigerator.
-
Once the chocolate is set, store the chocolate-covered cherries in an airtight container in a cool place. They are best after 1 or 2 weeks, as the flavors meld and the cherry syrup infuses the dough, creating a delightful, almost liqueur-like experience.
Expert Tips & Tricks
- Cherry Prep is Key: Thoroughly drying the cherries is crucial for preventing the chocolate from seizing. If you have time, let the cherries sit on paper towels overnight.
- Dough Consistency: If your dough is too sticky, add a tablespoon of confectioners’ sugar at a time until you reach the desired consistency. Conversely, if it’s too dry, add a teaspoon of corn syrup.
- Chocolate Tempering (Optional): For a truly professional finish, temper your chocolate. This involves heating and cooling the chocolate to specific temperatures to create a shiny, snappy coating.
- Stem Savvy: The stems are not just decorative; they’re essential for dipping! If some cherries lose their stems, use a toothpick to dip them, but be sure to remove the toothpick before the chocolate sets.
- Melting Chocolate Perfection: Avoid getting any water into the melting chocolate, as this can cause it to seize.
- Experiment with extracts in the dough such as almond or vanilla for elevated flavor.
Serving & Storage Suggestions
Serve your homemade chocolate-covered cherries on a decorative platter or in a gift box. They make a wonderful addition to dessert tables, holiday gatherings, or as a thoughtful homemade gift.
Store them in an airtight container in a cool, dry place for up to 2 weeks. They can also be stored in the refrigerator for longer storage, but the chocolate may bloom (develop a white coating), although this doesn’t affect the taste. Freezing is not recommended, as it can alter the texture of the cherries and the dough.
Nutritional Information
| Nutrient | Amount per Serving | % Daily Value |
|---|---|---|
| Calories | 70 kcal | 4% |
| Total Fat | 4.5g | 6% |
| Saturated Fat | 2.8g | 14% |
| Cholesterol | 1.5mg | 0% |
| Sodium | 6.2mg | 0% |
| Total Carbohydrate | 9.1g | 3% |
| Dietary Fiber | 1.4g | 5% |
| Sugars | 6.2g | 24% |
| Protein | 1g | 1% |
Note: Nutritional information is an estimate and may vary based on specific ingredients used.
Variations & Substitutions
- Dark Chocolate Delight: Use dark chocolate instead of semisweet for a more intense flavor.
- White Chocolate Wonder: Swap the semisweet chocolate for white chocolate for a sweeter, creamier treat. Add a few drops of peppermint extract to the melted chocolate for a festive touch.
- Nutty Nuance: Dip the chocolate-covered cherries in chopped nuts, such as almonds or pecans, before the chocolate sets.
- Liqueur Infusion: Soak the cherries in a liqueur, such as Kirsch or brandy, for a few hours before wrapping them in the dough for an extra-special indulgence (adults only, of course!).
- Vegan Option: Use vegan butter and dairy-free chocolate to make this recipe vegan-friendly.
FAQs (Frequently Asked Questions)
Q: Why are my chocolate-covered cherries sticky?
A: This is usually due to excess moisture. Ensure the cherries are thoroughly dried before wrapping them in the dough. Also, chilling the dough-covered cherries before dipping them in chocolate helps.
Q: Can I use a different type of chocolate?
A: Absolutely! Milk chocolate, dark chocolate, or even flavored chocolate (like mint or orange) all work well. Just be sure to use a good-quality chocolate for the best flavor.
Q: How long do these last?
A: Chocolate-covered cherries are best enjoyed within 2 weeks when stored in a cool, dry place.
Q: My chocolate is seizing up when I melt it. What am I doing wrong?
A: Chocolate seizes when it comes into contact with even a small amount of water. Make sure your bowl and utensils are completely dry, and avoid steaming the chocolate too vigorously if using a double boiler.
Q: Can I make these ahead of time?
A: Yes, you can make the dough and wrap the cherries a day or two in advance. Store them in the refrigerator until you’re ready to dip them in chocolate. The longer they sit, the better they taste!
Final Thoughts
Making chocolate-covered cherries at home might seem a little daunting at first, but trust me, the process is incredibly rewarding. The joy of creating something so delicious and sharing it with loved ones is unmatched. Don’t be afraid to experiment with different flavors and coatings to create your own signature version. And if you happen to make a batch that’s gone before the two week ripening period, well, that’s just a sign that you’ve created something truly special. Happy dipping!