
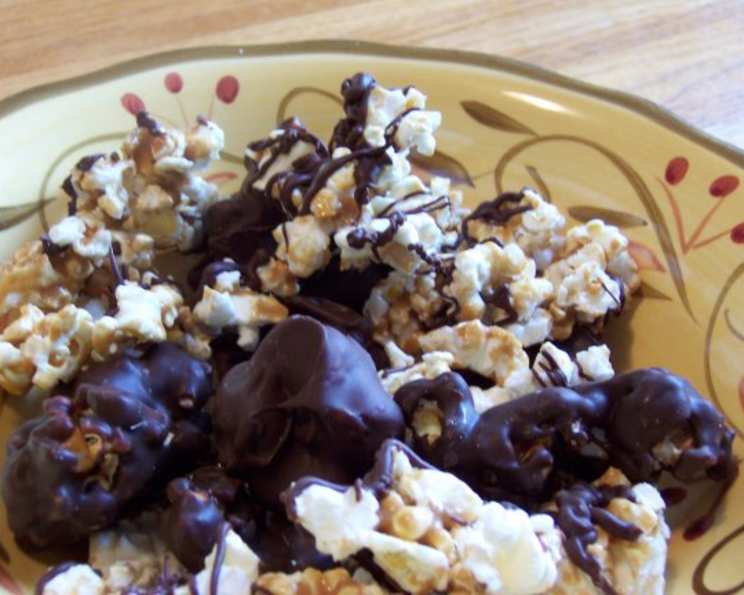
Chocolate Covered Popcorn (Boy Scouts Copycat) Caramel Corn
The aroma alone transports me back to my childhood. Every year, without fail, my family would eagerly await the arrival of the Boy Scouts’ annual fundraiser. While I loved the wreaths and the holiday cards, there was one item that truly captivated me: that irresistible bag of chocolate-covered popcorn. The perfect balance of salty, sweet, crunchy, and chocolatey… it was pure magic. Trying to recreate that magic at home has been a delicious quest, and I think I’ve finally cracked the code to achieving that signature crunch and satisfying chocolate coating.
Recipe Overview
- Prep Time: 30 minutes
- Cook Time: 1 hour
- Total Time: 1 hour 30 minutes
- Servings: 20
- Yield: About 20 servings
- Dietary Type: Not Gluten-Free
Ingredients
- 3 quarts lightly salted popped popcorn
- 1 cup light brown sugar, firmly packed
- 1/2 cup sweet unsalted butter (USE REAL BUTTER)
- 1/4 cup light corn syrup
- 1/2 cup peanuts (optional)
- 1/2 teaspoon baking soda
- 1 lb dipping milk chocolate (Ghirardelli’s)
Equipment Needed
- Large Baking Pan (or two 9×13 pans)
- Very Large Saucepan
- Cookie Sheet
- Parchment Paper or Cooking Spray
- Spatula or Large Spoon
Instructions
-
Preheat your oven to 200 degrees Fahrenheit (93 degrees Celsius). This low temperature is crucial for drying out the caramel corn and achieving that signature crunch.
-
Place the popped popcorn in the largest baking pan you have. If you only have a 9×13 inch pan, you might need to divide the popcorn and bake it in two batches to ensure even caramelization and prevent overcrowding. You need ample space to stir the popcorn effectively.
-
In a very large saucepan, melt the butter over medium heat. Make sure the saucepan is large enough because the caramel will foam up later when the baking soda is added.
-
Add the light brown sugar (firmly packed) and light corn syrup to the melted butter in the saucepan. Stir the mixture constantly with a heat-resistant spatula or wooden spoon.
-
Bring the mixture to a boil over medium heat, continuing to stir constantly to prevent burning or scorching. Once boiling, continue to boil for 5 minutes, still stirring constantly. This step is essential for achieving the right caramel consistency.
-
If you’re using peanuts, add them to the caramel mixture during the last minute of boiling. Stir them in well to coat them evenly.
-
Remove the saucepan from the heat and immediately add the baking soda. Be prepared for the mixture to foam up rapidly. Stir quickly and thoroughly to incorporate the baking soda evenly into the caramel. This is what gives the caramel corn its light and airy texture.
-
Pour the hot caramel mixture over the popcorn in the baking pan. Use a spatula or large spoon to mix the popcorn and caramel thoroughly, ensuring that every piece of popcorn is coated as evenly as possible. This is best achieved by gently folding the popcorn over the caramel rather than stirring vigorously, which can crush the popcorn.
-
Bake the popcorn in the preheated oven for one hour, stirring every 10-15 minutes. This frequent stirring is vital for even caramelization and drying. It also prevents the popcorn from clumping together too much. The caramel corn should become deeply golden and crispy during this process.
-
Remove the baking pan from the oven and allow the caramel corn to cool completely. As it cools, continue to stir it occasionally to prevent it from sticking together. This ensures that you’ll have individual pieces of chocolate-covered popcorn, rather than one giant clump.
-
Prepare a cookie sheet by spraying it lightly with cooking oil or covering it with parchment paper. This will prevent the chocolate-covered popcorn from sticking to the sheet as the chocolate sets.
-
Melt half of the dipping milk chocolate according to the package directions. Ghirardelli’s dipping chocolate is recommended for its smooth melting properties and delicious flavor, but you can use any good-quality milk chocolate. You can melt the chocolate in a double boiler or in the microwave, using short intervals and stirring frequently to prevent burning.
-
Dip individual pieces of caramel corn into the melted chocolate, ensuring that they are fully coated. Use a fork or dipping tool to remove the chocolate-covered popcorn from the melted chocolate and place it individually on the prepared cookie sheet. This prevents the pieces from sticking together as the chocolate sets.
-
Repeat the dipping process until all the caramel corn is coated in chocolate. If the chocolate starts to thicken or cool, you can melt more as needed, following the package directions.
-
Allow the chocolate-covered popcorn to set completely. This will take approximately 30-60 minutes at room temperature or can be accelerated by placing the cookie sheet in the refrigerator for a shorter period.
-
Once the chocolate is set, the chocolate-covered caramel corn is ready to serve or store.
Expert Tips & Tricks
- Use REAL butter: The flavor of real butter is essential for a rich, authentic caramel taste. Margarine or other substitutes will not yield the same results.
- Constant stirring is key: Stirring the caramel constantly during the boiling process prevents burning and ensures even heat distribution. Stirring the popcorn frequently during baking ensures even caramelization and crispiness.
- Don’t overcrowd the baking pan: If your baking pan is too small, divide the popcorn into two batches and bake them separately. Overcrowding will prevent the popcorn from caramelizing evenly and becoming crispy.
- Control the Chocolate: If the chocolate is too thick, add a teaspoon of vegetable oil or shortening while melting. This will thin it out for easier dipping.
- Consider adding a sprinkle of sea salt on the chocolate after dipping for an even more elevated flavour
Serving & Storage Suggestions
Serve the chocolate-covered caramel corn as a snack, dessert, or party favor. It’s best enjoyed fresh, but it can be stored in an airtight container at room temperature or in the refrigerator for up to a week. If stored in the refrigerator, the chocolate may become slightly brittle, but it will still taste delicious. Do not freeze the chocolate-covered caramel corn, as this can affect the texture of the popcorn.
Nutritional Information
| Nutrient | Amount per Serving | % Daily Value |
|---|---|---|
| Calories | 234 kcal | N/A |
| Total Fat | 11.6 g | 17% |
| Saturated Fat | 6.2 g | 30% |
| Cholesterol | 17.4 mg | 5% |
| Sodium | 57.3 mg | 2% |
| Total Carbohydrate | 31.2 g | 10% |
| Dietary Fiber | 1.5 g | 5% |
| Sugars | 23.4 g | 93% |
| Protein | 2.4 g | 4% |
Note: Nutritional information is an estimate and may vary based on specific ingredients and serving sizes.
Variations & Substitutions
- Nut-Free: Omit the peanuts for a nut-free version.
- Dark Chocolate: Substitute dark chocolate for milk chocolate for a richer, more intense flavor.
- White Chocolate: Use white chocolate for a sweeter, visually appealing variation.
- Spice It Up: Add a pinch of cayenne pepper or chili powder to the caramel mixture for a spicy kick.
- Extracts: Stir in a teaspoon of vanilla extract, almond extract, or peppermint extract to the caramel mixture for added flavor.
- Sprinkles: Add sprinkles or chopped nuts to the chocolate-covered popcorn before the chocolate sets.
FAQs (Frequently Asked Questions)
Q: Why is it important to use real butter?
A: Real butter provides a richer flavor and creamy texture that cannot be replicated by margarine or butter substitutes. This significantly impacts the caramel’s overall taste.
Q: Can I use pre-caramelized popcorn to save time?
A: No, using pre-caramelized popcorn will likely result in a soggy product. The baking process is crucial for drying the popcorn and achieving the desired crunch.
Q: What if my caramel becomes too hard during the boiling process?
A: Add a tablespoon or two of water to the caramel and stir continuously until it reaches the desired consistency. Watch it carefully to avoid burning.
Q: How do I prevent the chocolate from seizing up when melting?
A: Avoid getting any water or steam into the chocolate during melting. Use a clean, dry bowl and utensils, and melt the chocolate over low heat or in short intervals in the microwave.
Q: My chocolate-covered popcorn is sticky. What did I do wrong?
A: Ensure the caramel corn is fully cooled before dipping, and that the chocolate is completely set before storing. Excess humidity can also cause stickiness.
Final Thoughts
This recipe for Chocolate Covered Popcorn is more than just a sweet treat; it’s a nostalgic journey back to simpler times. Recreating those cherished memories with each crunchy, chocolatey bite is what makes this recipe so special. I encourage you to gather your ingredients, preheat your oven, and embark on this delicious adventure. Don’t be afraid to experiment with different chocolate types, add-ins, or flavor extracts to create your own unique version. And please, share your creations and feedback; I’d love to see how you make this classic recipe your own! Enjoy!