
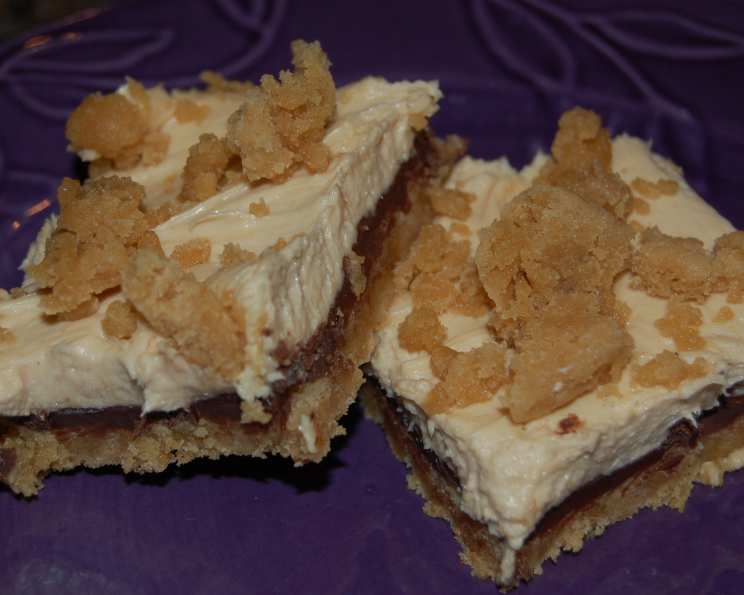
Chocolate-Cream Cheese-Peanut Butter Bars (Cookie Mix)
My grandmother, bless her heart, wasn’t exactly known for her culinary prowess. Her signature dish was, shall we say, “boiled chicken,” and it tasted precisely how it sounds. But every so often, she would whip out a pan of these Chocolate-Cream Cheese-Peanut Butter Bars, and it was pure magic. The combination of the sweet chocolate, tangy cream cheese, and salty peanut butter was, and still is, a symphony of flavors that always brings me back to her tiny, slightly chaotic kitchen. It wasn’t fancy, but it was made with love, and that’s what truly mattered.
Recipe Overview
- Prep Time: 20 minutes
- Cook Time: 12 minutes
- Chill Time: 1 hour
- Total Time: 1 hour 32 minutes
- Yields: 36 bars
- Dietary Type: Not specified, contains dairy, gluten, and eggs
Ingredients
Cookie Base and Topping
- 1 (17 1/2 ounce) envelope Betty Crocker Peanut Butter Cookie Dough Mix
- 3 tablespoons vegetable oil
- 1 tablespoon water
- 1 egg
Filling
- 1 1/4 cups semi-sweet chocolate chips
- 1/4 cup butter or margarine
- 1 (8 ounce) package cream cheese, softened
- 2/3 cup peanut butter
- 3/4 cup powdered sugar
- 1/2 cup whipping cream
Equipment Needed
- 13×9-inch pan
- Cooking spray
- Large bowl
- Cookie sheet
- Fork
- Small microwavable bowl
- Medium bowl
- Electric mixer
Instructions
- Preheat your oven to 350°F (175°C).
- Spray only the bottom of a 13×9-inch pan with cooking spray. This prevents the bars from sticking while still allowing the edges to bake properly.
- In a large bowl, stir together the peanut butter cookie dough mix, vegetable oil, water, and egg until a soft dough forms. Be careful not to overmix, as this can result in a tough cookie base.
- Shape 6 (1-inch) balls of dough. These will be used for the topping later.
- On an ungreased cookie sheet, place the dough balls about 2 inches apart. Flatten each ball in a crisscross pattern using a fork. This ensures they bake evenly and have a nice texture.
- With the remaining cookie dough, press it evenly into the prepared 9×13-inch pan. Make sure the dough is spread uniformly to ensure even baking.
- Bake the flattened cookies and the cookie base for 10 to 12 minutes, or until the edges are lightly golden brown. Keep a close eye on them, as ovens can vary. You want the base to be set but not overbaked.
- Cool the baked cookies and base in the pan for 10 minutes. This allows the base to firm up slightly before adding the chocolate layer.
- Reserve the 6 baked cookies for the topping. Set them aside to cool completely.
- In a small microwavable bowl, combine the chocolate chips and butter. Microwave uncovered on high for 1 minute to 1 minute 30 seconds, stirring every 30 seconds, until the chocolate and butter are melted and smooth. Stir well to ensure everything is fully incorporated.
- Spread the melted chocolate evenly over the cooled cookie base in the pan.
- Refrigerate the pan until the chocolate layer is firm, about 30 minutes. This provides a solid foundation for the cream cheese layer.
- In a medium bowl, beat the cream cheese, peanut butter, powdered sugar, and whipping cream with an electric mixer on low speed until blended.
- Increase the mixer speed to high and beat for about 2 minutes, or until the mixture is light and fluffy. Be careful not to overwhip, as this can cause the mixture to become too soft.
- Spread the cream cheese mixture evenly over the chilled chocolate layer.
- Crush the reserved cookies into small pieces. You can do this by placing them in a zip-top bag and crushing them with a rolling pin or by pulsing them in a food processor.
- Sprinkle the crushed cookies evenly over the cream cheese layer.
- Gently press the crushed cookies into the cream cheese layer to help them adhere.
- Refrigerate the bars until set, about 30 minutes. This will allow the cream cheese layer to firm up and make the bars easier to cut.
- For serving, cut the bars into 9 rows by 4 rows, yielding 36 bars.
- Store the bars covered in the refrigerator to maintain their freshness and prevent the cream cheese layer from softening.
Expert Tips & Tricks
- Soften the cream cheese completely: This is crucial for a smooth and lump-free cream cheese layer. Let it sit at room temperature for at least an hour, or microwave it in 15-second intervals until softened but not melted.
- Use a hot knife for clean cuts: When cutting the bars, run a long, sharp knife under hot water and dry it before each cut. This will help you achieve clean, professional-looking slices.
- Don’t overbake the cookie base: Overbaking will result in a dry and crumbly base. The edges should be just lightly golden brown.
- For a richer chocolate flavor: Use dark chocolate chips instead of semi-sweet.
- Add a sprinkle of sea salt: A pinch of sea salt on top of the finished bars enhances the sweetness and brings out the peanut butter flavor.
Serving & Storage Suggestions
These bars are best served chilled, straight from the refrigerator. They make a delightful dessert for parties, potlucks, or simply a sweet treat to enjoy at home.
- Storage: Store the bars covered in the refrigerator for up to 5 days.
- Freezing: You can also freeze the bars for longer storage. Wrap them individually in plastic wrap and then place them in a freezer-safe container. They can be frozen for up to 2 months. Thaw in the refrigerator overnight before serving. They can also be enjoyed straight from the freezer.
- Serving Suggestion: Serve with a glass of cold milk or a scoop of vanilla ice cream for an extra indulgent treat.
Nutritional Information
| Nutrient | Amount per Serving | % Daily Value (approximate) |
|---|---|---|
| Calories | 186 kcal | N/A |
| Calories from Fat | N/A | N/A |
| Total Fat | 13.6 g | 20% |
| Saturated Fat | 5.5 g | 27% |
| Cholesterol | 24.4 mg | 8% |
| Sodium | 108.3 mg | 4% |
| Total Carbohydrate | 14.6 g | 4% |
| Dietary Fiber | 0.8 g | 3% |
| Sugars | 6.1 g | 24% |
| Protein | 3.3 g | 6% |
Note: Nutritional information is an estimate and may vary based on specific ingredients used.
Variations & Substitutions
- Gluten-Free: Use a gluten-free peanut butter cookie mix. Ensure all other ingredients are also gluten-free.
- Dairy-Free: Substitute the butter with a dairy-free margarine, the cream cheese with a dairy-free cream cheese alternative, and the whipping cream with a dairy-free whipping cream alternative, such as coconut cream.
- Chocolate Swirl: Before chilling the chocolate layer, swirl in some peanut butter for a marbled effect.
- Different Nut Butter: Try using almond butter or cashew butter instead of peanut butter for a different flavor profile.
- Add-ins: Mix chopped nuts, sprinkles, or mini chocolate chips into the cream cheese layer for added texture and flavor.
FAQs (Frequently Asked Questions)
Q: Can I use a different size pan?
A: Yes, but you’ll need to adjust the baking time accordingly. A smaller pan will require a longer baking time, while a larger pan will require a shorter baking time. Keep a close eye on the cookie base to prevent overbaking.
Q: My cream cheese layer is too runny. What did I do wrong?
A: The most common cause of a runny cream cheese layer is using cream cheese that wasn’t fully softened. Make sure the cream cheese is at room temperature before mixing. Also, avoid overwhipping the cream cheese mixture.
Q: Can I make these bars ahead of time?
A: Absolutely! These bars are perfect for making ahead of time. They can be stored in the refrigerator for up to 5 days or frozen for up to 2 months.
Q: My chocolate layer is cracking when I cut the bars. How can I prevent this?
A: Let the chocolate layer soften slightly at room temperature before cutting. Also, use a warm, sharp knife to cut the bars.
Q: Can I use a homemade peanut butter cookie recipe instead of a mix?
A: Yes, you can! Just make sure the dough is similar in consistency to the cookie mix dough. You’ll need enough dough to press into the bottom of the pan and to make the 6 cookies for the topping.
Final Thoughts
These Chocolate-Cream Cheese-Peanut Butter Bars are more than just a dessert; they’re a comforting reminder of simpler times and shared moments. Whether you’re a seasoned baker or just starting out, this recipe is easy enough to follow and guaranteed to impress. So gather your ingredients, preheat your oven, and get ready to create a batch of these irresistible bars. And don’t forget to share the love (and the bars!) with your family and friends. I encourage you to try this recipe and share your delicious creations. Happy baking!