
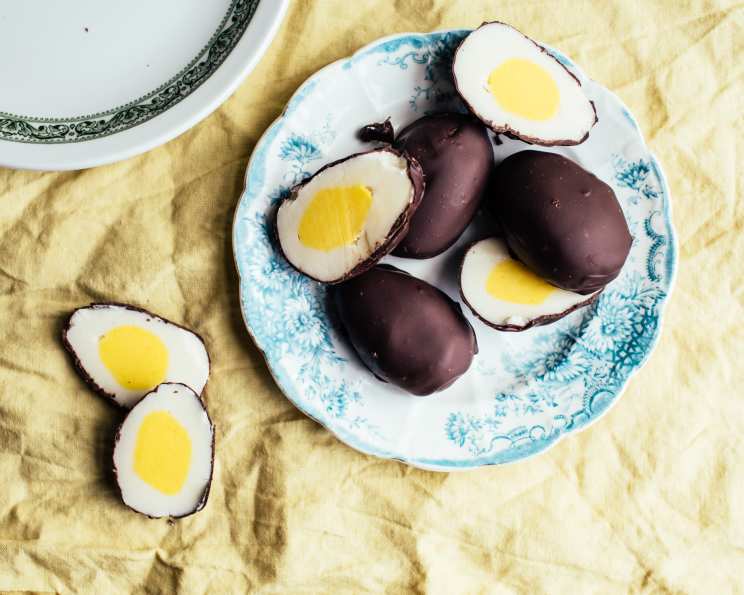
Chocolate Cream Filled Easter Eggs: A Sweet Nostalgia
Every Easter, the memory of my grandmother’s kitchen floods back – the scent of melting chocolate, the cheerful yellow food coloring, and the hushed excitement as we helped shape these very eggs. They weren’t just candy; they were edible love letters, tiny parcels of joy. My grandmother’s hands, dusted with powdered sugar, would patiently guide ours as we molded the sweet, creamy filling. The rich, bittersweet chocolate shell always held the promise of a perfect, melt-in-your-mouth bite. Now, as I make these for my own family, I hope to pass on that same joy and create lasting Easter memories.
Recipe Overview
- Prep Time: 30 minutes
- Cook Time: 4 hours (chill time)
- Total Time: 4 hours 30 minutes
- Servings: 10-15 eggs
- Yield: 10-15 eggs
- Dietary Type: Vegetarian
Ingredients
- 1/2 cup sweetened condensed milk
- 1/2 cup (1 stick) butter, softened
- 1 1/2 teaspoons corn syrup
- 1 teaspoon salt
- 1 teaspoon vanilla extract
- 6-7 cups sifted icing sugar, plus more for kneading if needed
- Yellow food coloring
- 1 lb semisweet chocolate
- 1 ounce paraffin wax (optional, for a smoother chocolate shell)
Equipment Needed
- Large mixing bowl
- Measuring cups and spoons
- Food coloring
- Plastic wrap
- Baking tray
- Double boiler or heatproof bowl and saucepan
- Fondue fork or dipping tools
- Waxed paper or parchment paper
Instructions
-
Prepare the Cream Filling: In a large mixing bowl, combine the sweetened condensed milk, softened butter, corn syrup, salt, and vanilla extract. Using an electric mixer or sturdy spoon, thoroughly mix until all ingredients are well incorporated and the mixture is smooth.
-
Incorporate the Icing Sugar: Gradually add the sifted icing sugar in 3 or 4 batches. Be sure to stir well after each addition. Mixing in batches prevents a cloud of powdered sugar and ensures an even consistency.
-
Knead and Adjust Consistency: Once most of the icing sugar is incorporated, the mixture will become quite stiff. At this stage, use your hands to knead the mixture, working it until it holds its shape and is smooth to the touch. If the mixture is still too soft, gradually add more sifted icing sugar, a little at a time, until you achieve the desired consistency. The dough should be pliable and easy to mold.
-
Create the Yolks: Divide the cream filling mixture. Take approximately 1/4 of the mixture and add yellow food coloring, mixing until the color is evenly distributed. Form this yellow mixture into 10 to 15 small balls, roughly the size of large marbles. These will be the “yolks” of your Easter eggs. Set these aside.
-
Shape the Eggs: Take the remaining, uncolored cream filling and divide it into 10 to 15 larger portions. Flatten each portion in the palm of your hand to create a small disc. Place one yellow “yolk” ball in the center of each disc. Gently shape the white mixture around the yellow ball, completely enclosing it to form an egg shape. Try to make the eggs as smooth and uniform as possible.
-
Chill the Eggs: Place the shaped eggs on a baking tray lined with waxed paper or parchment paper. Cover the tray tightly with plastic wrap, ensuring that the plastic wrap is in contact with the eggs. This prevents them from drying out. Chill the eggs in the refrigerator for at least 4 hours, or preferably overnight, until they are firm.
-
Prepare the Chocolate Coating: While the eggs are chilling, prepare the chocolate coating. In a double boiler, or a heatproof bowl set over a pot of simmering water (making sure the bottom of the bowl doesn’t touch the water), melt the semisweet chocolate and paraffin wax (if using). Stir frequently until the chocolate is completely melted and smooth. The paraffin wax is optional but helps create a glossier, smoother coating that snaps nicely when broken. Be careful not to overheat the chocolate, as this can cause it to seize. The water should be simmering gently, not boiling vigorously.
-
Dip the Eggs: Once the chocolate is melted and the eggs are chilled and firm, it’s time to dip them. Use a fondue fork or other dipping tool to carefully lower each egg into the melted chocolate. Make sure the egg is completely coated. Lift the egg out of the chocolate and gently tap the fork against the side of the bowl to remove any excess chocolate.
-
Set the Chocolate: Place the dipped eggs on a tray lined with waxed paper or parchment paper. Allow the chocolate to set completely in a cool place. You can speed up this process by placing the tray in the refrigerator for a short time.
-
Decorate (Optional): Once the chocolate has set, you can decorate the eggs as desired. Use melted white chocolate, colored sprinkles, or other edible decorations to create festive designs.
Expert Tips & Tricks
- Don’t Overheat the Chocolate: Overheated chocolate can become grainy and difficult to work with. Use a low, gentle heat when melting.
- Chill the Eggs Well: Properly chilled eggs are easier to dip and hold their shape better in the warm chocolate.
- Kneading is Key: Don’t skip the kneading step! It ensures a smooth, pliable filling.
- Paraffin Wax Alternative: If you prefer not to use paraffin wax, you can add a tablespoon of vegetable oil to the melted chocolate for a similar effect.
- Even Coating: For a uniform chocolate coating, maintain a consistent chocolate temperature and tap off any excess after dipping.
Serving & Storage Suggestions
Serve the Chocolate Cream Filled Easter Eggs chilled or at room temperature. They are best enjoyed within a few days of making them. Store leftover eggs in an airtight container in the refrigerator for up to a week. For longer storage, you can freeze the eggs for up to a month. Thaw them in the refrigerator before serving.
Nutritional Information
| Nutrient | Amount per Serving | % Daily Value |
|---|---|---|
| Calories | 428 kcal | 21% |
| Total Fat | 24g | 37% |
| Saturated Fat | 15g | 75% |
| Cholesterol | 20mg | 7% |
| Sodium | 230mg | 10% |
| Total Carbohydrate | 55g | 18% |
| Dietary Fiber | 2g | 8% |
| Sugars | 45g | N/A |
| Protein | 3g | 6% |
Note: Nutritional information is an estimate and may vary based on specific ingredients and portion sizes.
Variations & Substitutions
- Dark Chocolate: Use dark chocolate instead of semisweet for a richer, more intense flavor.
- Peanut Butter Filling: Add a few tablespoons of peanut butter to the cream filling for a peanut butter cup-inspired treat.
- Mint Chocolate: Add a few drops of peppermint extract to the melted chocolate for a refreshing minty flavor.
- Different Food Coloring: Get creative with the food coloring! Use pink, blue, or green to create a colorful assortment of Easter eggs.
- Vegan Option: Substitute the butter with a vegan butter alternative and use a vegan condensed milk substitute to make this recipe vegan-friendly. Ensure the chocolate used is also vegan.
FAQs (Frequently Asked Questions)
Q: Can I use chocolate chips instead of a chocolate bar?
A: Yes, you can use chocolate chips, but a good quality chocolate bar will melt more smoothly and create a better coating.
Q: What if my chocolate seizes while melting?
A: Try adding a teaspoon of vegetable oil or shortening to the chocolate and stir gently. This can sometimes help to bring it back together. Be very careful not to get any water into the chocolate, as this is a common cause of seizing.
Q: Can I make the cream filling ahead of time?
A: Yes, you can make the cream filling up to 2 days in advance. Store it in an airtight container in the refrigerator.
Q: How do I prevent the eggs from sticking to the parchment paper?
A: Make sure the parchment paper is clean and dry. If you’re concerned about sticking, you can lightly grease the parchment paper with butter or cooking spray.
Q: My eggs are too soft. What should I do?
A: If your eggs are too soft, add a little more sifted icing sugar to the cream filling, a tablespoon at a time, until you reach the desired consistency. Make sure to chill the eggs for at least 4 hours before dipping them in chocolate.
Final Thoughts
These Chocolate Cream Filled Easter Eggs are more than just a treat; they are a tradition, a memory waiting to be made. Gather your family, put on some music, and create a batch of these sweet delights together. The joy of shaping the eggs, the anticipation of the first bite, and the shared laughter are all part of the magic. Don’t be afraid to get creative with decorations and flavors, and most importantly, have fun! I hope you and your loved ones enjoy this recipe as much as my family does. Happy Easter!