
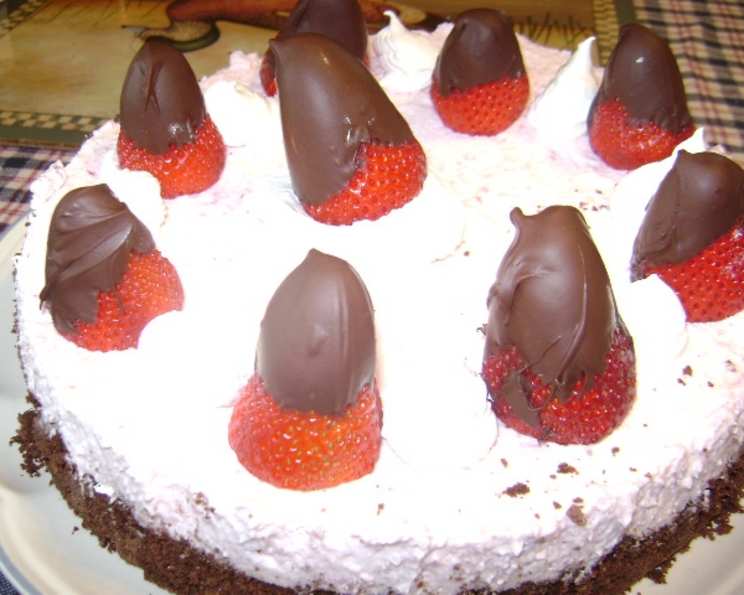
Chocolate-Dipped Strawberry Cheesecake: A Light and Luscious Delight
I remember the first time I made a cheesecake. It was for my grandmother’s birthday, and I was determined to impress her. I spent hours carefully measuring ingredients and meticulously following the instructions. When I finally pulled it out of the oven, a wave of sweet aroma filled the kitchen, promising a delightful indulgence. It turned out perfectly golden brown, and my grandmother declared it the best cheesecake she had ever tasted. This Chocolate-Dipped Strawberry Cheesecake evokes similar memories of joy, simple elegance, and the satisfaction of creating something beautiful and delicious.
Recipe Overview
- Prep Time: 30 minutes
- Cook Time: 10 minutes
- Chill Time: 2-3 hours
- Servings: 12
- Yield: 1 cheesecake
- Dietary Type: Light
Ingredients
- 1 3/4 cups chocolate graham cracker crumbs (about 9 whole crackers)
- 1/4 cup butter, melted
- 1 lb fresh strawberries (or frozen, thawed)
- 2 (1 ounce) envelopes unflavored gelatin
- 1/2 cup cold water
- 2 (8 ounce) packages fat free cream cheese, cubed
- 1 cup fat-free cottage cheese
- 3/4 cup sugar (or sugar substitute)
- 1 (8 ounce) carton reduced-fat whipped topping, thawed, divided
- Chocolate for dipping
Equipment Needed
- 9-inch springform pan
- Baking sheet
- Wire rack
- Food processor
- Small saucepan
- Microwave-safe bowl
- Waxed paper
- Papertowels
Instructions
-
Preheat your oven to 350 degrees F (175 degrees C). In a small bowl, thoroughly combine the chocolate graham cracker crumbs and melted butter.
-
Coat a 9-inch springform pan with cooking spray. Press the crumb mixture evenly onto the bottom and 1 inch up the sides of the prepared pan. Place the pan on a baking sheet.
-
Bake the crust at 350 degrees F (175 degrees C) for 10 minutes, or until it appears set. Remove from the oven and cool completely on a wire rack. This is crucial to ensure the crust doesn’t crumble when the filling is added.
-
While the crust cools, prepare the strawberry puree. Hull the fresh strawberries (or if using frozen, ensure they are thoroughly thawed and drained). Place the hulled strawberries in a food processor and process until smooth. Remove the strawberry puree and set aside.
-
In a small saucepan, sprinkle the unflavored gelatin over the cold water. Let it stand for 1 minute to soften.
-
Heat the gelatin mixture over low heat, stirring constantly, until the gelatin is completely dissolved. Do not boil.
-
Transfer the dissolved gelatin mixture to the food processor. Add the cubed fat-free cream cheese, fat-free cottage cheese, and sugar (or sugar substitute). Cover and process until the mixture is completely smooth and creamy. Scrape down the sides of the food processor as needed to ensure everything is well combined.
-
Add the reserved strawberry puree to the cream cheese mixture in the food processor. Cover and process again until everything is thoroughly blended and the mixture has a uniform pink color.
-
Transfer the strawberry cream cheese mixture to a large bowl. Gently fold in 2 cups of the thawed reduced-fat whipped topping. Be careful not to overmix, as this can deflate the whipped topping and result in a less airy cheesecake.
-
Pour the strawberry cream cheese filling into the cooled graham cracker crust. Spread evenly. Cover the springform pan with plastic wrap and refrigerate for at least 2-3 hours, or until the cheesecake is completely set.
-
While the cheesecake is chilling, prepare the chocolate-dipped strawberries for garnish. Wash the remaining fresh strawberries and gently pat them completely dry with papertowels. This step is essential for the chocolate to adhere properly. Cut the tops off the berries.
-
In a microwave-safe bowl, melt chocolate at 50 percent power in 30-second intervals, stirring until smooth. Be careful not to overheat the chocolate, as it can seize. If using a double boiler, melt the chocolate over simmering water, stirring constantly.
-
Dip each strawberry tip into the melted chocolate until about half of the berry is coated. Allow any excess chocolate to drip off.
-
Place the chocolate-dipped strawberries with the chocolate tips pointing up on a waxed paper-lined baking sheet. Refrigerate for at least 30 minutes, or until the chocolate is firm.
-
Once the cheesecake is set, carefully run a knife around the edge of the springform pan to loosen the cheesecake from the sides. Remove the sides of the pan.
-
Arrange the chocolate-dipped strawberries, chocolate tips up, around the edge of the cheesecake and place one in the center. Garnish the cheesecake with the remaining whipped topping.
-
Refrigerate any leftovers to maintain freshness.
Expert Tips & Tricks
- For a richer flavor, consider using full-fat cream cheese instead of fat-free, but remember this will alter the nutritional information.
- If you’re short on time, you can purchase pre-made graham cracker crusts, but the homemade crust tastes significantly better.
- Ensure your strawberries are completely dry before dipping them in chocolate. Moisture will prevent the chocolate from adhering properly.
- If your chocolate seizes while melting, try adding a teaspoon of vegetable oil or shortening to help smooth it out.
- To prevent the crust from becoming soggy, brush the cooled crust with a thin layer of melted chocolate before adding the filling.
Serving & Storage Suggestions
Serve the Chocolate-Dipped Strawberry Cheesecake chilled. It’s best enjoyed within 3-4 days of making it. Store any leftover cheesecake in an airtight container in the refrigerator. While you can freeze the cheesecake, the texture may change slightly upon thawing. If freezing, wrap it tightly in plastic wrap and then in aluminum foil. Thaw it in the refrigerator overnight. Do not leave the cheesecake at room temperature for more than 2 hours.
Nutritional Information
| Nutrient | Amount per Serving | % Daily Value |
|---|---|---|
| Calories | 201.1 kcal | N/A |
| Calories from Fat | 61 g | 31% |
| Total Fat | 6.9 g | 10% |
| Saturated Fat | 4.8 g | 24% |
| Cholesterol | 15.9 mg | 5% |
| Sodium | 362.7 mg | 15% |
| Total Carbohydrate | 23.6 g | 7% |
| Dietary Fiber | 0.8 g | 3% |
| Sugars | 21.1 g | 84% |
| Protein | 12 g | 24% |
Variations & Substitutions
- Gluten-Free: Use gluten-free graham crackers to make the crust.
- Dairy-Free: Substitute the cream cheese and cottage cheese with plant-based alternatives. Use coconut whipped cream instead of reduced-fat whipped topping.
- Berry Variations: Experiment with other berries like raspberries, blueberries, or mixed berries in the puree and as garnish.
- Chocolate Crust: For an even more intense chocolate flavor, use chocolate sandwich cookies instead of graham crackers for the crust.
- Extracts: Add a teaspoon of vanilla extract or almond extract to the cream cheese filling for extra flavor.
FAQs (Frequently Asked Questions)
Q: Can I use frozen strawberries instead of fresh?
A: Yes, you can use frozen strawberries. Just make sure to thaw them completely and drain any excess liquid before pureeing.
Q: How do I prevent the crust from getting soggy?
A: Baking the crust before adding the filling helps to prevent it from becoming soggy. You can also brush the cooled crust with a thin layer of melted chocolate.
Q: Can I make this cheesecake ahead of time?
A: Absolutely! In fact, it’s best to make it at least a day in advance to allow the flavors to meld together.
Q: What’s the best way to melt chocolate for dipping?
A: Melting chocolate in the microwave at 50% power in short intervals, stirring in between, is a great way to prevent burning. Alternatively, use a double boiler over simmering water.
Q: How long will the cheesecake last in the refrigerator?
A: The cheesecake will last for 3-4 days in the refrigerator if stored properly in an airtight container.
Final Thoughts
I sincerely hope you will give this Chocolate-Dipped Strawberry Cheesecake recipe a try. It’s a wonderfully light and refreshing dessert, perfect for any occasion. Feel free to adjust the sweetness to your liking by modifying the amount of sugar or sugar substitute. Don’t be afraid to get creative with the garnishes – perhaps a sprinkle of cocoa powder or a drizzle of white chocolate. I’m confident you’ll create a stunning and delicious dessert that everyone will love. Enjoy the process, savor each bite, and please share your feedback with me!