
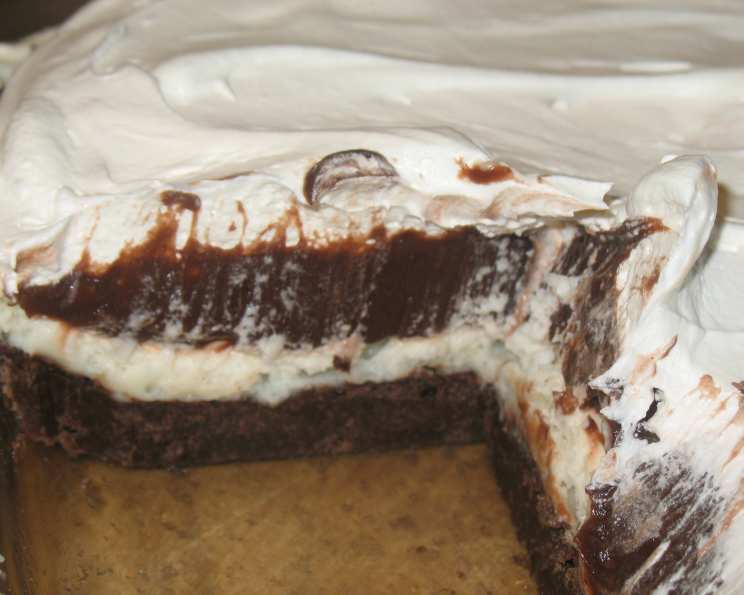
Chocolate Dream Cream Dessert
I remember the first time I tasted this dessert. It was at a family reunion, and my Aunt Carol, the queen of decadent desserts, had brought it. I took one bite, and the world seemed to slow down. The layers of crumbly chocolate crust, creamy cheesecake filling, and rich chocolate pudding, topped with billowy whipped cream, were a symphony of textures and flavors. I snuck back for seconds, thirds, and maybe even a fourth helping. This dessert isn’t just food; it’s a chocolate-induced trip down memory lane, a reminder of family gatherings and the joy of shared sweets.
Recipe Overview
- Prep Time: 20 minutes
- Cook Time: 15-18 minutes
- Total Time: 2 hours 35-38 minutes (includes chilling time)
- Servings: 12
- Yield: 1 (9×13 inch) dessert
- Dietary Type: Not specified
Ingredients
- ¾ cup butter
- 1 (18 ¼ ounce) package chocolate cake mix
- 1 egg, lightly beaten
- 1 (8 ounce) package cream cheese, softened
- 1 cup confectioners’ sugar
- 4 cups stabilized whipped cream, divided
- 3 cups milk
- 2 (4 ounce) packages instant chocolate pudding mix
- Chocolate curls (optional)
Equipment Needed
- 9-in. x 13-in. x 2-in. baking dish
- Mixing bowls (small and large)
- Electric mixer
- Whisk
- Wire rack
Instructions
- Begin by preparing the crust. In a large bowl, cut the butter into the chocolate cake mix using a pastry blender or your fingers until the mixture resembles coarse crumbs. This ensures the butter is evenly distributed, creating a tender crust.
- Add the lightly beaten egg to the crumbly mixture and mix well until everything is fully incorporated. The egg acts as a binder, helping the crust hold its shape during baking.
- Press the cake mixture evenly into a greased 9-in. x 13-in. x 2-in. baking dish. Ensure the crust is of uniform thickness for even baking and a visually appealing dessert.
- Bake the crust in a preheated oven at 350 degrees Fahrenheit (175 degrees Celsius) for 15-18 minutes, or until the crust is set. Keep a close eye on the crust to prevent it from burning; it should be firm to the touch and slightly golden brown.
- Remove the baking dish from the oven and cool the crust completely on a wire rack. Cooling the crust thoroughly is crucial for preventing the cheesecake layer from melting.
- While the crust is cooling, prepare the cream cheese layer. In a small mixing bowl, beat the softened cream cheese and confectioners’ sugar together using an electric mixer until the mixture is smooth and creamy. Ensure the cream cheese is fully softened to avoid any lumps in the filling.
- Fold in 1 cup of the stabilized whipped cream into the cream cheese mixture. Folding gently incorporates the whipped cream without deflating it, resulting in a light and airy cheesecake layer.
- Carefully spread the cream cheese mixture evenly over the cooled cake crust. Use an offset spatula or the back of a spoon to create a smooth and even layer.
- Refrigerate the crust with the cream cheese layer while you prepare the pudding layer. This allows the cream cheese layer to firm up, preventing the pudding from seeping into the crust.
- In a clean bowl, whisk the milk and instant chocolate pudding mix together for 2 minutes until well combined.
- Allow the pudding mixture to stand for a few minutes until it slightly thickens. This ensures the pudding layer has enough body to hold its shape on top of the cream cheese layer.
- Spread the slightly thickened pudding evenly over the cream cheese layer. Again, use an offset spatula or the back of a spoon to create a smooth and even layer.
- Top the pudding layer with the remaining stabilized whipped cream. You can pipe the whipped cream for a decorative touch or simply spread it evenly over the pudding.
- Refrigerate the assembled dessert for at least 2 hours before cutting and serving. This allows all the layers to set properly, ensuring clean cuts and a harmonious blend of flavors.
- Before serving, garnish with chocolate curls, if desired, for an elegant finishing touch.
Expert Tips & Tricks
- To ensure a perfect crust, use cold butter. The cold butter creates flaky layers as it melts during baking.
- Stabilized whipped cream is essential for this recipe. It holds its shape better than regular whipped cream, preventing the dessert from becoming soggy. You can buy pre-made stabilized whipped cream or make your own by adding a stabilizer like gelatin or cornstarch.
- If you’re short on time, you can use a store-bought chocolate cookie crust instead of making one from scratch.
- For an extra chocolatey flavor, add a tablespoon of unsweetened cocoa powder to the cake mix when making the crust.
- To prevent the crust from sticking to the baking dish, grease it well with butter or cooking spray. You can also line the bottom of the dish with parchment paper for easy removal.
Serving & Storage Suggestions
Serve the Chocolate Dream Cream Dessert chilled, straight from the refrigerator. It’s best served within 2-3 days for optimal freshness. Store any leftovers covered in the refrigerator. It can be kept for up to 3 days, but the crust may become slightly softer over time. Freezing is not recommended, as the textures of the whipped cream and pudding may change upon thawing. This dessert pairs well with a scoop of vanilla ice cream or a cup of strong coffee.
Nutritional Information
| Nutrient | Amount per Serving | % Daily Value |
|---|---|---|
| Calories | 557.1 kcal | N/A |
| Calories from Fat | 290 g | 52% |
| Total Fat | 32.3 g | 49% |
| Saturated Fat | 17.2 g | 86% |
| Cholesterol | 92.7 mg | 30% |
| Sodium | 818.2 mg | 34% |
| Total Carbohydrate | 63.5 g | 21% |
| Dietary Fiber | 1.7 g | 6% |
| Sugars | 37.5 g | 149% |
| Protein | 7.7 g | 15% |
Variations & Substitutions
- Gluten-Free: Use a gluten-free chocolate cake mix to make the crust.
- Dairy-Free: Substitute dairy-free cream cheese, whipped cream, and milk to make this dessert dairy-free. Look for coconut or almond-based alternatives.
- Different Pudding Flavors: Experiment with different flavors of instant pudding, such as vanilla, butterscotch, or white chocolate.
- Crushed Cookies: For a twist on the crust, use crushed Oreo cookies or graham crackers instead of cake mix.
- Seasonal Fruit: Add a layer of fresh berries or sliced bananas on top of the cream cheese layer for a burst of freshness and flavor.
FAQs (Frequently Asked Questions)
Q: Can I make this dessert ahead of time?
A: Absolutely! In fact, it’s best to make it at least 2 hours in advance to allow the flavors to meld and the layers to set properly.
Q: What is stabilized whipped cream and why is it important?
A: Stabilized whipped cream holds its shape longer than regular whipped cream, preventing the dessert from becoming soggy. It’s made by adding a stabilizer like gelatin or cornstarch.
Q: Can I use a different size baking dish?
A: Yes, but you may need to adjust the baking time. A smaller dish will require a longer baking time, while a larger dish will require a shorter baking time.
Q: Can I freeze this dessert?
A: Freezing is not recommended, as the textures of the whipped cream and pudding may change upon thawing.
Q: How can I prevent the crust from sticking to the baking dish?
A: Grease the baking dish well with butter or cooking spray. You can also line the bottom of the dish with parchment paper for easy removal.
Final Thoughts
This Chocolate Dream Cream Dessert is more than just a recipe; it’s an invitation to create memories. Gather your loved ones, preheat your oven, and embark on this delicious adventure. Don’t be afraid to experiment with variations and substitutions to make it your own. And most importantly, don’t forget to share your creations and feedback. After all, the best desserts are the ones shared with friends and family, accompanied by laughter and good company. I hope this recipe brings as much joy to your table as it has to mine. Enjoy!