
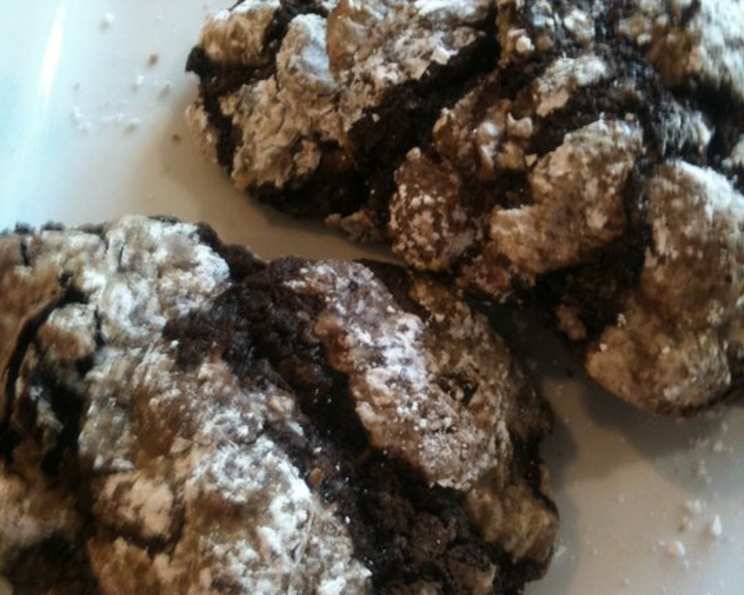
Chocolate Earthquake Cookies: A Crackly, Fudgy Delight
I remember the first time I saw these cookies emerge from the oven. The crackled, snowy surface against the deep, dark chocolate was absolutely mesmerizing – like tiny, edible volcanoes! My grandmother used to make them every Christmas, and the anticipation of biting into that fudgy interior was almost unbearable. Now, the scent of melting butter and unsweetened chocolate instantly transports me back to her cozy kitchen, filled with warmth and laughter.
Recipe Overview
- Prep Time: 2 hours 15 minutes (includes chilling time)
- Cook Time: 12 minutes
- Total Time: 2 hours 27 minutes
- Yields: About 50 cookies
- Dietary Type: Not specified (contains dairy and eggs)
Ingredients
- 8 tablespoons unsalted butter
- 4 ounces unsweetened chocolate (4 squares)
- 4 eggs
- 2 cups sugar
- 2 teaspoons vanilla extract
- 2 cups flour
- 2 teaspoons baking powder
- 1/4 teaspoon salt
- 1 cup powdered sugar
Equipment Needed
- Heavy saucepan
- Large bowl
- Whisk
- Baking sheets
- Wire rack
Instructions
- Begin by melting the butter and unsweetened chocolate. In a heavy saucepan over low heat, combine the butter and chocolate. Stir frequently until the chocolate is almost completely melted.
- Remove the saucepan from the heat. The residual heat will melt the remaining chocolate. Stir until the mixture is smooth and completely melted. Allow the chocolate mixture to cool slightly. This is crucial; you don’t want to cook the eggs in the next step!
- In a large bowl, whisk the eggs until they are well beaten and slightly frothy. This incorporates air and contributes to the cookies’ texture.
- Whisk in the sugar, vanilla extract, and the cooled melted chocolate mixture into the beaten eggs. Make sure everything is well combined, creating a smooth and homogenous batter.
- In the same bowl, add the flour, baking powder, and salt. Whisk until all the dry ingredients are incorporated and the batter is smooth. Avoid overmixing at this stage, as it can develop the gluten in the flour, resulting in tougher cookies.
- Cover the bowl tightly with plastic wrap and chill the dough in the refrigerator until firm. This usually takes at least 2 hours, but you can chill it for up to 24 hours. Chilling is essential for the cookies to hold their shape during baking. A firm dough also makes them easier to roll.
- When you’re ready to bake, preheat your oven to 350 degrees F (175 degrees C). Ensure your oven rack is positioned in the center for even baking.
- Lightly butter one or two baking sheets. Alternatively, you can line the baking sheets with parchment paper for easy cleanup and to prevent sticking.
- Place the powdered sugar in a small bowl. This is where the magic happens!
- Using about a teaspoon of the chilled cookie dough (a small cookie scoop works great for this), roll it between your palms to form a ball. The size of the ball will determine the size of your finished cookie. Aim for consistency for even baking.
- Roll the ball in the powdered sugar to coat it completely. Make sure every surface of the dough is covered in a generous layer of powdered sugar. This creates the signature crackled effect.
- Place the coated dough balls onto the prepared baking sheet(s). Leave enough space between each cookie (about 2 inches) to allow for spreading during baking. You should be able to fit about a dozen cookies on a standard baking sheet.
- Bake for 12 minutes. If you’re baking two sheets at once, switch the placement of the baking sheets halfway through the baking time (around 6 minutes) to ensure even cooking.
- The cookies are done when the edges are set and the tops have cracked dramatically. Don’t overbake; you want the center to remain fudgy.
- Allow the cookies to cool slightly on the baking sheets for a few minutes before carefully transferring them to a wire rack to cool completely. This prevents them from breaking apart while they’re still soft.
Expert Tips & Tricks
- Don’t skip the chilling! This is vital for preventing the cookies from spreading too thin and achieving that signature crackled look.
- For an even fudgier center, slightly underbake the cookies. They will continue to set as they cool.
- If your dough is too sticky to handle, add a tablespoon or two of flour. However, be careful not to add too much, as this can make the cookies dry.
- Use high-quality unsweetened chocolate for the best flavor. The quality of the chocolate really shines through in this recipe.
- For a richer flavor, try adding a pinch of espresso powder to the dough. It enhances the chocolate notes beautifully.
- If your powdered sugar melts into the cookie while baking, try double coating the dough balls or chilling them in the freezer for 10 minutes before baking.
Serving & Storage Suggestions
These Chocolate Earthquake Cookies are best enjoyed slightly cooled, when the centers are still soft and fudgy. They’re perfect with a glass of cold milk, a scoop of vanilla ice cream, or a warm cup of coffee.
Store leftover cookies in an airtight container at room temperature for up to 3 days. For longer storage, you can freeze them for up to 2 months. To freeze, place the cooled cookies in a single layer on a baking sheet, freeze until solid, then transfer them to a freezer bag or container. Thaw at room temperature before serving.
Nutritional Information
| Nutrient | Amount per Serving | % Daily Value |
|---|---|---|
| Calories | 92.5 kcal | N/A |
| Calories from Fat | 31 kcal | N/A |
| Total Fat | 3.5 g | 5% |
| Saturated Fat | 2 g | 10% |
| Cholesterol | 19.8 mg | 6% |
| Sodium | 32.9 mg | 1% |
| Total Carbohydrate | 15 g | 4% |
| Dietary Fiber | 0.5 g | 2% |
| Sugars | 10.4 g | N/A |
| Protein | 1.3 g | 2% |
Note: Nutritional information is an estimate and may vary depending on specific ingredients and portion sizes.
Variations & Substitutions
- Mint Chocolate Earthquake Cookies: Add 1/2 teaspoon of peppermint extract to the dough along with the vanilla.
- Spice it up: Add 1/2 teaspoon of cinnamon or a pinch of cayenne pepper for a warm, spicy kick.
- Nutty Earthquake Cookies: Add 1/2 cup of chopped walnuts or pecans to the dough.
- Gluten-Free Option: Substitute the all-purpose flour with a gluten-free blend. Be sure to choose a blend that is designed for baking and contains xanthan gum or another binding agent. The texture may be slightly different, but the flavor will still be delicious.
- You can substitute the butter with plant-based butter alternatives. Just make sure they are a 1:1 substitute for baking!
FAQs (Frequently Asked Questions)
Q: Why are my cookies flat and not cracking?
A: The most common reason is that the dough wasn’t chilled long enough. Chilling helps the fats solidify, which prevents excessive spreading. Also, ensure your oven is at the correct temperature.
Q: Can I make the dough ahead of time?
A: Absolutely! The dough can be stored in the refrigerator for up to 24 hours. Just make sure to wrap it tightly to prevent it from drying out.
Q: My powdered sugar melted into the cookies during baking. What can I do?
A: Try double-coating the dough balls in powdered sugar, or chilling them in the freezer for 10-15 minutes before baking. This helps the sugar adhere better and prevents it from dissolving too quickly.
Q: Can I use semi-sweet or milk chocolate instead of unsweetened chocolate?
A: While you can, the cookies will be significantly sweeter. You may want to reduce the amount of sugar in the recipe if you use sweeter chocolate. The bitterness of the unsweetened chocolate is what balances the sweetness of the sugar and creates a complex flavor profile.
Q: How do I store these cookies to keep them soft?
A: Store the cookies in an airtight container with a slice of bread. The bread will absorb excess moisture, keeping the cookies soft and chewy.
Final Thoughts
These Chocolate Earthquake Cookies are more than just a recipe; they’re a taste of nostalgia, a burst of fudgy goodness, and a guaranteed crowd-pleaser. So, gather your ingredients, preheat your oven, and prepare to be amazed by the crackled, chocolatey perfection that awaits. Don’t be afraid to experiment with variations and make them your own. And most importantly, enjoy the process of creating and sharing these delicious treats with your loved ones. They’re sure to become a new family favorite!