
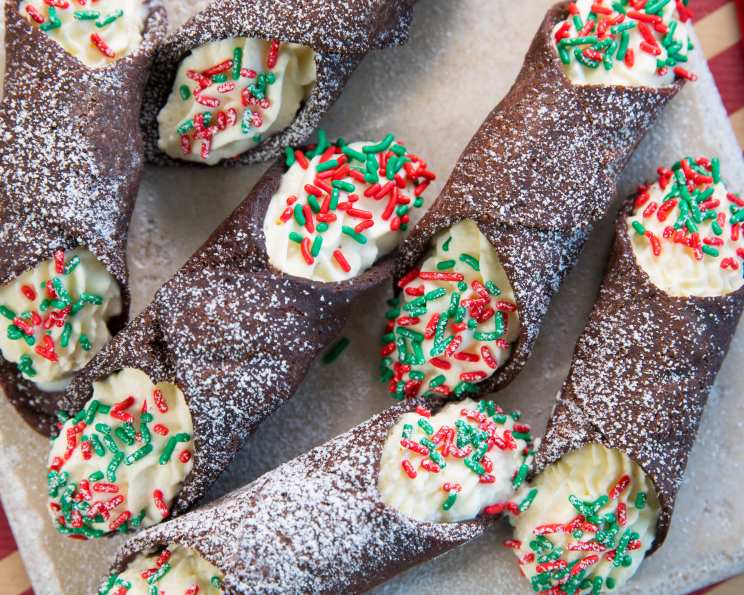
Chocolate Eggnog Cannoli: A Festive Twist on a Classic Treat
My grandmother, Nonna Emilia, always made cannoli for our family gatherings. I can still picture her, flour dusting her apron, meticulously rolling out the dough and frying those golden-brown shells. While she stuck to the traditional ricotta filling, I couldn’t resist experimenting with a holiday twist: eggnog. The rich, spiced flavor of eggnog combined with creamy ricotta and a hint of nutmeg creates a decadent filling that perfectly complements the crisp, chocolatey shells. It’s a taste of tradition with a modern, festive flair.
Recipe Overview
- Prep Time: 45 minutes
- Cook Time: 25 minutes
- Total Time: 1 hour 10 minutes
- Servings: 10
- Yield: Approximately 32 cannoli
- Dietary Type: Not specified (contains dairy, eggs, and gluten)
Ingredients
Chocolate Cannoli Shells:
- 2 cups all-purpose flour
- ½ cup sugar
- ½ cup unsweetened cocoa powder
- ⅛ teaspoon salt
- ¼ cup cold butter, cut into small cubes
- 2 large eggs, lightly beaten
- ¼ cup milk
- 2 tablespoons honey
- 1 large egg white
- Oil, for deep frying (vegetable or canola oil recommended)
Eggnog Filling:
- 1 cup heavy whipping cream
- ½ cup eggnog
- 1 cup ricotta cheese (whole milk, drained well)
- 1 tablespoon sugar
- ½ teaspoon nutmeg
- Candy sprinkles, red and green, for garnish
Equipment Needed
- Medium bowl
- Small bowl
- Pastry blender or food processor
- Rolling pin
- Floured surface
- Metal cannoli forms/cylinders (approximately 4-inch)
- Deep fryer or large pot
- Tongs
- Paper towels
- Electric mixer or whisk
- Pastry bag
- Spatula
Instructions
-
Prepare the Cannoli Dough: In a medium bowl, thoroughly whisk together the all-purpose flour, sugar, cocoa powder, and salt. This ensures even distribution of ingredients.
-
Incorporate the Butter: Using a pastry blender or a food processor, cut in the cold butter into the flour mixture until the mixture resembles coarse crumbs. The smaller the butter pieces, the flakier the shells will be.
-
Combine Wet Ingredients: In a separate small bowl, stir together the eggs, milk, and honey. Make sure the honey is fully incorporated.
-
Combine Wet and Dry: Add the egg mixture to the flour mixture. Stir just until the mixture forms a ball. Be careful not to overmix the dough, as this can lead to tough shells.
-
Divide and Rest: Divide the dough in half. Wrap each half in plastic wrap and refrigerate for at least 30 minutes. This allows the gluten to relax, making the dough easier to roll out.
-
Roll Out the Dough: On a lightly floured surface, roll out each dough portion into a 16-inch square. Aim for a thickness of about 1/16 inch. The thinner the dough, the crispier the cannoli shells.
-
Cut into Squares: Cut each square into sixteen 4-inch squares. Use a sharp knife or pastry wheel to ensure clean cuts.
-
Wrap the Cylinders: Lightly wrap each square around one end of a greased metal cannoli cylinder. Overlap the edges slightly.
-
Seal the Seam: In a small bowl, lightly beat the egg white. Moisten the overlapping dough with the egg white; press gently to seal. This will prevent the shells from opening during frying.
-
Heat the Oil: Heat vegetable or canola oil in a deep fryer or large pot to 350 degrees F (175 degrees C). Use a thermometer to ensure the oil is at the correct temperature. Frying at the wrong temperature can result in greasy or undercooked shells.
-
Fry the Shells: Fry the cannoli shells, a few at a time, in the hot oil for about 1 minute or until golden brown. Watch them carefully, as they can burn quickly.
-
Drain and Cool: Using tongs, carefully and gently lift the shells from the hot oil; drain any hot oil that is in metal cannoli cylinders back into the pan. Drain on paper towels. Cool completely before removing the cannoli cylinders.
-
Prepare the Eggnog Filling: In a large bowl, combine the heavy whipping cream, eggnog, ricotta cheese, sugar, and nutmeg.
-
Whip the Filling: Whip the mixture with an electric mixer or whisk until medium-stiff peaks form. Be careful not to overwhip, as this can cause the filling to become grainy.
-
Chill the Filling: Place the filling in the freezer for about 15 minutes to firm up slightly. This will make it easier to pipe into the shells.
-
Assemble the Cannoli: Using a pastry bag fitted with a large round tip, pipe each cooled cannoli shell full of filling.
-
Garnish: Dip the ends of each filled cannoli into red and green sprinkles.
-
Serve Immediately: Serve immediately for the best texture.
Expert Tips & Tricks
- Draining the Ricotta: Proper draining of the ricotta is essential to prevent a soggy filling. Place the ricotta in a cheesecloth-lined sieve over a bowl and let it drain in the refrigerator for at least a few hours, or even overnight.
- Flavor Boost: For an extra kick of chocolate, add mini chocolate chips to the eggnog filling.
- Make-Ahead Shells: The cannoli shells can be fried ahead of time and stored in an airtight container at room temperature for up to 2 days. Do not fill them until just before serving, as the filling will soften the shells.
- Oil Temperature: Maintaining a consistent oil temperature is crucial for even cooking. Use a deep-fry thermometer and adjust the heat as needed.
- Preventing Soggy Shells: Avoid filling the cannoli too far in advance, as the moisture from the filling will soften the shells. If you need to prepare them ahead of time, consider dipping the insides of the shells in melted chocolate before filling to create a moisture barrier.
Serving & Storage Suggestions
Serve these Chocolate Eggnog Cannoli immediately after filling for the best flavor and texture. The crisp shells and creamy filling are best enjoyed fresh. If you have leftover filling, store it in an airtight container in the refrigerator for up to 2 days. However, once the cannoli are filled, they are best consumed immediately. Storing filled cannoli will result in softened shells. Freezing is not recommended as it will affect the texture of both the shells and the filling.
Nutritional Information
| Nutrient | Amount per Serving | % Daily Value* |
|---|---|---|
| Calories | 355 kcal | 18% |
| Total Fat | 19 g | 29% |
| Saturated Fat | 12 g | 58% |
| Cholesterol | 103 mg | 34% |
| Sodium | 131 mg | 5% |
| Total Carbohydrate | 39 g | 13% |
| Dietary Fiber | 2 g | 8% |
| Sugars | 16 g | N/A |
| Protein | 9 g | 18% |
*Percent Daily Values are based on a 2,000 calorie diet.
Variations & Substitutions
- Gluten-Free Cannoli: Use a gluten-free flour blend designed for baking to create gluten-free cannoli shells. Be sure to add a binder like xanthan gum to help hold the dough together.
- Dairy-Free Filling: Substitute the heavy whipping cream with a plant-based whipping cream alternative and the ricotta cheese with a dairy-free ricotta substitute, such as one made from almonds or cashews.
- Spiced Shells: Add a pinch of cinnamon or nutmeg to the cannoli dough for a warmer, spicier flavor.
- Citrus Zest: Grate a bit of orange or lemon zest into the eggnog filling for a bright, citrusy twist.
- Alcoholic Kick: Add a tablespoon of rum or brandy to the eggnog filling for a grown-up treat.
FAQs (Frequently Asked Questions)
Q: Why are my cannoli shells not crispy?
A: Several factors can contribute to this. Make sure the dough is rolled out thinly enough, the oil temperature is correct, and you are not overcrowding the fryer. Also, avoid filling the cannoli too far in advance.
Q: Can I bake the cannoli shells instead of frying them?
A: While frying yields the most authentic and crispy results, you can try baking them at 375°F (190°C) for 10-12 minutes, or until golden brown. However, the texture will be slightly different.
Q: How do I prevent the filling from becoming too runny?
A: Ensure the ricotta cheese is well-drained. Chilling the filling before piping it into the shells will also help it maintain its shape.
Q: Can I make the cannoli shells ahead of time?
A: Yes, you can fry the shells ahead of time and store them in an airtight container at room temperature for up to 2 days.
Q: What can I use if I don’t have cannoli forms?
A: You can use metal pastry tubes or even wrap the dough around greased wooden dowels. Just make sure they are heat-safe for frying.
Final Thoughts
These Chocolate Eggnog Cannoli are a delightful and unexpected treat that’s sure to impress your family and friends during the holiday season. Don’t be intimidated by the process – with a little patience and attention to detail, you can create these elegant and delicious pastries at home. I encourage you to give this recipe a try and share your creations! Perhaps serve them alongside a warm mug of eggnog or a glass of sparkling wine for the ultimate festive indulgence.