
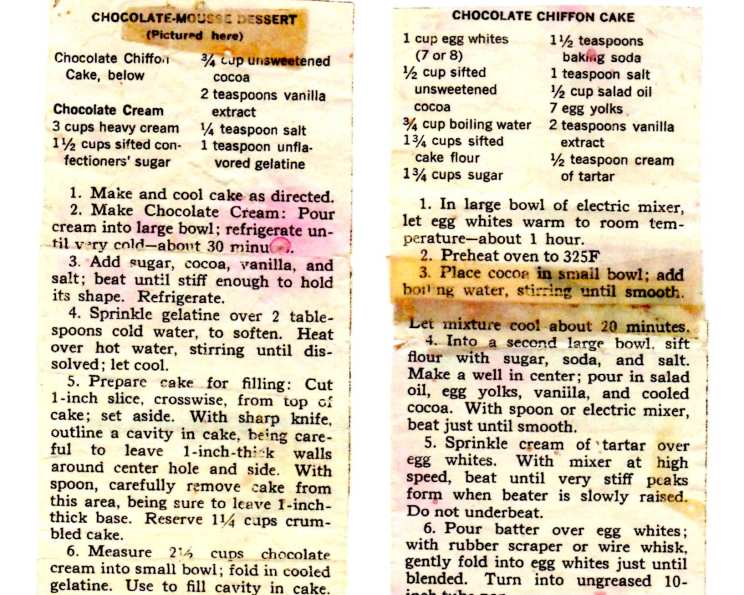
Chocolate Lover’s Chiffon Cake: A Slice of Heaven
My grandmother, bless her heart, wasn’t much of a baker. Her strengths lay in hearty stews and perfectly roasted chicken. But once, just once, she attempted a chocolate cake – a towering, magnificent Chiffon cake that I remember vividly. It was slightly lopsided, and the frosting was a bit too sweet, but the airy, chocolatey crumb was unforgettable. Every bite was a taste of love, a testament to her dedication to making something special. That cake sparked my lifelong obsession with baking, and specifically, with the delicate art of the Chiffon cake.
Recipe Overview
- Prep Time: 2 hours
- Cook Time: 60-65 minutes
- Total Time: 4 hours 30 minutes (includes cooling time)
- Servings: 12
- Yield: 1 cake
- Dietary Type: Not Gluten-Free
Ingredients
Cake:
- 1 cup egg whites (about 7 or 8 large eggs)
- ½ cup sifted unsweetened cocoa
- ¾ cup boiling water
- 1 ¾ cups sifted cake flour
- 1 ¾ cups sugar
- 1 ½ teaspoons baking soda
- 1 teaspoon salt
- ½ cup salad oil (vegetable or canola oil)
- 7 egg yolks
- 2 teaspoons vanilla extract
- ½ teaspoon cream of tartar
Filling:
- 3 cups heavy cream
- 1 ½ cups sifted confectioners’ sugar
- ¾ cup sifted unsweetened cocoa
- 2 teaspoons vanilla extract
- ¼ teaspoon salt
- 1 teaspoon unflavored gelatin
Equipment Needed
- Electric Mixer
- Small Bowl
- Large Bowl
- Wooden Spoon
- Whisk
- 10-inch Tube Pan (ungreased)
- Bottle (for inverting the cake)
- Spatula
- Sharp Knife
- Dental Floss (optional, for cutting cake layers)
Instructions
- Prepare the Egg Whites: Begin by separating the eggs. Place the egg whites in the large bowl of an electric mixer and allow them to warm to room temperature. This usually takes about an hour, and it is crucial for achieving maximum volume when whipping.
- Bloom the Cocoa: In a small bowl, combine the sifted cocoa with the boiling water. Stir until the mixture is smooth and let it cool for approximately 30 minutes. This process, called “blooming,” intensifies the chocolate flavor.
- Preheat the Oven: Preheat your oven to 325°F (160°C). Ensure your oven rack is in the center position for even baking.
- Sift Dry Ingredients: In a large bowl, sift together the cake flour, sugar, baking soda, and salt. This step is vital for a light and airy cake. Make a well in the center of the dry ingredients.
- Combine Wet Ingredients: Into the well, pour the salad oil, egg yolks, vanilla extract, and the cooled cocoa mixture.
- Mix the Batter Base: Using a wooden spoon, gently beat the wet and dry ingredients together until just smooth. Do not overmix at this stage. Overmixing will develop the gluten in the flour, resulting in a tougher cake.
- Whip the Egg Whites: Sprinkle the cream of tartar over the egg whites. Using the electric mixer on high speed, beat the egg whites until very stiff peaks form when the beater is slowly raised. The peaks should stand straight up and hold their shape. Do not underbeat the egg whites; proper stiffness is essential for the cake’s structure.
- Fold the Batter: Gently pour the batter over the whipped egg whites. With a whisk, using an under-and-over motion, carefully fold the batter and egg whites together until just combined. It’s important to be gentle to avoid deflating the egg whites. A few streaks of white are okay, but ensure most of the batter is uniform in color.
- Prepare the Pan: Pour the batter into an ungreased 10-inch tube pan. An ungreased pan allows the cake to cling to the sides as it rises, giving it its characteristic height.
- Bake the Cake: Bake in the preheated oven for 60-65 minutes, or until the top springs back when lightly pressed with a finger. A toothpick inserted into the center should come out clean.
- Cool Upside Down: Immediately invert the pan over the neck of a bottle (a full 2-liter bottle works well) to allow the cake to cool completely. This prevents the cake from collapsing. Cool for about 1 ½ hours.
- Remove from Pan: Once cooled, loosen the cake from the sides of the pan with a spatula. Remove the cake from the pan and place it on a cooling rack.
- Prepare the Filling: In a large bowl, combine the heavy cream, confectioners’ sugar, cocoa, vanilla extract, and salt. Refrigerate the mixture for 1 hour.
- Whip the Filling: After refrigerating, use an electric mixer to beat the cream mixture until stiff peaks form. Be careful not to overwhip, as the cream can turn grainy. Once whipped, refrigerate again until ready to assemble.
- Dissolve Gelatin: Sprinkle the gelatin over 2 tablespoons of cold water to soften. Let it sit for a few minutes. Then, heat the mixture, stirring, over hot water to dissolve the gelatin completely. Ensure there are no granules remaining. Allow the dissolved gelatin to cool slightly.
- Prepare the Cake for Filling: Cut a 1-inch slice crosswise from the top of the cake. A long string of dental floss can be used for a clean cut. Set the top slice aside.
- Create the Cavity: Using a sharp knife, carefully outline a cavity inside the cake, leaving a 1-inch thick wall around the center, side, and bottom.
- Remove Cake Crumbles: With a spoon, carefully remove the cake from the outlined area, creating the cavity. Reserve 1 ½ cups of the crumbled cake.
- Combine Gelatin with Filling: Measure 2 ½ cups of the whipped chocolate filling into a small bowl and gently fold in the cooled, dissolved gelatin. This will help stabilize the filling inside the cake.
- Fill the Cavity: Use the gelatin-infused chocolate filling to fill the cavity in the cake.
- Replace Top Layer: Replace the top slice of cake that was previously set aside.
- Combine Crumbles with Filling: Mix ½ cup of the remaining chocolate filling with the reserved 1 ½ cups of crumbled cake.
- Fill the Center Hole: Use the crumbled cake and filling mixture to fill the center hole of the tube cake.
- Frost the Cake: Frost the top and sides of the cake with the remaining chocolate filling.
- Refrigerate: Refrigerate the assembled cake until serving to allow the filling to set properly and the flavors to meld.
Expert Tips & Tricks
- Egg White Volume: Ensuring your egg whites are at room temperature and that your bowl is completely clean and free of any grease or yolk residue is crucial for achieving maximum volume when whipping. A tiny speck of yolk can prevent the egg whites from whipping properly.
- Folding Technique: The folding technique is critical for maintaining the airiness of the cake. Use a light hand and avoid stirring or overmixing, which will deflate the egg whites.
- Tube Pan is Key: A tube pan with a removable bottom makes releasing the cake easier. If you don’t have one, you can use a regular tube pan, but be extra careful when loosening the cake from the sides.
- Even Baking: If your oven tends to brown cakes unevenly, try rotating the cake halfway through the baking time.
- Chocolate Intensity: For a richer chocolate flavor, use a high-quality cocoa powder. Dutch-processed cocoa will provide a deeper, more intense chocolate flavor.
- Gelatin Alternative: If you prefer not to use gelatin, you can try using a vegetarian substitute like agar-agar, but be sure to follow the package instructions carefully.
Serving & Storage Suggestions
Serve the Chocolate Lover’s Chiffon Cake chilled for the best flavor and texture. A dusting of cocoa powder or a few fresh berries can elevate the presentation. Slices pair beautifully with a scoop of vanilla ice cream or a dollop of whipped cream.
Store any leftover cake in the refrigerator, covered, for up to 3 days. The cake can also be frozen for longer storage. Wrap individual slices tightly in plastic wrap and then place them in a freezer-safe container. Frozen cake will keep for up to 2 months. Thaw the cake in the refrigerator before serving.
Nutritional Information
| Nutrient | Amount per Serving | % Daily Value |
|---|---|---|
| Calories | 593 kcal | N/A |
| Total Fat | 34.8 g | 53% |
| Saturated Fat | 16.6 g | 82% |
| Cholesterol | 191.7 mg | 63% |
| Sodium | 463.6 mg | 19% |
| Total Carbohydrate | 66.9 g | 22% |
| Dietary Fiber | 3.3 g | 13% |
| Sugars | 44.5 g | N/A |
| Protein | 8.4 g | 16% |
Note: Nutritional information is an estimate and may vary based on specific ingredients and preparation methods.
Variations & Substitutions
- Mocha Chiffon Cake: Add 1-2 tablespoons of instant espresso powder to the cocoa-boiling water mixture for a mocha-flavored cake.
- Peppermint Chocolate Chiffon Cake: Add ½ teaspoon of peppermint extract to the batter and a few drops of green food coloring (optional) for a festive holiday cake.
- Orange Chocolate Chiffon Cake: Zest one orange and add it to the dry ingredients. Substitute orange juice for some of the boiling water in the cocoa mixture.
- Dairy-Free Option: While the recipe relies heavily on dairy, the filling can be adapted. Use a high-quality coconut cream whipped until stiff as a substitute for the heavy cream. The taste will be different, but still delicious!
- Gluten-Free Adaptation: Replacing cake flour with a gluten-free blend designed for baking is possible, but might alter the cake’s final texture. Experiment with different blends until achieving the desired result.
FAQs (Frequently Asked Questions)
Q: Why is it important to cool the cake upside down?
A: Cooling the cake upside down prevents it from collapsing and helps maintain its airy texture by allowing the structure to set properly.
Q: Can I use regular flour instead of cake flour?
A: Cake flour has a lower protein content, which results in a more tender cake. Using regular flour will likely make the cake tougher.
Q: How do I know when the egg whites are whipped enough?
A: The egg whites should form stiff, glossy peaks that stand straight up when the beaters are lifted.
Q: Can I make the filling ahead of time?
A: Yes, you can make the filling a day in advance and store it in the refrigerator. However, it’s best to whip it just before using it to ensure it’s light and airy.
Q: What if I don’t have a tube pan?
A: A tube pan is essential for a Chiffon cake because it allows the cake to rise properly. If you don’t have one, it’s best to use another cake recipe that doesn’t rely on the tube pan for its structure.
Final Thoughts
This Chocolate Lover’s Chiffon Cake is more than just a recipe; it’s a journey into the heart of baking, a tribute to those who taught us to love the sweet things in life. So, gather your ingredients, preheat your oven, and prepare to create a masterpiece. Don’t be afraid to experiment with variations and make it your own. And most importantly, share your creation with loved ones and savor every delicious bite. I’d love to hear how it turns out for you! Perhaps pair it with a strong cup of coffee or a sweet dessert wine.