
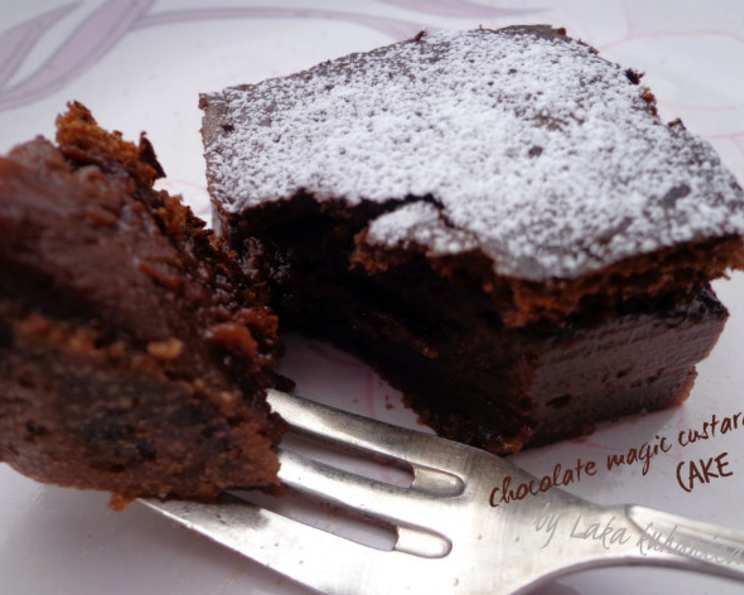
Chocolate Magic Custard Cake: A Culinary Revelation
The first time I experienced the magic of this cake was at a small Parisian bistro, tucked away on a cobblestone street. The air was thick with the aroma of freshly brewed coffee and warm pastries. I ordered a slice, intrigued by its description, and what arrived was a revelation. Each bite was a journey through textures, from the slightly fudgy top to the creamy custard center. It was pure alchemy, a seemingly impossible feat of baking, and I’ve been chasing that magic ever since. This recipe comes as close as possible to recreating that incredible experience.
Recipe Overview
- Prep Time: 20 minutes
- Cook Time: 40-50 minutes
- Total Time: 1 hour 30 minutes (including chilling)
- Servings: 8
- Yield: 1 cake
- Dietary Type: Not specified
Ingredients
- 4 eggs, at room temperature
- 1 cup sugar
- 1 teaspoon vanilla extract
- 110 g butter, melted
- ½ cup all-purpose flour
- ⅓ cup unsweetened cocoa powder
- 2 cups milk, lukewarm
- 1 tablespoon powdered sugar, for dusting
Equipment Needed
- Electric mixer (stand or hand-held)
- Whisk
- Spatula
- 30x17cm baking pan
- Parchment paper
- Mixing bowls
Instructions
-
Begin by preheating your oven to 320°F (160°C). Line a 30x17cm baking pan with parchment paper, ensuring the paper extends slightly over the edges for easy removal later.
-
Next, separate the eggs, placing the egg whites in one bowl and the egg yolks in another. It is crucial that no yolk gets into the whites, as this can inhibit their ability to whip properly. Allow both to come to room temperature; this aids in emulsification and volume.
-
In a separate bowl, whisk together the all-purpose flour and unsweetened cocoa powder. This ensures even distribution of the cocoa and prevents lumps in the final batter. Set aside this mixture.
-
In the bowl containing the egg yolks, add the sugar. Using an electric mixer, whisk the egg yolks and sugar together for about 4 minutes, or until the mixture becomes creamy and pale yellow. This step is essential for creating a light and airy base. The mixture should have significantly increased in volume and appear almost ribbon-like when the whisk is lifted.
-
Pour the melted butter into the egg yolk mixture, followed by the vanilla extract. Mix on low speed for approximately 30 seconds, or until just combined. Avoid overmixing at this stage.
-
Gradually add the flour and cocoa powder mixture to the wet ingredients. Using a spatula, gently fold the dry ingredients into the wet ingredients until just incorporated. Be careful not to overmix; a few streaks of flour are acceptable at this point.
-
Slowly pour the lukewarm milk into the batter while continuing to beat on low speed. Ensure the milk is fully incorporated, resulting in a thin, liquid batter.
-
In the bowl containing the egg whites, use a clean electric mixer to beat the egg whites until stiff peaks form. This step is crucial for creating the distinct layers in the magic cake. The egg whites should be firm enough to hold their shape when the mixer is turned off.
-
Gently fold one-third of the beaten egg whites into the chocolate batter to lighten it. Then, carefully fold in the remaining egg whites in two additions, being gentle to avoid deflating the mixture. Do not overmix; stir only a few times after each addition until just combined. It’s okay if some streaks of egg white remain; these will blend during baking.
-
Pour the liquid batter into the prepared baking pan lined with parchment paper. Spread the batter evenly across the bottom of the pan.
-
Bake in the preheated oven for 40-50 minutes. The cake is done when the top is set and slightly jiggly, but the center still has a slight wobble. Be cautious not to overbake, as this will result in a less creamy texture.
-
Remove the cake from the oven and let it cool completely at room temperature. Once cooled, cover and chill in the refrigerator for at least one hour before serving. This chilling period allows the layers to fully set and enhances the flavor.
-
Before serving, carefully lift the cake out of the pan using the parchment paper overhang. Slice it into squares or rectangles, as desired. Dust generously with powdered sugar just before serving.
Expert Tips & Tricks
- Room temperature ingredients: Ensuring that your eggs are at room temperature is critical for proper emulsification and a smooth batter.
- Don’t overmix: Overmixing the batter after adding the flour and cocoa powder will develop the gluten, resulting in a tougher cake.
- Gentle folding: Be gentle when folding in the egg whites. The goal is to incorporate them without deflating them, which contributes to the cake’s unique texture.
- Oven calibration: Ovens vary, so keep an eye on the cake during baking. If the top is browning too quickly, tent it with foil.
- Chocolate intensity: Adjust the amount of cocoa powder to your liking. Use a high-quality cocoa powder for the best flavor.
Serving & Storage Suggestions
Serve the Chocolate Magic Custard Cake chilled, dusted with powdered sugar. It pairs wonderfully with fresh berries, a dollop of whipped cream, or a scoop of vanilla ice cream. For a sophisticated touch, serve with a glass of dessert wine or a cup of freshly brewed coffee.
Store any leftover cake in an airtight container in the refrigerator for up to 3 days. It is not recommended to freeze this cake, as the texture of the custard may change upon thawing. This cake is best enjoyed within a few days of baking.
Nutritional Information
| Nutrient | Amount per Serving | % Daily Value |
|---|---|---|
| Calories | 310 kcal | N/A |
| Total Fat | 16 g | 25% |
| Saturated Fat | 10 g | 47% |
| Cholesterol | 131 mg | 43% |
| Sodium | 164 mg | 7% |
| Total Carbohydrate | 37 g | 12% |
| Dietary Fiber | 1 g | 4% |
| Sugars | 26 g | N/A |
| Protein | 7 g | 14% |
Nutritional information is an estimate and may vary based on specific ingredients and portion sizes.
Variations & Substitutions
- Gluten-free: Substitute the all-purpose flour with a gluten-free all-purpose blend.
- Dairy-free: Use plant-based milk (almond, soy, or oat milk) and a dairy-free butter alternative.
- Flavor variations: Add a teaspoon of espresso powder to the dry ingredients for a mocha version, or incorporate orange zest for a citrusy twist.
- Nutty: Add a handful of chopped nuts (walnuts, pecans, or almonds) to the batter for added texture and flavor.
- Seasonal Fruit: Add a layer of fresh berries or sliced peaches to the bottom of the pan before pouring in the batter. This will create a delightful fruity layer on top when the cake is flipped.
FAQs (Frequently Asked Questions)
Q: Why does the cake separate into layers?
A: The separation occurs due to the different densities of the ingredients. The egg whites create a lighter, airy layer on top, while the heavier ingredients sink to the bottom, forming the custard layer.
Q: Can I use a different size baking pan?
A: Using a different size pan will affect the baking time and the thickness of the layers. A smaller pan will require a longer baking time, while a larger pan will result in thinner layers and a shorter baking time.
Q: Why is my cake not setting properly?
A: This could be due to underbaking or an incorrect oven temperature. Ensure your oven is properly calibrated and bake the cake until the top is set and slightly jiggly. Chilling the cake thoroughly is also crucial for setting the custard layer.
Q: Can I make this cake ahead of time?
A: Yes, this cake can be made a day or two in advance. Store it in the refrigerator in an airtight container.
Q: How do I prevent the cake from sticking to the pan?
A: Lining the baking pan with parchment paper is the best way to prevent sticking. Ensure the parchment paper extends over the edges for easy removal.
Final Thoughts
This Chocolate Magic Custard Cake is more than just a dessert; it’s an experience. Its unique texture and rich chocolate flavor make it a showstopper for any occasion. Don’t be intimidated by the seemingly complex layering; this recipe is surprisingly simple to execute. I encourage you to try it and discover the magic for yourself. Share your creations and feedback, and perhaps pair it with a scoop of vanilla ice cream or a glass of your favorite dessert wine. Happy baking!