
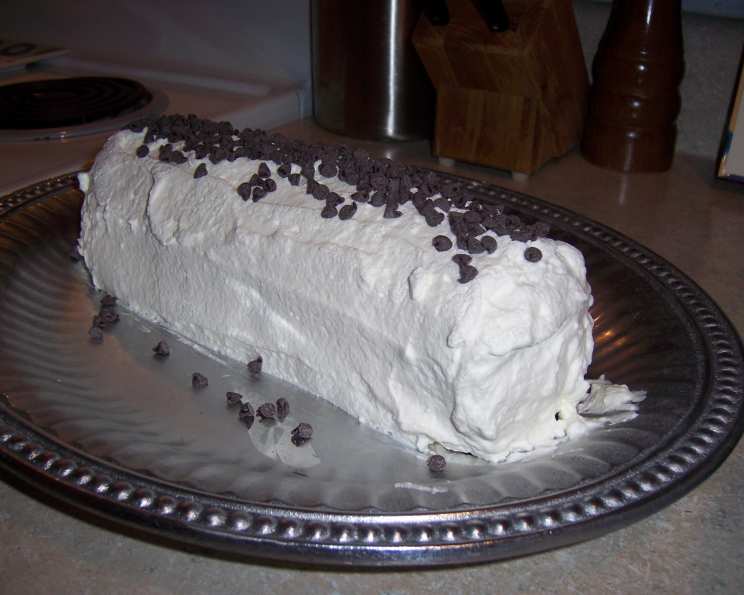
Chocolate Mint Icebox Cake: A Cool Slice of Nostalgia
The first time I tasted chocolate mint icebox cake, I was probably eight years old, standing on tiptoe to peer over the kitchen counter at my Aunt Carol. She was a whirlwind of powdered sugar and flour, but this particular dessert was different—no baking involved. I remember the dark, crisp chocolate wafers, the fluffy, pale green cream, and the way the chocolate chips sparkled like tiny jewels on top. The whole thing seemed like pure magic, a dessert conjured from the depths of the refrigerator. It was simple, utterly delicious, and always a guaranteed crowd-pleaser at family gatherings. That first bite – the slight crunch of the wafers giving way to the cool, minty cream – transported me to a world of pure summer joy.
Recipe Overview
- Prep Time: 15 minutes
- Cook Time: 0 minutes
- Total Time: 4 hours 15 minutes
- Servings: 6-8
- Yield: 1 cake
- Dietary Type: Vegetarian
Ingredients
- 1 ¾ cups chilled heavy whipping cream
- ¼ cup sugar
- ¾ teaspoon mint extract
- 1 (9 ounce) package chocolate wafers
- 1 cup miniature chocolate chips
Equipment Needed
- Electric mixer
- Serving platter or plate
- Small spatula or knife
Instructions
- Prepare the Mint Cream: In a large bowl, combine the 1 ¾ cups of chilled heavy whipping cream, ¼ cup of sugar, and ¾ teaspoon of mint extract. Using an electric mixer (either hand-held or stand mixer), beat the ingredients together on medium-high speed until stiff peaks form. This typically takes 3-5 minutes, depending on your mixer. Be careful not to overwhip the cream, as it can turn grainy. The cream is ready when you can lift the beaters and the peaks of the cream stand up straight.
- Assemble the Cake: Take one chocolate wafer and spread approximately ½ tablespoon of the mint cream on one side. Place another wafer on top, cream-side down, to create a stack. Continue this process until all the chocolate wafers are used, forming multiple stacks. You should have several stacks of wafers held together by the mint cream.
- Form the Log: Lay the stacks horizontally on a long serving platter or plate. Gently press the stacks together to form a log shape. Don’t press too hard, or the cream will squeeze out the sides. The goal is to create a cohesive log, but allow the wafers to retain some of their individual structure.
- Frost the Cake: Using a small spatula or knife, spread the remaining mint cream evenly over the entire log, covering the top and sides. Be generous with the frosting to ensure every inch of the cake is coated. Smooth the frosting for a neat appearance, or create swirls for a more rustic look.
- Chill and Set: Cover the cake loosely with plastic wrap and refrigerate for at least four hours, or preferably overnight. This allows the chocolate wafers to soften and meld with the mint cream, creating the signature icebox cake texture. The cake can be refrigerated for up to two days.
- Garnish and Serve: Just before serving, sprinkle the 1 cup of miniature chocolate chips evenly over the top of the cake. Slice the cake diagonally with a serrated knife and serve immediately. The wafers should be soft and tender, offering a delightful contrast to the rich, minty cream.
Expert Tips & Tricks
- Chilling is Key: Don’t skimp on the chilling time! The longer the cake sits in the refrigerator, the softer and more flavorful it becomes. Overnight is ideal.
- Wafer Selection: Look for good-quality chocolate wafers that are crisp and not stale. Nabisco Famous Chocolate Wafers are a classic choice, but feel free to experiment with other brands.
- Mint Extract Measurement: Taste the mint cream after adding the ¾ teaspoon of extract. If you prefer a stronger mint flavor, add a few drops more, but be cautious—too much mint extract can be overpowering.
- Cream Consistency: Ensure your heavy cream is thoroughly chilled before whipping. This will help it whip up faster and hold its shape better.
- Prevent Soggy Wafers: If you’re worried about the wafers becoming too soggy, brush them lightly with melted chocolate before assembling the cake. This creates a moisture barrier.
- Easier Slicing: Run your knife under hot water and wipe it dry before each slice for clean, even cuts.
Serving & Storage Suggestions
Serve the chocolate mint icebox cake cold, directly from the refrigerator. Garnish each slice with an extra sprinkle of chocolate chips or a sprig of fresh mint for a more elegant presentation. This cake is best enjoyed within a few days of making it.
- Room Temperature: This cake should not be left at room temperature for more than an hour or two, as the cream will soften and melt.
- Refrigerator: Store leftover cake in an airtight container in the refrigerator for up to 3 days.
- Freezer: While freezing is not recommended (as the texture of the cream may change), you can freeze individual slices for up to 1 month. Thaw in the refrigerator before serving.
Nutritional Information
| Nutrient | Amount per Serving | % Daily Value |
|---|---|---|
| Calories | 595.5 kcal | N/A |
| Calories from Fat | 363 kcal | N/A |
| Total Fat | 40.4 g | 62% |
| Saturated Fat | 22.9 g | 114% |
| Cholesterol | 96 mg | 31% |
| Sodium | 276.2 mg | 11% |
| Total Carbohydrate | 59.3 g | 19% |
| Dietary Fiber | 3.1 g | 12% |
| Sugars | 36.8 g | N/A |
| Protein | 5.4 g | 10% |
Note: Nutritional information is an estimate and may vary based on specific ingredients and serving sizes.
Variations & Substitutions
- Chocolate Variation: Add 2 tablespoons of unsweetened cocoa powder to the cream while whipping for a richer chocolate flavor.
- Coffee Variation: Add 1 teaspoon of instant espresso powder to the cream for a mocha twist.
- Peanut Butter Variation: Swirl peanut butter into the mint cream for a chocolate peanut butter icebox cake.
- Gluten-Free: Use gluten-free chocolate wafers to make a gluten-free version of this cake.
- Vegan Option: While heavy whipping cream is essential for this recipe, you can experiment with whipped coconut cream as a dairy-free alternative, although the texture may be slightly different. Look for a brand with high fat content for best results. Use a vegan brand of chocolate wafers.
FAQs (Frequently Asked Questions)
Q: Can I make this cake ahead of time?
A: Absolutely! In fact, it’s recommended. The cake needs at least four hours to chill, but it can be made up to two days in advance.
Q: The wafers are too hard after chilling. What did I do wrong?
A: Make sure the cake is properly covered while chilling to prevent it from drying out. Also, ensuring there’s enough cream between the wafers is key for softening.
Q: Can I use a different extract instead of mint?
A: Yes, you can experiment with other extracts like vanilla, almond, or even orange extract for a different flavor profile.
Q: Can I add fruit to this cake?
A: Yes, you can add a layer of sliced strawberries, raspberries, or blueberries between the wafers for added flavor and texture.
Q: Is there a way to make the cake without an electric mixer?
A: Whipping cream by hand is possible, but it will take significantly longer and require a lot of elbow grease. Use a whisk and a chilled bowl for best results.
Final Thoughts
This chocolate mint icebox cake is more than just a dessert; it’s a trip down memory lane, a slice of pure comfort food. Its simplicity is its charm, and its deliciousness is undeniable. Don’t be intimidated by the seemingly simple instructions; the magic lies in the quality of the ingredients and the patience to let the flavors meld together. I encourage you to give this recipe a try, and perhaps even create your own variations. Share it with loved ones, and let them experience the joy of a truly classic dessert. And if you make it your own with creative substitutions, I would love to hear about your experiences! Maybe pair a slice with a cup of hot chocolate on a chilly evening for an extra-special treat. Happy baking!