
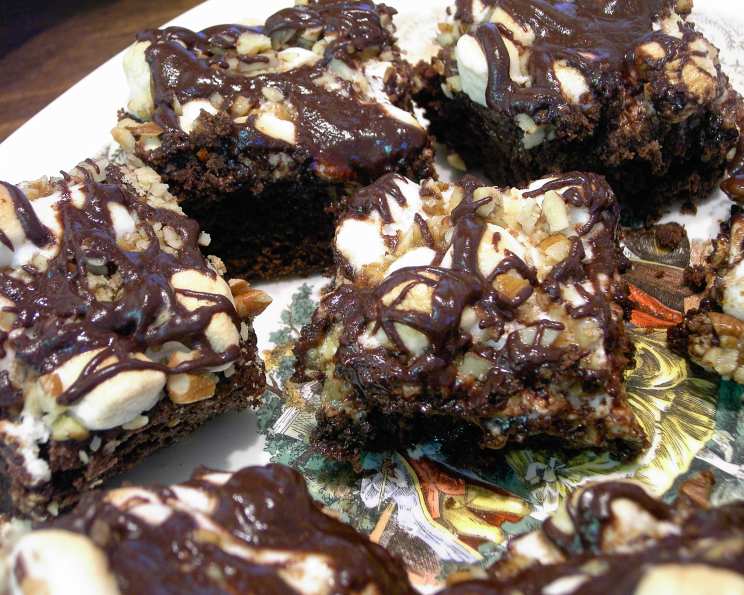
Chocolate Mud Brownie Bars: A Decadent Delight
My grandmother, bless her heart, wasn’t much of a baker. But she had one recipe, etched on a stained index card, that I’d beg for every year: her “Mud Hen Bars.” They weren’t fancy, but the dense, fudgy brownie base, the gooey caramel, the toasted nuts, and that final drizzle of chocolate… it was pure comfort. Every bite transported me back to her cozy kitchen, filled with the aroma of warm chocolate and the sound of her humming along to the radio. These Chocolate Mud Brownie Bars are my take on that childhood favorite, a little more refined perhaps, but with all the love and nostalgia baked right in.
Recipe Overview
- Prep Time: 20 minutes
- Cook Time: 43-45 minutes
- Total Time: 63-65 minutes
- Servings: 16
- Yield: 16 bars
- Dietary Type: Vegetarian
Ingredients
For the Brownie Base:
- 1 cup flour
- 1 ¼ teaspoons baking powder
- ¾ teaspoon salt
- 1 ¼ cups sugar (reduce slightly for a less sweet taste)
- ½ cup sifted unsweetened baking cocoa
- ½ cup Crisco shortening
- 1 large egg
- ½ cup water
- 2 teaspoons vanilla
For the Topping:
- ¾ cup caramel sauce
- 1 ¼ cups mini marshmallows
- ¾ cup chopped pecans or walnuts
- 1 cup miniature chocolate chips
- 2 tablespoons butter
Equipment Needed
- 8 x 8-inch baking dish
- Aluminum foil
- Mixing bowls
- Pastry blender or fork
- Microwave-safe bowl
- Measuring cups and spoons
Instructions
-
Preheat your oven to 350 degrees F (175 degrees C). This is crucial for even baking and prevents the edges from burning before the center is cooked through.
-
Prepare an 8 x 8-inch baking dish by lining it with aluminum foil. Ensure the foil overhangs the sides; this will make it much easier to remove the brownie bars later. Grease the foil thoroughly with cooking spray or butter. This step prevents sticking and ensures clean edges.
-
In a large mixing bowl, combine the flour, baking powder, salt, sugar, and sifted cocoa powder. Sifting the cocoa powder eliminates lumps, ensuring a smooth and even brownie base. Whisk these dry ingredients together until they are thoroughly combined.
-
Using a pastry blender or a fork, cut in the shortening into the dry ingredients. Continue working the mixture until it resembles coarse crumbs. The goal is to evenly distribute the shortening, creating a tender and slightly crumbly texture.
-
Add the egg, ½ cup water, and vanilla to the bowl. Stir until just combined. Be careful not to overmix, as this can lead to a tough brownie. The batter should be smooth and well-incorporated.
-
Spread the brownie batter evenly into the prepared baking dish. Use a spatula to ensure the batter reaches all corners.
-
Bake in the preheated oven for approximately 35 minutes, or until the center is set. To test for doneness, insert a toothpick into the center of the brownie. It should come out with moist crumbs clinging to it, not completely clean. Avoid overbaking, as this will result in dry brownies.
-
Remove the brownie from the oven and immediately spread it evenly with the caramel sauce. Make sure the caramel covers the entire surface of the brownie for optimal flavor in every bite.
-
Sprinkle the mini marshmallows evenly over the caramel layer, followed by the chopped pecans or walnuts. Press the nuts lightly into the marshmallows to help them adhere.
-
Return the baking dish to the oven and bake for another 6-8 minutes, or until the marshmallows are lightly golden brown and puffed. Watch carefully to prevent burning.
-
While the marshmallow layer is baking, prepare the chocolate drizzle. In a microwave-safe bowl, combine the miniature chocolate chips and butter. Microwave in 30-second intervals, stirring after each interval, until the chocolate and butter are completely melted and smooth.
-
Once the brownie bars are out of the oven from the second bake, drizzle the melted chocolate mixture evenly over the warm bars.
-
Allow the Chocolate Mud Brownie Bars to cool completely in the baking dish before cutting them into small squares. This allows the caramel and marshmallow layers to set, making them easier to handle.
Expert Tips & Tricks
- For an extra fudgy brownie: Substitute melted butter for the shortening. This will create a richer, more decadent flavor and a slightly chewier texture.
- To prevent marshmallows from burning: Tent the baking dish loosely with aluminum foil during the last few minutes of baking.
- Elevate the nuts: Toast the pecans or walnuts in a dry skillet over medium heat before adding them to the bars. This will enhance their flavor and add a delightful crunch.
- Make-ahead Tip: The brownie base can be baked a day ahead of time. Cool completely, wrap tightly, and store at room temperature. Add the toppings just before serving.
- Salted Caramel Variation: Use salted caramel sauce instead of regular caramel to balance the sweetness and add a delightful savory note.
- Fixing Common Issues: If the caramel is too thick to spread easily, microwave it for a few seconds until it is more fluid. If the marshmallows are browning too quickly, lower the oven temperature slightly and extend the baking time.
Serving & Storage Suggestions
Serve these Chocolate Mud Brownie Bars at room temperature or slightly warmed. A scoop of vanilla ice cream complements the rich chocolate and caramel flavors beautifully. They are also delicious with a glass of cold milk or a cup of hot coffee.
Store leftover brownie bars in an airtight container at room temperature for up to 3 days, in the refrigerator for up to a week, or in the freezer for up to 2 months. To reheat, microwave individual bars for a few seconds until slightly warmed.
Nutritional Information
| Nutrient | Amount per Serving | % Daily Value |
|---|---|---|
| Calories | 309.8 kcal | – |
| Calories from Fat | – | 45% |
| Total Fat | 15.6 g | 23% |
| Saturated Fat | 5.1 g | 25% |
| Cholesterol | 17.2 mg | 5% |
| Sodium | 211.9 mg | 8% |
| Total Carbohydrate | 44.3 g | 14% |
| Dietary Fiber | 2.4 g | 9% |
| Sugars | 24.1 g | – |
| Protein | 3 g | 5% |
Note: Nutritional information is an estimate and may vary based on specific ingredients and portion sizes.
Variations & Substitutions
- Gluten-Free: Substitute a gluten-free all-purpose flour blend for the regular flour.
- Dairy-Free: Use dairy-free chocolate chips and butter substitute. Ensure the caramel sauce is also dairy-free.
- Nut-Free: Omit the nuts or substitute with toasted sunflower seeds.
- Different Nuts: Experiment with other nuts such as chopped almonds, macadamia nuts, or pistachios.
- Spice It Up: Add a pinch of cinnamon or cayenne pepper to the brownie batter for a touch of warmth and complexity.
- Seasonal Twist: During the holidays, add a layer of crushed peppermint candies to the top of the bars.
FAQs (Frequently Asked Questions)
Q: Can I use a different size baking dish?
A: While an 8×8 inch baking dish is ideal for the specified thickness, you can use a 9×13 inch dish, but the bars will be thinner and may require a shorter baking time.
Q: My marshmallows are burning before the brownie is cooked through. What should I do?
A: Tent the baking dish loosely with aluminum foil during the last few minutes of baking to protect the marshmallows from the heat.
Q: Can I make these bars ahead of time?
A: Yes, the brownie base can be baked a day ahead. Cool completely, wrap tightly, and store at room temperature. Add the toppings just before serving.
Q: The caramel sauce is too thick to spread easily. How can I thin it?
A: Microwave the caramel sauce for a few seconds until it is more fluid and easier to spread.
Q: Can I freeze these brownie bars?
A: Yes, Chocolate Mud Brownie Bars can be frozen for up to 2 months. Wrap them tightly in plastic wrap and then in aluminum foil to prevent freezer burn. Thaw completely before serving.
Final Thoughts
These Chocolate Mud Brownie Bars are more than just a dessert; they’re a warm hug in every bite. The fudgy brownie, the gooey caramel, the crunchy nuts, and the sweet chocolate drizzle create a symphony of flavors and textures that will tantalize your taste buds. So, gather your ingredients, preheat your oven, and embark on a baking adventure. Share these delightful bars with your loved ones, and watch their faces light up with joy. I encourage you to experiment with variations and substitutions to create your own signature version. Don’t forget to share your feedback and baking triumphs. Happy baking! And if you’re feeling particularly decadent, pair these bars with a scoop of vanilla bean ice cream and a drizzle of hot fudge sauce. You won’t regret it!