
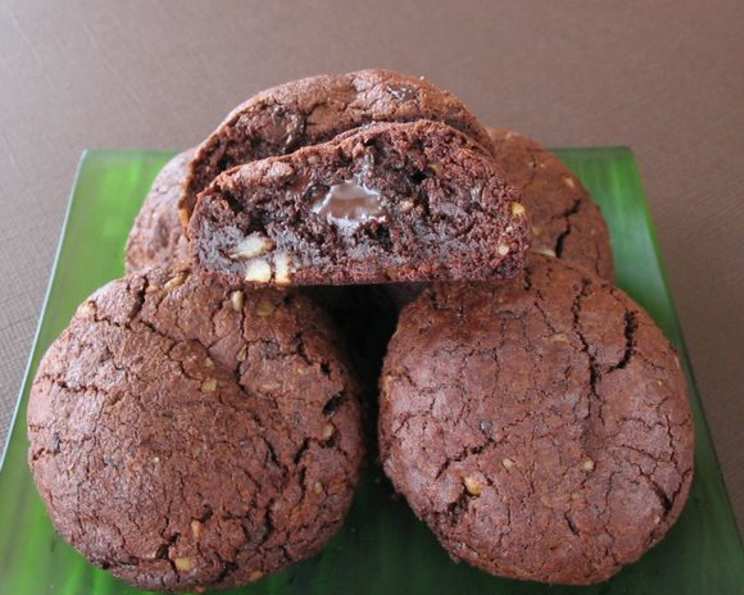
Chocolate Mudslide Cookies: An Irresistible Decadence
I’ll never forget the first time I tasted a truly exceptional chocolate cookie. It was at a small bakery tucked away on a rainy street in Seattle. The air hung thick with the aroma of roasting coffee and melting chocolate, and the cookie, a dense, almost fudgy creation, was served warm, practically melting in my hands. One bite, and I was hooked. These Chocolate Mudslide Cookies evoke that same intense chocolate experience, a reminder that sometimes the simplest pleasures are the most profound.
Recipe Overview
- Prep Time: 20 minutes
- Cook Time: 15-25 minutes
- Total Time: 35-45 minutes
- Yields: 20 Large cookies
- Dietary Type: Not specified (contains dairy and eggs)
Ingredients
- 1 1⁄2 cups unsweetened chocolate, in chips or chunks
- 8 cups bittersweet chocolate, in chips or chunks
- 3⁄8 cup unsalted butter
- 2 cups sugar
- 5 eggs
- 1⁄2 cup all-purpose flour
- 2 3⁄4 teaspoons baking powder
- 1 1⁄4 teaspoons salt
- 1 1⁄4 cups walnuts (optional)
Equipment Needed
- Double boiler (or a metal bowl and saucepan)
- Mixer
- Parchment paper
- Baking sheet(s)
- Refrigerator
- Knife
Instructions
-
Begin by preheating your oven to 400 degrees Fahrenheit (200 degrees Celsius). Make sure your oven rack is positioned in the center for even baking.
-
Prepare a double boiler. If you don’t have a dedicated double boiler, you can create one by placing a heatproof metal bowl over a saucepan filled with simmering water. Ensure the bottom of the bowl doesn’t touch the water. Add the unsweetened chocolate and 4 cups of the bittersweet chocolate to the bowl. Stir periodically until the chocolate is completely melted and smooth. Remove from heat and set aside.
-
In a separate bowl, cream together the butter and sugar using a mixer on medium speed. Continue mixing until the mixture is light and fluffy, which typically takes about 3-5 minutes. This creaming process is crucial for incorporating air into the dough, resulting in a softer cookie.
-
Add the eggs to the creamed butter and sugar mixture, one at a time, blending well after each addition. Make sure each egg is fully incorporated before adding the next. This prevents the mixture from curdling.
-
In a separate bowl, whisk together the all-purpose flour, baking powder, and salt. This step ensures that the baking powder and salt are evenly distributed throughout the flour.
-
Gradually add the dry ingredients to the wet ingredients (the butter and egg mixture). Mix on low speed just until combined. Be careful not to overmix, as this can lead to tough cookies.
-
Pour the melted chocolate into the batter and mix until everything is thoroughly combined, creating a rich, dark chocolate dough.
-
If desired, stir in the walnuts and the remaining bittersweet chocolate pieces. Incorporate these additions evenly throughout the dough.
-
Line a baking sheet with parchment paper. This will prevent the cookies from sticking and make cleanup easier.
-
Pour the cookie mixture onto the parchment-lined baking sheet. Spread the mixture out evenly.
-
Place the baking sheet with the cookie mixture into the refrigerator for 5 to 10 minutes. This chilling period will help the dough firm up slightly, making it easier to shape into individual cookies. Avoid chilling the dough completely, as it should remain pliable.
-
Remove the baking sheet from the refrigerator. Reverse the sheet onto another piece of parchment paper on a hard surface. This allows you to easily remove the slightly chilled dough.
-
Use a knife to carefully divide the mixture into approximately 20 squares. Aim for roughly equal-sized squares for even baking.
-
With your hands, gently roll each square into a ball. Don’t overwork the dough, as this can make the cookies tough.
-
Evenly space the cookie dough balls on one or two parchment-lined baking sheets, leaving enough room for them to spread during baking.
-
Bake the cookies for 15 to 25 minutes, or until they appear crusty on the outside but remain gooey on the inside. The exact baking time will depend on your oven and the size of the cookies. Keep a close eye on them to prevent overbaking.
-
Once baked, remove the cookies from the oven and allow them to cool on the baking sheets for at least 20 minutes before transferring them to a wire rack to cool completely. This cooling period is crucial, as the cookies will continue to set as they cool.
-
Serve and enjoy these decadent Chocolate Mudslide Cookies!
Expert Tips & Tricks
- Melting Chocolate: Be patient when melting chocolate. Low and slow is the key to preventing it from seizing. If the chocolate does seize, try adding a teaspoon of vegetable oil and stirring vigorously.
- Doneness Check: To check for doneness, gently press the edge of a cookie. It should feel firm and slightly crusty, while the center remains soft.
- Adjust Baking Time: Baking times may vary depending on your oven. Start checking the cookies at 15 minutes and adjust the baking time as needed.
- Substitute Nuts: If you’re not a fan of walnuts, you can substitute them with other nuts like pecans or macadamia nuts.
- Make-Ahead Tip: The cookie dough can be made ahead of time and stored in the refrigerator for up to 2 days. Allow the dough to come to room temperature slightly before shaping and baking.
Serving & Storage Suggestions
Serve these Chocolate Mudslide Cookies warm or at room temperature. They are delicious on their own or paired with a scoop of vanilla ice cream or a glass of cold milk.
To store leftover cookies, place them in an airtight container at room temperature. They will stay fresh for up to 3 days. For longer storage, you can freeze the cookies in an airtight container for up to 2 months. To reheat frozen cookies, thaw them at room temperature or warm them briefly in a microwave.
Nutritional Information
| Nutrient | Amount per Serving | % Daily Value |
|---|---|---|
| Calories | ~350 kcal | ~18% |
| Total Fat | ~20g | ~30% |
| Saturated Fat | ~12g | ~60% |
| Cholesterol | ~60mg | ~20% |
| Sodium | ~200mg | ~8% |
| Total Carbohydrate | ~40g | ~13% |
| Dietary Fiber | ~1g | ~4% |
| Sugars | ~30g | ~60% |
| Protein | ~4g | ~8% |
Note: Nutritional information is an estimate and may vary depending on specific ingredients and portion sizes.
Variations & Substitutions
- Gluten-Free: Substitute the all-purpose flour with a gluten-free flour blend.
- Dairy-Free: Replace the butter with a dairy-free butter substitute. Be mindful of the chocolate used; ensure it’s dairy-free as well.
- Add Espresso Powder: For an extra kick, add a teaspoon of espresso powder to the dry ingredients. This will enhance the chocolate flavor.
- Different Chocolate: Experiment with different types of chocolate, such as milk chocolate or white chocolate, for a unique twist.
- Spices: Add a pinch of cinnamon, nutmeg, or cayenne pepper to the dough for added warmth and depth of flavor.
FAQs (Frequently Asked Questions)
Q: Why are my cookies spreading too much?
A: This can happen if the dough is too warm or if there is too much sugar in the recipe. Make sure to chill the dough before baking and measure the ingredients accurately.
Q: Can I use chocolate chips instead of chocolate chunks?
A: Yes, you can use chocolate chips. However, chocolate chunks will create a more decadent and fudgy texture.
Q: How do I prevent the cookies from burning on the bottom?
A: Make sure your oven is properly calibrated and that you’re using a good quality baking sheet. You can also try using a double baking sheet or placing a silicone baking mat on the baking sheet.
Q: Can I freeze the baked cookies?
A: Yes, you can freeze the baked cookies for up to 2 months. Wrap them tightly in plastic wrap or place them in an airtight container.
Q: My cookies are too dry. What did I do wrong?
A: Overbaking is the most common cause of dry cookies. Make sure to bake the cookies for the recommended time and keep a close eye on them.
Final Thoughts
These Chocolate Mudslide Cookies are a true indulgence for chocolate lovers. The intense chocolate flavor and gooey texture make them irresistible. Don’t be afraid to experiment with different variations and substitutions to create your own signature version. Gather your ingredients, preheat your oven, and prepare to experience chocolate bliss. Share these cookies with friends and family, and let them know you made them with love! And of course, feel free to share your experience with this recipe; I’m always happy to hear your feedback! Pair these cookies with a rich, dark coffee or a sweet dessert wine for an unforgettable treat.