
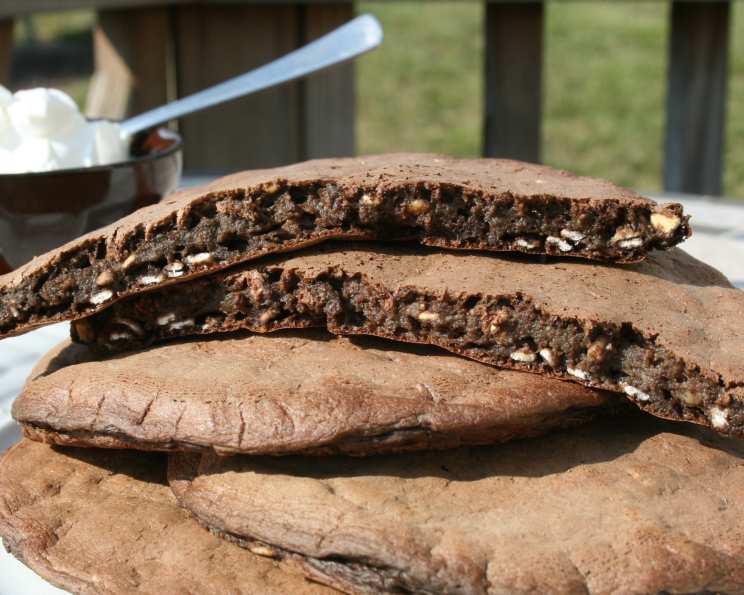
Guilt-Free Gluten-Free Chocolate Oatmeal Pancakes: A Deliciously Healthy Start
There’s something profoundly comforting about the smell of pancakes sizzling on a griddle. As a child, waking up to that aroma meant a day filled with possibility. My grandmother, a master of simple pleasures, always made them from scratch. While her recipe was undeniably delicious, it was also loaded with butter and sugar – a far cry from a healthy breakfast! So, I embarked on a mission to recreate that comforting experience with a recipe that wouldn’t leave me feeling sluggish. These Chocolate Oatmeal Pancakes are my answer: a decadent, yet wholesome, treat that’s perfect for starting the day right.
Recipe Overview
- Prep Time: 15 minutes
- Cook Time: 22 minutes
- Total Time: 37 minutes
- Servings: 6
- Yield: 6 pancakes
- Dietary Type: Gluten-Free
Ingredients
NIGHT BEFORE (or at least 15 minutes before)
- 1 1/4 cups plain soymilk (or vanilla soymilk, regular milk works too!)
- 1/2 cup gluten-free rolled oats (Bob’s Red Mill makes gluten-free oats)
DRY MIX (Optional: Make Ahead)
- 1/4 cup cocoa powder
- 1/4 cup brown rice flour
- 1/4 cup garfava bean flour
- 2 tablespoons tapioca flour
- 2 tablespoons cornstarch
- 1 teaspoon baking powder
- 1/2 teaspoon baking soda
- 1/4 teaspoon salt
WET INGREDIENTS
- 1/3 cup ripe mashed banana (~1 medium banana)
- 3 egg whites (or 1 whole egg and 1 egg white)
- 1 teaspoon vanilla extract
Equipment Needed
- Medium-sized bowl
- Small bowl
- Wire whisk or fork
- 8-inch or smaller non-stick skillet
- Measuring cups and spoons
- Timer
Instructions
- The night before (or at least 15 minutes before starting), combine the soymilk and gluten-free rolled oats in a bowl. Let this mixture sit in the refrigerator overnight. If you’re short on time, you can do this step first thing in the morning and let it sit while you prepare the other ingredients. The longer the oats soak, the softer they will become, resulting in a smoother pancake batter.
- Heat an 8-inch or smaller non-stick skillet over just slightly under medium-low heat. Using a smaller skillet where the batter runs to the edge will create perfectly round pancakes every time. Patience is key here; low and slow cooking ensures even cooking and prevents burning.
- In a medium-sized bowl, combine the cocoa powder, brown rice flour, garfava bean flour, tapioca flour, cornstarch, baking powder, baking soda, and salt. Mix these dry ingredients thoroughly with a wire whisk. This step is crucial for evenly distributing the baking powder and baking soda, which are responsible for the pancakes’ fluffy texture.
- In a small bowl, mash the ripe banana with a fork for at least 1 minute. Continue mashing until there are no clumps and the banana becomes shiny and almost soupy. This process releases the natural sugars in the banana, enhancing its sweetness and making it easier to incorporate into the batter. If you prefer a stronger banana flavor, mash it less.
- Add the mashed banana, egg whites, vanilla extract, and the milk/oats mixture to the bowl with the dry ingredients.
- Mix everything together thoroughly with a whisk or fork, making sure to scrape the bottom of the bowl to incorporate all the ingredients. Continue mixing for at least 1 minute, or until the batter is fully combined and smooth. A well-mixed batter is essential for a consistent pancake texture.
- Ensure your skillet has fully preheated. A properly heated skillet is essential for preventing the pancakes from sticking and achieving a golden-brown color.
- Pour about 1/2 cup of the batter into the dry, preheated pan (no oil or butter is necessary due to the non-stick skillet). Set a timer for 3 minutes, then flip the pancake and cook for another 3 minutes on the other side.
- If your first pancake does not flip easily after 3 minutes, leave it on for another minute. If the next one does the same thing, you may need to raise the heat a bit, but be careful not to burn the pancakes.
- Repeat the process until all the batter is used. This recipe makes approximately 6 pancakes.
- Serve the pancakes warm with your favorite toppings.
Expert Tips & Tricks
- Overnight Oat Infusion: Don’t skip the overnight soaking of the oats! This step is vital for a tender and moist pancake. The oats absorb the soymilk, resulting in a smoother batter and a more delicate texture.
- Perfectly Round Pancakes: Using a smaller skillet ensures that the batter naturally spreads to the edges, creating those picture-perfect round pancakes every time.
- Mastering the Flip: Patience is key! Don’t rush the flipping process. Wait until the edges of the pancake are set and the top is covered with small bubbles before attempting to flip.
- Make-Ahead Dry Mix: Save time by preparing the dry ingredients in advance. Simply combine them in a plastic baggie and store in your pantry, fridge, or freezer. This makes breakfast a breeze on busy mornings.
- Adjusting Sweetness: If you prefer a sweeter pancake, you can add a touch of stevia or your favorite sugar substitute to the batter. However, the mashed banana provides a natural sweetness that complements the chocolate flavor beautifully.
Serving & Storage Suggestions
Serve these delicious Chocolate Oatmeal Pancakes warm. Consider topping them with a dollop of Cool Whip or vanilla yogurt for a creamy treat. For a lighter option, try pouring hot soymilk over them instead of syrup – it adds moisture without the extra calories.
Leftover pancakes can be stored in the refrigerator for up to a week. To reheat, simply microwave them for about 30 seconds per pancake, or until warmed through. You can also freeze the pancakes for longer storage. Wrap them individually in plastic wrap and then place them in a freezer bag. They can be reheated directly from frozen in the microwave or toaster.
Nutritional Information
Here is an estimate of the nutritional information per serving (approximately 1 pancake):
| Nutrient | Amount per Serving | % Daily Value |
|---|---|---|
| Calories | 116.8 kcal | N/A |
| Calories from Fat | 19g | 17% |
| Total Fat | 2.1 g | 3% |
| Saturated Fat | 0.5 g | 2% |
| Cholesterol | 0 mg | 0% |
| Sodium | 319.7 mg | 13% |
| Total Carbohydrate | 19.7 g | 6% |
| Dietary Fiber | 3.2 g | 12% |
| Sugars | 2.2 g | 8% |
| Protein | 6.5 g | 12% |
Note: Nutritional information is an estimate and may vary based on specific ingredients and portion sizes.
Variations & Substitutions
- Dairy-Free Delight: This recipe already uses soymilk, but you can easily substitute it with almond milk, oat milk, or any other plant-based milk of your choice.
- Egg-Free Option: For a completely vegan version, substitute the egg whites with flax eggs. Simply combine 1 tablespoon of ground flaxseed meal with 3 tablespoons of water and let it sit for 5 minutes to thicken before adding it to the batter.
- Spice It Up: Add a pinch of cinnamon, nutmeg, or cardamom to the dry ingredients for a warm, comforting flavor.
- Berry Bliss: Fold in fresh blueberries, raspberries, or chopped strawberries into the batter for a burst of fruity goodness.
- Nutty Indulgence: Add a tablespoon of chopped walnuts, pecans, or almonds to the batter for added texture and flavor.
FAQs (Frequently Asked Questions)
Q: Can I use regular all-purpose flour instead of brown rice and garfava bean flour?
A: While you can, the texture will be different. Brown rice and garfava bean flour contribute to the unique moistness and slightly nutty flavor of these pancakes. Using all-purpose flour will result in a denser pancake. If you do substitute, use about 1/2 cup of all-purpose flour.
Q: Can I make the batter ahead of time?
A: Yes, you can prepare the batter up to 24 hours in advance. Store it in an airtight container in the refrigerator. Give it a good stir before using.
Q: How do I prevent the pancakes from sticking to the pan?
A: Using a high-quality non-stick skillet is crucial. Also, make sure the skillet is properly preheated before adding the batter. Cooking the pancakes over medium-low heat also helps prevent sticking.
Q: Can I freeze these pancakes?
A: Absolutely! Allow the pancakes to cool completely, then wrap them individually in plastic wrap and place them in a freezer bag. They can be stored in the freezer for up to 2 months. Reheat them directly from frozen in the microwave or toaster.
Q: What can I use instead of banana?
A: Unsweetened applesauce can be used in place of mashed banana at a 1:1 ratio.
Final Thoughts
These Chocolate Oatmeal Pancakes are more than just a breakfast recipe; they’re a testament to the fact that healthy eating can be both delicious and satisfying. They’re the perfect way to start your day on a positive note, fueling your body with wholesome ingredients and indulging your sweet tooth without the guilt. So, gather your ingredients, fire up your skillet, and prepare to experience the joy of a truly guilt-free chocolatey treat. Don’t hesitate to experiment with variations and toppings to create your own signature pancake masterpiece. And please, share your creations and feedback! Happy cooking!