
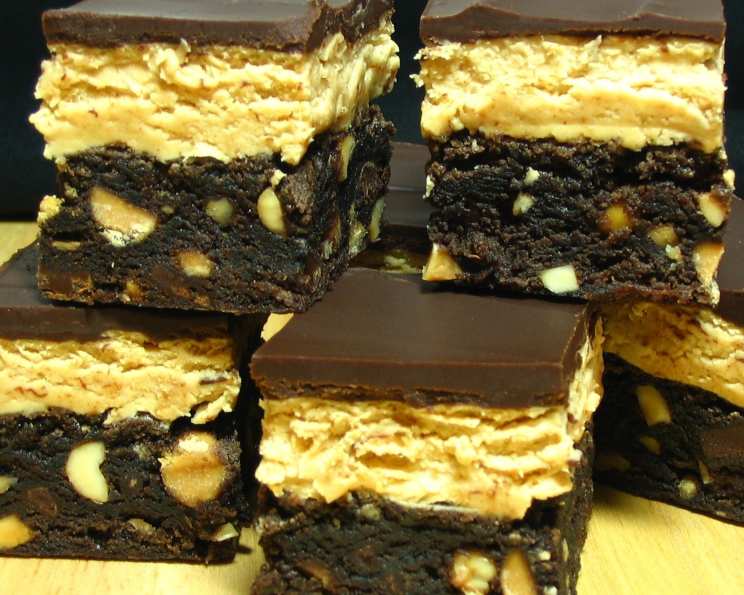
Chocolate-Peanut Butter Fudge Bars: A Decadent Dream
The memory is still so vivid: sneaking into my grandmother’s kitchen as a child, drawn by the intoxicating aroma of baking chocolate and peanut butter. She always had a special treat hidden away for her grandchildren, and more often than not, it was something along the lines of these incredible Chocolate-Peanut Butter Fudge Bars. The rich, fudgy brownie base, the creamy peanut butter filling, and that glossy chocolate glaze… it was pure bliss in every bite. These bars aren’t just dessert; they’re a warm hug of nostalgia, a reminder of simpler times and the love that only a grandmother can bake into a treat.
Recipe Overview
- Prep Time: 25 minutes
- Cook Time: 30 minutes
- Total Time: 1 hour 25 minutes
- Yields: 36 bars
- Serves: 36
- Dietary Type: Vegetarian
Ingredients
- 1 (18 ounce) box brownie mix (Triple Chocolate Decadence)
- 1/2 cup peanut butter chips
- 1/2 cup dry roasted peanuts, chopped
Peanut Butter Filling
- 3/4 cup creamy peanut butter
- 1 cup marshmallow cream (such as Marshmallow Fluff or Creme)
- 6 tablespoons unsalted butter, softened
- 3/4 cup confectioners’ sugar
Chocolate Glaze
- 6 ounces bittersweet baking chocolate, coarsely chopped
- 5 tablespoons unsalted butter
- 1 tablespoon corn syrup
Equipment Needed
- 9-inch square baking pan
- Aluminum foil
- Nonstick cooking spray
- Mixing bowls (medium)
- Electric mixer
- Wire rack
- Microwave-safe bowl
- Cutting board
- Sharp knife
- Wax paper
Instructions
-
Preheat your oven to 350°F (175°C). Line a 9-inch square pan with aluminum foil, ensuring the foil extends over the edges of the pan on opposite sides. This overhang will act as handles for easy removal later. Generously coat the foil with nonstick cooking spray. This ensures the bars release cleanly and effortlessly.
-
Prepare the brownie mix according to the package directions for fudgy brownies. The key here is fudginess, so don’t overbake! Stir in the peanut butter chips and chopped dry roasted peanuts. Distribute the mixture evenly into the prepared pan. The peanuts add a delightful crunch that complements the creamy peanut butter filling.
-
Bake for 30 minutes, or until a wooden pick inserted into the center comes out with moist crumbs attached. Resist the urge to overbake; slightly underbaked brownies are the best for fudge bars. Cool completely in the pan on a wire rack. Patience is key; the bars need to be completely cool before adding the filling to prevent it from melting.
-
Now, for the Peanut Butter Filling: In a medium bowl, beat together the peanut butter, marshmallow cream, and softened butter with an electric mixer on high speed until well blended and smooth. Softened butter is crucial for a creamy filling. Reduce the mixer speed to low, gradually add the confectioners’ sugar, and beat until fully incorporated. Avoid overmixing, which can make the filling tough. Spread the peanut butter filling evenly over the cooled brownie layer.
-
Time for the decadent Chocolate Glaze: In a microwave-safe bowl, combine the coarsely chopped bittersweet baking chocolate and butter. Microwave in 30-second intervals, stirring after each interval, until the chocolate is melted and smooth. Be careful not to overheat the chocolate, as it can seize up. Stir in the corn syrup. The corn syrup adds shine and prevents the glaze from becoming too brittle.
-
Pour the chocolate glaze evenly over the peanut butter filling layer. Ensure the entire surface is covered for a beautiful, glossy finish.
-
Refrigerate for at least 1 hour, or until the filling is firm and the glaze has set. This chilling time is essential for the bars to hold their shape and for the flavors to meld together.
-
Once chilled, lift the foil using the overhanging edges onto a cutting board. This makes removing the bars from the pan incredibly easy and mess-free. Cut the bars into 6 rows lengthwise and 6 rows crosswise to yield 36 bars. Use a sharp knife and wipe it clean between cuts for neat, professional-looking bars.
-
Store the bars in the refrigerator in an airtight container with wax paper between layers for up to 2 weeks, or freeze for up to 3 months. The wax paper prevents the bars from sticking together during storage.
Expert Tips & Tricks
- For an extra layer of peanut butter flavor, use a brownie mix that already contains peanut butter.
- To prevent the knife from sticking when cutting the bars, dip it in hot water and wipe it dry before each cut.
- If you don’t have marshmallow cream, you can make a substitute by melting marshmallows with a little butter until smooth.
- For a richer chocolate glaze, use a higher quality bittersweet chocolate with a cocoa content of at least 70%.
- If your chocolate glaze becomes too thick, add a teaspoon of vegetable oil to thin it out.
Serving & Storage Suggestions
These Chocolate-Peanut Butter Fudge Bars are best served chilled, straight from the refrigerator. They make a delightful addition to any dessert platter or can be enjoyed as an afternoon treat with a glass of cold milk or a cup of hot coffee. To store leftovers, layer them between sheets of wax paper in an airtight container in the refrigerator for up to 2 weeks. They can also be frozen for up to 3 months. To thaw, place the bars in the refrigerator overnight. They don’t typically require reheating, as they are delicious served cold.
Nutritional Information
| Nutrient | Amount per Serving | % Daily Value |
|---|---|---|
| Calories | 190 kcal | N/A |
| Calories from Fat | 96 kcal | N/A |
| Total Fat | 10.8 g | 16% |
| Saturated Fat | 3.7 g | 18% |
| Cholesterol | 9.3 mg | 3% |
| Sodium | 107.2 mg | 4% |
| Total Carbohydrate | 22.2 g | 7% |
| Dietary Fiber | 0.7 g | 2% |
| Sugars | 7.1 g | N/A |
| Protein | 3.2 g | 6% |
Note: Nutritional information is an estimate and may vary based on specific ingredients used.
Variations & Substitutions
- Gluten-Free: Use a gluten-free brownie mix and ensure all other ingredients are certified gluten-free.
- Nut-Free: Substitute sunflower seed butter for the peanut butter in the filling. Omit the peanut butter chips and chopped peanuts in the brownie layer, or use another nut-free chip alternative.
- Dark Chocolate Lover’s Dream: Use dark chocolate chips in the brownie batter and a dark chocolate glaze made with 70% or higher cocoa content.
- Peanut Butter Cup Overload: Add chopped peanut butter cups to the brownie batter and sprinkle them on top of the chocolate glaze before it sets.
- Salted Caramel Swirl: Drizzle salted caramel sauce over the peanut butter filling before adding the chocolate glaze.
FAQs (Frequently Asked Questions)
Q: Can I use a different size pan?
A: While a 9-inch square pan is recommended for the stated baking time and thickness, you can use an 8-inch square pan for thicker bars, but you may need to increase the baking time slightly.
Q: Can I make the brownie layer from scratch?
A: Absolutely! If you prefer, you can use your favorite brownie recipe instead of a boxed mix, just make sure it’s a fudgy brownie recipe.
Q: How do I prevent the chocolate glaze from cracking when I cut the bars?
A: Make sure the chocolate glaze is not too thick and use a warm, clean knife for each cut. Cutting the bars while they are still slightly chilled can also help.
Q: Can I use natural peanut butter?
A: While natural peanut butter can be used, the filling may not be as smooth and stable. You might need to add a bit more confectioners’ sugar to achieve the desired consistency.
Q: How long can I keep these bars at room temperature?
A: Due to the creamy filling, it’s best to store these bars in the refrigerator. However, they can be kept at room temperature for a few hours if necessary, but they may become softer.
Final Thoughts
So there you have it – my take on these irresistible Chocolate-Peanut Butter Fudge Bars. I encourage you to try this recipe and create your own memories with every bite. Don’t be afraid to experiment with the variations and make it your own. And please, share your feedback! What did you think? What would you change? Perhaps pair these decadent bars with a scoop of vanilla ice cream or a strong cup of espresso for an unforgettable dessert experience. Happy baking!