
Chocolate Peanut Butter Oatmeal Cookies (Gift Mix in a Jar)
The aroma of freshly baked cookies has a magic all its own. I remember one Christmas Eve, snow falling softly outside, my grandmother and I were in her cozy kitchen, the scent of peanut butter and chocolate swirling in the air. We were assembling gift jars of cookie mix, each layer carefully packed, a promise of warmth and sweet indulgence for friends and family. Years later, recreating these jars brings back those cherished memories, a delicious reminder of love, giving, and the simple joy of sharing homemade treats.
Recipe Overview
- Prep Time: 20 minutes
- Cook Time: 8-10 minutes
- Total Time: 30 minutes
- Yields: 3 dozen cookies
- Serves: 18
- Dietary Type: Vegetarian
Ingredients
JAR Ingredients:
- ¾ cup flour
- ⅛ teaspoon salt
- ⅛ teaspoon baking soda
- ½ teaspoon baking powder
- ⅓ cup sugar
- 1 cup instant oats
- ⅓ cup brown sugar, packed
- ½ cup peanut butter chips
- 1 cup semi-sweet chocolate chips
ADDITIONAL INGREDIENTS (to be added by the recipient):
- ½ cup butter, softened
- 1 egg
- 1 teaspoon vanilla extract
Equipment Needed
- 1-quart wide-mouth canning jar
- Flat-bottomed object (for pressing layers)
- Large mixing bowl
- Electric mixer or whisk
- Measuring cups and spoons
- Baking sheet
- Wire rack
Instructions
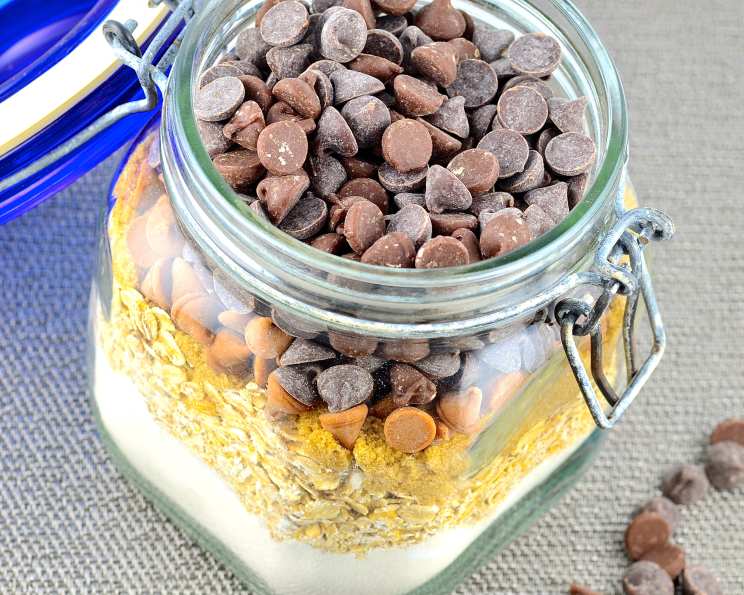
- Begin by thoroughly washing and drying a 1-quart wide-mouth canning jar. It’s crucial that the jar is completely dry to prevent clumping of the dry ingredients.
- Now, layer the ingredients into the jar in the order listed above. Start with the flour, followed by the salt, baking soda, and baking powder.
- Next, add the sugar, ensuring it forms an even layer.
- Continue layering with the instant oats, then the packed brown sugar. Gently press down on the brown sugar to eliminate air pockets.
- Add the peanut butter chips, creating a distinct layer.
- Finally, top off the jar with the semi-sweet chocolate chips.
- After adding each ingredient, use a flat-bottomed object (like the base of a measuring cup) to press firmly and create a compact, level layer. This not only looks beautiful but also ensures all ingredients fit snugly in the jar.
- Secure the lid tightly onto the jar. Decorate the jar as desired with ribbons, fabric, or personalized labels. Don’t forget to attach the instructions for making the cookies (as found below), either handwritten on a tag or printed on a card.
- For the cookie baking process (for the gift recipient): Preheat the oven to 375°F (190°C).
- In a large mixing bowl, blend the softened butter, egg, and vanilla extract until the mixture is smooth and creamy. An electric mixer makes this process easier, but a whisk and a bit of elbow grease will work just as well.
- Add the entire contents of the jar to the bowl with the wet ingredients.
- Stir the mixture thoroughly until all the dry ingredients are completely incorporated and the dough is well combined. Be patient; it may take a few minutes to ensure everything is evenly distributed.
- Drop the cookie dough by heaping teaspoonfuls onto an ungreased baking sheet, spacing the cookies about 2 inches apart. This prevents them from merging into one giant cookie during baking.
- Bake for 8-10 minutes, or until the edges of the cookies are lightly golden brown. Keep a close watch, as baking times can vary depending on your oven.
- Once baked, allow the cookies to cool for 2 minutes on the baking sheet before transferring them to a wire rack to cool completely. This prevents them from breaking apart while still warm.
- Serve the cookies immediately or store them in an airtight container for up to 1 week.
Expert Tips & Tricks
- Layering Perfection: For visually appealing layers, use a clear glass or acrylic disk slightly smaller than the jar’s opening to compress each layer. This creates sharp, defined lines.
- Brown Sugar Softness: To prevent the brown sugar from hardening in the jar, place a small marshmallow or a piece of bread in the jar with it. These will help absorb moisture and keep the sugar soft.
- Nut Butter Boost: For an extra peanut butter punch, add a tablespoon of creamy peanut butter to the wet ingredients. This will intensify the flavor and create a chewier texture.
- Baking Sheet Sanity: Lining your baking sheet with parchment paper is always a good idea. It prevents sticking and makes cleanup a breeze.
- Even Baking: If your oven tends to bake unevenly, rotate the baking sheet halfway through the baking time to ensure the cookies are evenly browned.
- Consider adding a small packet of festive sprinkles to include in the jar, allowing the recipient to add a colourful touch!
Serving & Storage Suggestions
These Chocolate Peanut Butter Oatmeal Cookies are best enjoyed warm, with a glass of cold milk or a hot cup of coffee. They also pair wonderfully with a scoop of vanilla ice cream for an extra-indulgent treat.
To store, place the cooled cookies in an airtight container at room temperature. They will stay fresh for up to a week, although they are unlikely to last that long! For longer storage, freeze the cookies in a single layer on a baking sheet, then transfer them to a freezer bag. Frozen cookies can be thawed at room temperature for about 30 minutes before serving.
Nutritional Information
| Nutrient | Amount per Serving | % Daily Value |
|---|---|---|
| Calories | 185 kcal | N/A |
| Calories from Fat | 89 kcal | N/A |
| Total Fat | 9.9g | 15% |
| Saturated Fat | 5.7g | 28% |
| Cholesterol | 23.9mg | 7% |
| Sodium | 98.2mg | 4% |
| Total Carbohydrate | 22.9g | 7% |
| Dietary Fiber | 1.4g | 5% |
| Sugars | 14.6g | N/A |
| Protein | 2.8g | 5% |
Note: Nutritional information is an estimate and may vary based on specific ingredients and portion sizes.
Variations & Substitutions
- Gluten-Free Option: Substitute the all-purpose flour with a gluten-free blend. Ensure the blend contains xanthan gum for binding.
- Vegan Version: Replace the butter with a vegan butter substitute and the egg with a flax egg (1 tablespoon of ground flaxseed mixed with 3 tablespoons of water, let sit for 5 minutes).
- Spice It Up: Add a pinch of cinnamon or nutmeg to the flour mixture for a warm, comforting flavor.
- Nutty Delight: Incorporate chopped walnuts or pecans into the dough for added texture and flavor.
- Chocolate Overload: Use dark chocolate chips instead of semi-sweet for a richer, more intense chocolate flavor.
- Seasonal Twist: Add some dried cranberries and orange zest during the holiday season, or pumpkin spice in the Fall!
FAQs (Frequently Asked Questions)
Q: Can I use quick oats instead of instant oats?
A: While you can use quick oats, the texture of the cookies may be slightly different. Instant oats tend to create a softer, chewier cookie.
Q: How long will the cookie mix last in the jar?
A: The cookie mix can last for up to 6 months if stored in a cool, dry place. Ensure the lid is tightly sealed to prevent moisture from entering.
Q: Can I double or triple the recipe for a larger batch?
A: Yes, you can easily scale the recipe up to make multiple jars. Just ensure you have enough jars and adjust the ingredient quantities accordingly.
Q: What if the dough is too dry after adding the wet ingredients?
A: Add a teaspoon of milk (dairy or non-dairy) at a time until the dough reaches a workable consistency.
Q: Can I freeze the cookie dough for later baking?
A: Yes, you can freeze the cookie dough. Scoop the dough into individual portions and freeze on a baking sheet. Once frozen, transfer to a freezer bag. Bake directly from frozen, adding a minute or two to the baking time.
Final Thoughts
This Chocolate Peanut Butter Oatmeal Cookie Mix in a Jar is more than just a recipe; it’s a heartfelt gift that brings the joy of homemade cookies to friends and family. Whether you’re creating a thoughtful present or simply treating yourself, the warm, comforting aroma and irresistible flavor of these cookies are sure to delight. So gather your ingredients, layer them with love, and share the sweetness. Don’t hesitate to leave a comment and share your baking experience or any creative variations you’ve tried! Happy baking!