
Chocolate Pigs: A Sweet & Simple Treat
The aroma of melting chocolate always transports me back to childhood. I remember rainy afternoons spent in my grandmother’s kitchen, the air thick with the scent of cocoa and sugar. While fancy pastries were sometimes on the menu, the real joy was in the simple, whimsical treats we’d create together. These little chocolate pigs remind me of that time – a perfect blend of easy fun and deliciousness, transforming ordinary ingredients into something truly special. Each bite brings me back to her cozy kitchen and the warmth of shared laughter and love.
Recipe Overview
- Prep Time: 20 minutes
- Cook Time: 0 minutes (setting time)
- Total Time: 1 hour 20 minutes
- Yields: 12 pigs
- Dietary Type: Vegetarian
Ingredients
- 12 large marshmallows
- 12 mini marshmallows
- 200 g dark chocolate (cooking)
- 50 g Copha (optional, for easier dipping and a shinier finish)
- 24 rainbow chocolate chips (or mini M&M’s)
- 1 white chocolate baking square
- 24 pieces sliced almonds (or one ice cream wafer)
Equipment Needed
- Scissors or hot knife
- Baking tray
- Baking paper
- Microwave-safe bowl or double boiler
- Skewers, dipper, or forks
- Tweezers
- Toothpick
Instructions
- First, prepare your chocolate. Melt the dark chocolate and Copha together. You can do this in a microwave-safe bowl in 30-second intervals, stirring in between to prevent burning, or use a double boiler for a more gradual melt. If you skip the copha, the melted chocolate may seize up a bit quicker so work promptly.
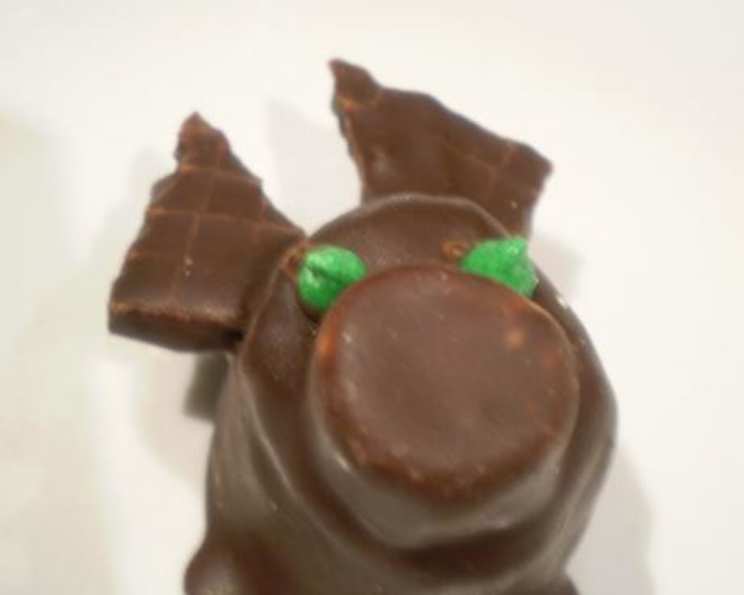
- While the chocolate is melting, prepare the pig’s ears. Take your large marshmallows and, using scissors or a hot knife, make a small cut in the “rounded” part of each marshmallow. This will be where you insert the ears. A hot knife will slice easily but be cautious if using one.
- Insert the ears: Take two sliced almonds and insert their small, pointed ends into the cuts you made in the marshmallows. These will act as the pig’s ears. If you have a nut allergy or simply prefer a nut-free option, cut your ice cream wafer into small triangles and use those instead.
- Time to add the snout! Dip the end of a mini marshmallow into the melted dark chocolate and carefully position it on the lower half of the “top” (rounded part) of the large marshmallow. This will be the pig’s snout.
- Place the assembled pigs on a baking tray lined with baking paper. This will prevent them from sticking to the tray. Place the tray in the refrigerator for about 10 minutes to allow the chocolate to set slightly and secure the snout.
- Now for the fun part: the chocolate bath! Using your preferred method (skewers, dipper, forks, etc.), carefully coat the entire pig “face” (the marshmallow with the ears and snout) in the melted dark chocolate. Let any excess chocolate drip off to avoid a thick, uneven coating.
- Carefully place the chocolate-coated pigs back onto the baking tray lined with baking paper. Allow them to set completely, which should take about an hour at room temperature or a little quicker in the refrigerator.
- Once the chocolate has set, re-melt any remaining dark chocolate. This is for creating the eyes.
- Using tweezers, dip two rainbow chocolate chips (or mini M&M’s) into the melted chocolate and position them above the snout as the pig’s eyes. Wipe the tweezers between uses to keep things tidy.
- Finally, melt your tiny amount of white chocolate baking square. Using a toothpick, carefully add two small dots of white chocolate onto the snout to create the pig’s nostrils.
- For an extra touch of whimsy (if you’re feeling artistic), you can use the remaining chocolate to create curly tails on the back of the pigs.
Expert Tips & Tricks
- Tempering Chocolate: For the ultimate shiny and professional finish, consider tempering your chocolate. This involves carefully heating and cooling the chocolate to specific temperatures to ensure the cocoa butter crystals form correctly. There are many online guides to help with tempering if you’re up for the challenge.
- Marshmallow Freshness: Use fresh marshmallows for the best results. Stale marshmallows can be dry and less pliable, making it harder to insert the ears and attach the snout.
- Chocolate Consistency: If your chocolate becomes too thick while you’re working with it, add a tiny amount of vegetable oil or more Copha to thin it out. Be careful not to add too much, as this can affect the chocolate’s setting properties.
- Quick Setting: If you’re short on time, you can speed up the setting process by placing the pigs in the freezer for about 15-20 minutes. Just be sure to keep a close eye on them, as they can become too hard if left in the freezer for too long.
Serving & Storage Suggestions
These adorable chocolate pigs are perfect for serving at children’s parties, dessert tables, or as a fun homemade gift. Arrange them on a platter or in a decorative box for a charming presentation.
Store the chocolate pigs in an airtight container at room temperature for up to 3 days, or in the refrigerator for up to a week. While refrigeration will extend their shelf life, it can also cause the chocolate to bloom (develop a whitish coating), which doesn’t affect the taste but can impact the appearance. They are best enjoyed fresh and at room temperature!
Nutritional Information
| Nutrient | Amount per Serving | % Daily Value |
|---|---|---|
| Calories | 170.9 kcal | N/A |
| Calories from Fat | 135 g | 79% |
| Total Fat | 15.1 g | 23% |
| Saturated Fat | 10.5 g | 52% |
| Cholesterol | 0.3 mg | 0% |
| Sodium | 12.9 mg | 0% |
| Total Carbohydrate | 13.4 g | 4% |
| Dietary Fiber | 3.2 g | 12% |
| Sugars | 6 g | 24% |
| Protein | 2.8 g | 5% |
Variations & Substitutions
- Dairy-Free Pigs: Use dairy-free dark chocolate and marshmallows to make these pigs suitable for those with dairy allergies or intolerances. Ensure your chocolate chips and white chocolate are also dairy-free.
- White Chocolate Pigs: Substitute the dark chocolate with white chocolate for a different flavor profile. You can also use pink-colored white chocolate to create even cuter pink piggies.
- Peanut Butter Pigs: Add a small amount of peanut butter to the melted dark chocolate for a delicious peanut butter chocolate flavor. Make sure the recipients don’t have peanut allergies.
- Spice it Up: Add a pinch of cinnamon or chili powder to the melted chocolate for a subtle hint of spice.
FAQs (Frequently Asked Questions)
Q: Can I use milk chocolate instead of dark chocolate?
A: Yes, you can substitute milk chocolate for dark chocolate. Keep in mind that milk chocolate is sweeter than dark chocolate, so the overall taste of the pigs will be sweeter.
Q: What if I don’t have Copha?
A: Copha is optional but helps with the melting process and gives the chocolate a shinier finish. If you don’t have it, you can omit it. The chocolate might be a little thicker and may seize slightly quicker, so work quickly.
Q: Can I make these pigs ahead of time?
A: Absolutely! These chocolate pigs can be made a day or two in advance. Store them in an airtight container at room temperature or in the refrigerator until you’re ready to serve them.
Q: The chocolate is not setting properly. What am I doing wrong?
A: Ensure that you are using good-quality chocolate that is designed for melting. Also, make sure you are not overheating the chocolate during the melting process. Overheating can cause the cocoa butter to separate, resulting in a chocolate that doesn’t set properly.
Q: Can I freeze these chocolate pigs?
A: While you can freeze them, it’s not recommended as it can affect the texture of the marshmallows and cause the chocolate to bloom. They are best enjoyed fresh.
Final Thoughts
These chocolate pigs are more than just a recipe; they are a delightful way to bring a little bit of joy and whimsy into your kitchen. Whether you’re making them for a special occasion, a fun family activity, or simply to satisfy your sweet tooth, I hope you find as much pleasure in creating them as I do. Don’t be afraid to get creative with your decorations, and most importantly, have fun! I’d love to hear about your experiences making these adorable treats, so please share your feedback and photos. Happy baking!