
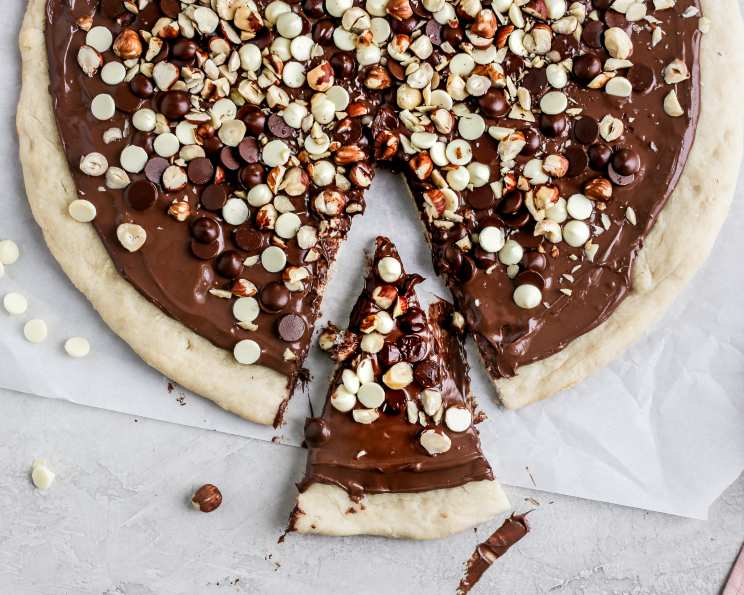
Chocolate Pizza: A Decadent Dessert You Can’t Resist
The first time I tasted chocolate pizza, I was a wide-eyed culinary student on a study abroad trip to Italy. We were in a small pizzeria in Naples, where the aroma of wood-fired ovens and simmering tomatoes hung heavy in the air. After a fiery Margherita, the pizzaiolo, with a wink, presented us with a pizza unlike any I’d ever seen. Instead of savory toppings, it was adorned with melted chocolate, a swirl of hazelnut spread, and a generous scattering of toasted nuts. That first bite – the crisp, slightly salty crust meeting the rich, sweet toppings – was pure magic. It was unexpected, playful, and utterly irresistible, and it changed my perception of what pizza could be.
Recipe Overview
- Prep Time: 20 minutes
- Cook Time: 21 minutes
- Total Time: 41 minutes
- Servings: 6
- Yield: 1 pie
- Dietary Type: Vegetarian (Can be made vegan with appropriate substitutions; see variations)
Ingredients
- 1 lb homemade pizza dough or 1 lb purchased pizza dough
- 2 teaspoons butter, melted
- ¼ cup chocolate hazelnut spread (Nutella recommended)
- ½ cup semi-sweet chocolate chips
- 2 tablespoons milk chocolate chips
- 2 tablespoons white chocolate chips
- 2 tablespoons chopped hazelnuts, toasted
Equipment Needed
- Heavy large baking sheet
- Parchment paper
- Rolling pin
- Oven
Instructions
- Begin by positioning the oven rack on the bottom of the oven and preheating to 450°F (232°C). This high heat is crucial for achieving a perfectly crisp crust.
- Line a heavy large baking sheet with parchment paper. This will prevent the pizza from sticking and make cleanup a breeze.
- On a lightly floured surface, roll out the dough to a 9-inch-diameter round. Aim for an even thickness to ensure uniform baking. If the dough is too elastic and keeps shrinking back, let it rest for 5-10 minutes before continuing.
- Carefully transfer the dough to the prepared baking sheet. Ensure it’s centered, leaving enough room around the edges.
- Using your fingers, gently make indentations all over the dough. This step serves two purposes: it prevents the dough from puffing up excessively during baking and creates little pockets for the chocolate to melt into.
- Brush the dough evenly with the 2 teaspoons of melted butter. The butter adds a richness and helps the crust brown beautifully.
- Bake the pizza dough until the crust is crisp and pale golden brown, about 20 minutes. Keep a close eye on it; baking times can vary depending on your oven. The edges should be nicely browned, and the base should feel firm when tapped.
- Remove the pizza from the oven and immediately spread the chocolate-hazelnut spread (Nutella recommended) evenly over the baked crust. Work quickly so the heat from the crust helps to soften the spread.
- Sprinkle all the chocolate chips (semi-sweet, milk, and white) evenly over the chocolate-hazelnut spread. Distribute them so that every bite gets a good mix of flavors.
- Return the pizza to the oven and bake just until the chocolate begins to melt, about 1 minute. Watch carefully! You want the chocolate to soften and become glossy, but not burn.
- Remove the chocolate pizza from the oven and immediately sprinkle the toasted chopped hazelnuts evenly over the melted chocolate.
- Let the pizza cool slightly before cutting it into wedges and serving. This allows the chocolate to set a bit, making it easier to handle.
Expert Tips & Tricks
- Toast Your Hazelnuts: Toasting the hazelnuts intensifies their flavor and adds a pleasant crunch. To toast them, spread them on a baking sheet and bake at 350°F (175°C) for 8-10 minutes, or until fragrant and lightly browned. Allow to cool slightly before chopping.
- Dough Perfection: For the best flavor, use a high-quality pizza dough. If using store-bought dough, let it come to room temperature before rolling it out. This will make it easier to work with.
- Chocolate Choices: Feel free to experiment with different types of chocolate. Dark chocolate, peanut butter chips, or even chopped-up candy bars would all be delicious additions.
- Crispy Crust Secret: Baking the crust first without toppings ensures that it gets nice and crispy. Adding the toppings directly to the raw dough can result in a soggy crust.
- Preventing Burnt Chocolate: Keep a close eye on the pizza during the final minute of baking. Chocolate burns easily, so you want to catch it just as it starts to melt.
Serving & Storage Suggestions
Serve your chocolate pizza warm, ideally within an hour of baking, for the best flavor and texture. Garnish with a dusting of powdered sugar or a drizzle of melted chocolate for an extra touch of elegance.
If you have any leftovers (though that’s unlikely!), store them in an airtight container at room temperature for up to 2 days. You can also refrigerate it for up to 4 days, but the crust may lose some of its crispness.
To reheat, warm individual slices in a preheated oven at 350°F (175°C) for a few minutes, or until the chocolate is melted and the crust is warm. You can also microwave it in short bursts, but be careful not to overheat it. Microwaving can make the crust a bit chewy.
Nutritional Information
| Nutrient | Amount per Serving | % Daily Value |
|---|---|---|
| Calories | 200 kcal | N/A |
| Calories from Fat | 116g | 58% |
| Total Fat | 13g | 19% |
| Saturated Fat | 8.2g | 41% |
| Cholesterol | 4.9mg | 1% |
| Sodium | 23.7mg | 0% |
| Total Carbohydrate | 21.2g | 7% |
| Dietary Fiber | 1.9g | 7% |
| Sugars | 18.3g | 73% |
| Protein | 2.2g | 4% |
Note: Nutritional information is an estimate and may vary based on specific ingredients and portion sizes.
Variations & Substitutions
- Vegan Chocolate Pizza: Substitute the butter with a vegan butter alternative or olive oil. Use vegan chocolate chips and ensure your chocolate-hazelnut spread is dairy-free (some brands offer vegan options).
- Gluten-Free Chocolate Pizza: Use a gluten-free pizza dough. There are many good quality pre-made gluten-free doughs available, or you can make your own.
- White Chocolate Raspberry Pizza: Replace the semi-sweet chocolate chips with white chocolate chips and add fresh or frozen raspberries before baking.
- Peanut Butter Cup Pizza: Substitute the chocolate hazelnut spread with peanut butter and add chopped peanut butter cups on top.
- Seasonal Fruit Pizza: Add sliced strawberries, blueberries, or other seasonal fruits after baking for a fresh and vibrant twist.
FAQs (Frequently Asked Questions)
Q: Can I use pre-made pizza crust instead of dough?
A: Yes, you can use a pre-made pizza crust, but the texture may be different. Look for a thin and crispy crust for the best results. Adjust the baking time accordingly, as pre-made crusts may require less time in the oven.
Q: Can I make the dough ahead of time?
A: Absolutely! Homemade pizza dough can be made a day or two in advance. Store it in the refrigerator in an airtight container. Let it come to room temperature before rolling it out.
Q: Can I freeze the chocolate pizza?
A: While you can freeze it, the texture may change upon thawing. The crust may become slightly soggy, and the chocolate could develop a slightly grainy texture. If you do freeze it, wrap it tightly in plastic wrap and then in foil. Thaw it in the refrigerator before reheating.
Q: My chocolate is burning in the oven. What can I do?
A: Reduce the baking time. Also, ensure that your oven temperature is accurate. Consider placing a sheet of foil loosely over the pizza to protect the chocolate from direct heat.
Q: Can I use a different type of nut instead of hazelnuts?
A: Yes, feel free to substitute with your favorite nuts, such as almonds, walnuts, or pecans. Make sure they are toasted for the best flavor.
Final Thoughts
Chocolate pizza is a dessert that’s both fun and sophisticated, perfect for a casual get-together or a special occasion. Its unexpected combination of textures and flavors is sure to delight everyone who tries it. Don’t be afraid to get creative with your toppings and make it your own. I encourage you to give this recipe a try and share your creations with friends and family. Pair it with a scoop of vanilla ice cream or a glass of dessert wine for a truly decadent experience. Bon appétit!