
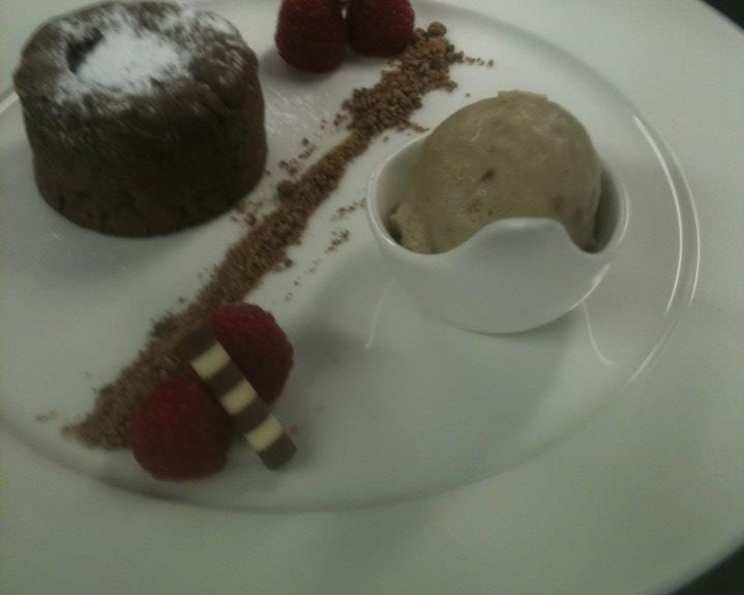
Chocolate Soil: The Secret to Culinary Textural Magic
I’ll never forget the first time I saw chocolate soil used in a professional kitchen. It was at a tiny Michelin-starred restaurant tucked away in the Cotswolds. The head chef, a stern but brilliant woman, was meticulously plating a deconstructed chocolate dessert. She reached for a small container and sprinkled a dark, crumbly substance around the dish. “Chocolate soil,” she declared, “the earth from which all chocolate dreams grow.” The visual impact, the textural contrast it provided, and the subtle bitterness it added were transformative. From that moment on, I was hooked.
Recipe Overview
- Prep Time: 5 minutes
- Cook Time: Approximately 8 minutes
- Total Time: 13 minutes
- Servings: 6
- Yield: Varies depending on use
- Dietary Type: Vegetarian (depending on chocolate choice)
Ingredients
- 70 g plain chocolate (at least 70% cocoa solids recommended for the best flavor)
- 100 g caster sugar
- 2 tablespoons water
Equipment Needed
- Small saucepan
- Thermometer (optional, but highly recommended)
- Whisk
- Heatproof container or baking sheet lined with parchment paper
Instructions
- In a small saucepan, combine the caster sugar and water.
- Chop the plain chocolate into small pieces, roughly the size of a fingernail. This ensures even melting.
- Place the saucepan with the sugar and water over medium heat. Cook until the sugar dissolves completely and the mixture begins to caramelize. If you have a thermometer, aim for a temperature of 130 degrees Celsius / 266 degrees Fahrenheit. If you don’t have a thermometer, watch closely; the sugar should be a medium-brown color, like amber. Be very careful during this step as hot sugar can cause severe burns.
- Remove the saucepan from the heat immediately once the sugar reaches the desired temperature or color.
- Add the chopped chocolate to the pan. Using a whisk, stir vigorously to coat all the chocolate pieces with the hot caramelized sugar.
- Continue whisking and stirring for approximately 2 minutes. The mixture will start to clump together, and the sugar will crystallize around the chocolate. Don’t worry if the mixture sticks to the sides of the pan – this is perfectly normal.
- Pour the mixture onto a heatproof container or a baking sheet lined with parchment paper. Spread it out as much as possible.
- Allow the mixture to cool completely. Once cooled, break it up with your hands or a spoon into small, irregular crumbs, resembling soil.
- To clean the saucepan, add hot water to the pan with the whisk. Bring to a boil, stirring to dissolve the hardened sugar. This makes cleaning much easier.
- You can experiment with different types of chocolate and spices.
Expert Tips & Tricks
- Chocolate Quality Matters: The flavor of your chocolate soil is directly proportional to the quality of the chocolate you use. Opt for a high-quality dark chocolate with at least 70% cocoa solids for a richer, more intense flavor.
- Sugar is Key: Keep a close eye on the sugar as it caramelizes. Too light, and you won’t get the desired depth of flavor. Too dark, and it will burn and become bitter. Aim for a medium amber color.
- Whisking is Essential: Don’t skimp on the whisking time. It’s crucial to ensure that the chocolate is thoroughly coated with the sugar. The whisking action also helps to create the crumbly texture as the sugar crystallizes.
- Prevent Sticking: Lightly greasing your baking sheet or using a silicone mat can help prevent the chocolate soil from sticking too much.
- Spice It Up: Feel free to add a pinch of sea salt or a dash of spices like cinnamon, cardamom, or chili powder to the sugar mixture before caramelizing for a unique flavor profile. A touch of instant coffee powder can also enhance the chocolate flavor.
- Make Ahead: Chocolate soil can be made well in advance and stored in an airtight container at room temperature for up to a week.
- Fixing a Mistake: If your sugar burns, unfortunately, you have to start again. Burnt sugar is intensely bitter and will ruin the flavor.
Serving & Storage Suggestions
Chocolate soil is incredibly versatile. Use it as a garnish for ice cream, panna cotta, mousse, or other desserts. It adds a delightful textural element and a subtle bitterness that balances sweetness. It’s also excellent sprinkled over yogurt, fruit salads, or even savory dishes like roasted vegetables or salads (especially when flavored with chili or spices).
Store chocolate soil in an airtight container at room temperature. It will keep for up to a week. Because it’s essentially caramelized sugar and chocolate, it will absorb moisture if exposed to humidity. Do not refrigerate, as this can cause the chocolate to bloom (develop a white coating). Freezing is not recommended as it can affect the texture.
Nutritional Information
Please note that these are estimated values and may vary based on specific ingredients used.
| Nutrient | Amount per Serving | % Daily Value* |
|---|---|---|
| Calories | 185 kcal | 9% |
| Total Fat | 8g | 12% |
| Saturated Fat | 5g | 25% |
| Cholesterol | 0 mg | 0% |
| Sodium | 1 mg | 0% |
| Total Carbohydrate | 27g | 9% |
| Dietary Fiber | 1g | 4% |
| Sugars | 24g | N/A |
| Protein | 1g | 2% |
*Percent Daily Values are based on a 2,000 calorie diet.
Variations & Substitutions
- Different Chocolate: Experiment with milk chocolate or white chocolate, but be aware that the sweetness will be significantly increased. Adjust the sugar accordingly.
- Vegan Chocolate Soil: Use vegan chocolate and ensure that the sugar you use is processed without bone char (most refined white sugar is vegan, but it’s always good to check).
- Nutty Chocolate Soil: Add chopped nuts (almonds, hazelnuts, pecans) to the chocolate mixture while it’s still warm.
- Citrus Zest: Add the zest of an orange or lemon to the sugar while it caramelizes for a bright, aromatic twist.
- Coffee Infusion: Mix a teaspoon of instant coffee powder with the sugar before heating it.
- Spicy Chocolate Soil: Add a pinch of cayenne pepper or chili flakes for a subtle kick.
- Salted Chocolate Soil: Sprinkle a pinch of flaky sea salt over the cooled chocolate soil for a sweet and salty contrast.
FAQs (Frequently Asked Questions)
Q: Can I use a different type of sugar?
A: Caster sugar is recommended because it dissolves easily and creates a smooth caramel. Granulated sugar can be used but may result in a slightly grainier texture. Avoid using brown sugar, as it will affect the color and flavor of the caramel.
Q: How do I prevent the sugar from burning?
A: Use medium heat and watch the sugar closely. If you see any signs of burning, immediately remove the pan from the heat and continue stirring. A thermometer is very helpful to ensure the sugar reaches the correct temperature without burning.
Q: My chocolate soil is too sticky. What did I do wrong?
A: This usually means the sugar didn’t caramelize enough, or the chocolate wasn’t thoroughly coated. Make sure the sugar reaches 130°C/266°F and that you whisk the chocolate and sugar together vigorously for the full two minutes.
Q: Can I make this without a thermometer?
A: Yes, but you need to pay close attention to the color of the sugar. It should be a medium amber color, like maple syrup. If it starts to smoke or smell burnt, it’s gone too far.
Q: How do I store chocolate soil to keep it crisp?
A: Store it in an airtight container in a cool, dry place. Humidity is the enemy! Adding a desiccant packet (like those found in vitamin bottles) can also help.
Final Thoughts
Chocolate soil might sound fancy, but it’s surprisingly simple to make at home. It’s a fantastic way to add a touch of culinary flair to your desserts and elevate even the simplest dishes. Don’t be afraid to experiment with different flavors and textures. Once you’ve mastered the basic technique, the possibilities are endless. I encourage you to give it a try – I think you’ll find it’s a delightful addition to your culinary repertoire. And please, share your creations and variations – I’m always eager to see how others put their own spin on this delicious little treat! Consider pairing it with a rich chocolate lava cake or a light and refreshing fruit tart for the perfect balance.