
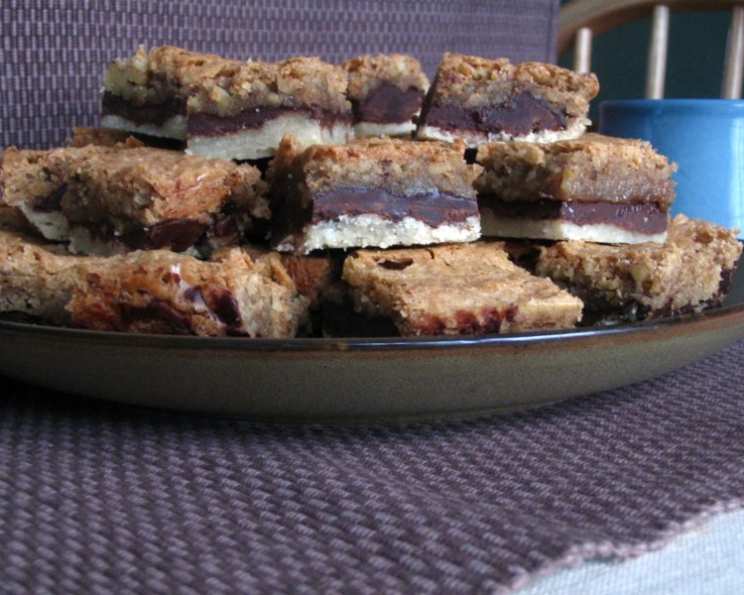
Decadent Chocolate Walnut Bars: A Layered Delight
My grandmother, a woman whose baking skills were legendary in our family, always had a stash of these chocolate walnut bars hidden away. Not for herself, mind you, but for us grandkids. I remember sneaking into her pantry, the sweet scent of chocolate and toasted nuts hitting me like a warm hug, and finding a tin overflowing with these treats. Each bite was an explosion of textures – the buttery, crumbly shortbread, the rich, melt-in-your-mouth chocolate, and the slightly crunchy, nutty walnut topping. They were pure happiness in bar form, and they remain one of my most cherished food memories.
Recipe Overview
- Prep Time: 20 minutes
- Cook Time: 33-38 minutes
- Total Time: 1 hour 5 minutes
- Yields: 32 bars
- Dietary Type: Not specified
Ingredients
Crust:
- 2/3 cup unsalted butter, softened
- 1/3 cup granulated sugar
- 1 teaspoon vanilla
- 1 1/3 cups all-purpose flour, sifted
Chocolate Layer:
- 12 ounces semi-sweet chocolate chips (2 cups) or bittersweet chocolate chips, good-quality
Walnut Layer:
- 3 large eggs
- 1 cup granulated sugar
- 1 tablespoon vanilla
- 1/2 cup unsalted butter, melted and cooled slightly (1 stick)
- 1 1/2 cups walnuts, chopped
Equipment Needed
- 13 x 9 inch pan (at least 1-1/2 inches deep)
- Heavy-duty aluminum foil
- Small bowl
- Medium bowl
- Cooling rack
- Large, sharp, straight-edged knife
Instructions
-
Begin by preparing your baking pan. Line a 13 by 9 inch pan (at least 1-1/2 inches deep) with heavy-duty aluminum foil, shiny side up. Make sure the foil extends up the sides of the pan to easily lift out the bars later. Set the lined pan aside.
-
Adjust the oven rack to the center position and preheat your oven to 350 degrees F (175 degrees C). It’s crucial to have the oven properly preheated for even baking.
-
Now, let’s make the crust. In a small bowl, combine the softened butter, sugar, and vanilla. Using a hand mixer or a sturdy spoon, cream the ingredients together until they are well-mixed and fluffy. This step is important for creating a tender crust.
-
Add the sifted flour to the butter mixture and stir to combine. Be careful not to overmix, as this can result in a tough crust. Mix just until the flour is incorporated.
-
Take the crust mixture and place it by small spoonfuls all over the bottom of the lined pan. This will help you distribute the dough evenly.
-
Keeping your hands lightly floured, press the crust mixture into an even layer with your fingertips and/or knuckles. The mixture can be a bit sticky, so re-flour your hands lightly as necessary to prevent sticking. Aim for a uniform thickness across the entire bottom of the pan.
-
Place the pan in the preheated oven and bake for 10 minutes. The crust should be lightly golden.
-
While the crust is baking, make sure you have your chocolate chips readily available. You’ll need them as soon as the crust comes out of the oven.
-
While the crust bakes, prepare the Walnut Layer. In a medium bowl, combine the eggs, sugar, and vanilla. Beat by hand until well-mixed. Set this mixture aside.
-
When the crust has baked for 10 minutes, remove it from the oven to a cooling rack.
-
Immediately sprinkle the chocolate chips as evenly as possible over the hot crust.
-
Return the pan to the oven for 3 minutes to melt the chocolate. Then, remove it to the cooling rack. Keep a close eye on the chocolate to prevent it from burning.
-
With the back of a spoon or an offset spatula, spread the melted chocolate evenly over the crust. This creates a smooth, rich base for the walnut layer. Allow the chocolate layer to stand for about 3 minutes. This will help it set up slightly and prevent the walnut layer from sinking.
-
During this short standing period for the chocolate, add the slightly cooled melted butter to the egg mixture and beat it in. It’s important that the butter isn’t too hot, as it could cook the eggs.
-
Stir in the chopped walnuts until they are evenly distributed throughout the egg mixture.
-
After the chocolate has stood for about 3 minutes, place the walnut mixture by spoonfuls all over the melted chocolate, distributing the walnuts as evenly as possible.
-
Return the pan to the oven. Bake for 20 to 25 minutes.
-
When done, the top of the walnut layer will be a light golden brown, and the edges will be darker. This indicates that the walnut layer is properly baked.
-
Remove the pan to a cooling rack and allow the bars to cool completely before storing or cutting. Cooling completely is crucial for the chocolate layer to set properly.
-
Before cutting, refer to the “Serving & Storage Suggestions” section below.
-
To cut the bars, use a large, sharp, straight-edged knife. For clean edges, trim about 1/4 inch from each edge before cutting into bars.
-
Store the bars airtight at room temperature for up to several days, or in the freezer for longer storage.
Expert Tips & Tricks
- Use high-quality chocolate chips for the best flavor. The better the chocolate, the richer the bars will taste.
- If your crust is browning too quickly, you can loosely cover the pan with foil during the last few minutes of baking.
- To prevent the chocolate from scorching in the oven, watch it closely during the melting stage and reduce the oven temperature slightly if needed.
- If you find that the crust is sticking to the foil, you can lightly grease the foil before lining the pan.
- For even cleaner cuts, chill the bars in the refrigerator for about 30 minutes before cutting.
Serving & Storage Suggestions
These bars are delicious served at room temperature. For an elegant presentation, consider dusting them lightly with powdered sugar or drizzling them with melted chocolate.
These bars can be stored airtight at room temperature for up to 3 days. For longer storage, they can be frozen for up to 2 months. To freeze, wrap the bars individually in plastic wrap and then place them in a freezer-safe container. Thaw them at room temperature before serving.
Nutritional Information
| Nutrient | Amount per Serving | % Daily Value |
|---|---|---|
| Calories | 205.8 kcal | N/A |
| Calories from Fat | 126 kcal | N/A |
| Total Fat | 14 g | 21% |
| Saturated Fat | 6.6 g | 33% |
| Cholesterol | 37.6 mg | 12% |
| Sodium | 8.9 mg | 0% |
| Total Carbohydrate | 19.9 g | 6% |
| Dietary Fiber | 1.1 g | 4% |
| Sugars | 14.4 g | 57% |
| Protein | 2.5 g | 4% |
Note: Nutritional information is an estimate and may vary based on specific ingredients and portion sizes.
Variations & Substitutions
- Gluten-Free: Substitute the all-purpose flour in the crust with a gluten-free all-purpose blend.
- Different Nuts: Replace the walnuts with pecans, almonds, or hazelnuts for a different flavor profile.
- Chocolate Variety: Experiment with different types of chocolate, such as milk chocolate or dark chocolate.
- Add Spices: Incorporate a pinch of cinnamon or nutmeg into the walnut layer for a warm, spiced flavor.
- Espresso Boost: Add a teaspoon of instant espresso powder to the chocolate layer for a richer, deeper chocolate flavor.
FAQs (Frequently Asked Questions)
Q: Can I use salted butter instead of unsalted butter?
A: Yes, you can use salted butter, but reduce the amount of salt you add to the recipe to avoid overly salty bars.
Q: How do I prevent the chocolate from burning when melting it in the oven?
A: Keep a close eye on the chocolate and reduce the oven temperature slightly if needed. You can also remove the pan from the oven briefly to stir the chocolate and redistribute the heat.
Q: Can I make these bars ahead of time?
A: Absolutely! These bars are perfect for making ahead of time. They can be stored at room temperature for a few days or frozen for longer storage.
Q: Why is my crust tough?
A: Overmixing the crust dough can result in a tough crust. Be sure to mix just until the flour is incorporated.
Q: How do I get clean cuts when slicing the bars?
A: Use a large, sharp, straight-edged knife. You can also chill the bars in the refrigerator for about 30 minutes before cutting to make them easier to slice.
Final Thoughts
These chocolate walnut bars are more than just a dessert; they’re a journey back to simpler times, to warm kitchens filled with the aroma of baking, and to the unconditional love of family. I encourage you to give this recipe a try and experience the joy of creating these layered delights. Don’t be afraid to experiment with variations and make them your own. And please, share your creations and feedback – I’d love to hear about your baking adventures! Perhaps serve them with a scoop of vanilla ice cream or a strong cup of coffee for the ultimate indulgence. Happy baking!