
Chorizo: A Taste of Colombian Home
The scent of chorizo always transports me back to my childhood summers spent visiting family in Colombia. My abuela (grandmother) would start preparing weeks in advance for family gatherings, and the rich, spicy aroma of chorizo curing in the kitchen was a constant, comforting presence. I remember sneaking tastes, the bold flavor a delightful contrast to the sweet mangoes that grew in her backyard. Those vibrant experiences ignited my lifelong love for food, and Colombian chorizo holds a special place in my heart.
Recipe Overview
- Prep Time: 48 hours 20 minutes
- Cook Time: Approximately 20 minutes per batch, depending on cooking method
- Total Time: 48 hours 40 minutes (including curing time)
- Servings: 30-40 links
- Yield: About 10 pounds of chorizo
- Dietary Type: Not suitable for vegetarians, vegans, or dairy-free diets
Ingredients
- Hog casings, 1 1/4 inch (Approximately 50 feet)
- 4 tablespoons cider vinegar (for soaking the hog casings)
- 7 lbs lean pork (I use Boston butt)
- 3 lbs pork belly (I have also used smoked hog jowls)
- 6 garlic cloves (minced finely)
- 4 bunches green onions (chopped finely)
- 1 bunch fresh cilantro (chopped finely, stems and all)
- 1 tablespoon dried oregano (chopped, not powdered)
- 2 tablespoons white vinegar (I have also used lemon juice)
- 3 1/2 cups cold water (approximately)
- 7 tablespoons salt (I really prefer Kosher salt)
Equipment Needed
- Large bowl
- Sharp knives or meat grinder (optional for pre-cubing)
- KitchenAid mixer with sausage stuffer attachment (or other sausage stuffer)
- String (optional for tying links, though casings can simply be twisted)
- Pins or needles
- Hooks for curing (or a suitable horizontal hanging space)
- Frying pan (for cooking)
Instructions
-
Hydrating the Casings: Begin by soaking the hog casings in 4 cups of tepid water (approximately 90 degrees Fahrenheit) overnight in the refrigerator. This rehydrates the casings, making them pliable and easier to work with. Some sausage makers might skip the next step, but I find it crucial for the best results.
-
Vinegar Soak: Before stuffing, drain the water and add about 1 tablespoon of cider vinegar per cup of water (so, 4 tablespoons total). Let the casings soak in this vinegar solution for a final 15 minutes. The vinegar tenderizes the casings and gives them a more translucent appearance.
-
Rinsing: Thoroughly rinse the casings inside and out. Slide the end of a casing over your faucet and gently run water through it. It is important to immediately start stuffing after rinsing since the casings may become tough or burst if you let them dry too much.
-
Preparing the Pork: Cut the pork meat and pork belly into very small cubes (approximately 1/4 inch). This is the most time-consuming step, but it’s important to be patient. Uniform cubes result in a better mixture and more evenly cooked chorizo. Resist the urge to grind the meat; the texture of hand-cut pork is essential for authentic Colombian chorizo.
-
Combining the Pork: Place the cubed pork in a large bowl and mix it thoroughly with your hands. This helps to distribute the different cuts of pork evenly.
-
Adding the Aromatics: Add the finely chopped cilantro and green onions to the pork mixture. Mix well to ensure that the herbs are evenly distributed throughout the meat. The fresh herbs are key to the vibrant flavor of this chorizo.
-
Spicing it Up: Add the remaining ingredients: minced garlic, dried oregano, salt, and white vinegar (or lemon juice). Mix everything well with your hands to evenly distribute the spices and flavorings.
-
Adding Water: Gradually add the cold water, mixing it with your hands. I usually add 2 cups initially, mix it in, and then add more water until the mixture becomes sticky but not runny. Continue to hand-mix for about ten minutes to ensure that the water is fully incorporated into the mixture. This is crucial for binding the meat and spices together.
-
Refrigerating Overnight: Cover the stuffing mixture and let it sit in the refrigerator overnight. Allowing the flavors to meld and penetrate the meat is crucial for developing the unique Colombian flavor profile.
-
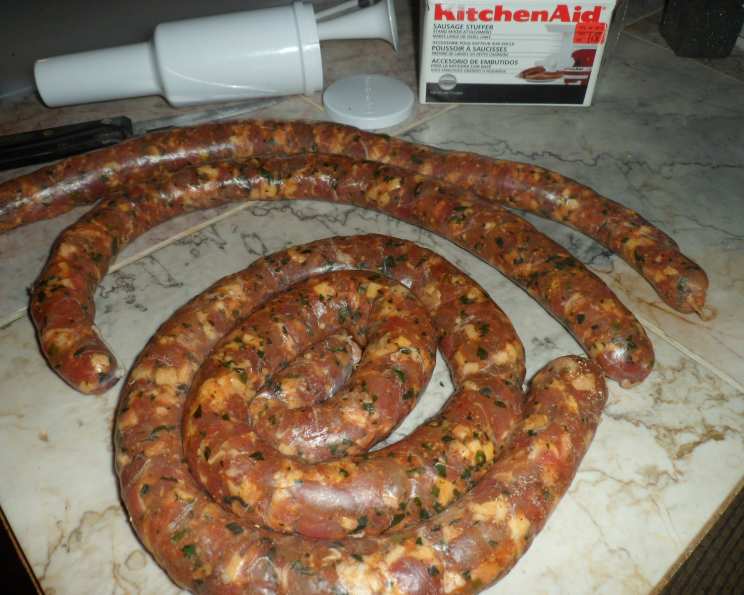
Stuffing the Casings: Tie one end of a casing in a knot. I prefer not to use string because it can sometimes get stuck in your teeth later. Attach the open end of the casing to the sausage stuffer attachment on your KitchenAid mixer (or other sausage stuffer). Carefully feed the meat mixture into the stuffer and begin filling the casings. Stuffing is a process of trial and error. Too tight, and the casings may burst when twisting into links; too loose, and the chorizo will be wrinkly with air pockets. My trick is to stuff one end of the casing fairly full and then very lightly at the other end. This way, I can start twisting from the heavy end, twist, and allow the mixture to move along the length of the casing and fill in the light end.
-
Creating the Links: To make the links, simply twist the stuffed casing two or three times every six inches or so. The length of the links is up to your preference.
-
Preventing Bursting: After the links are done, use a pin or needle to poke three or four holes on each side of each link. This prevents the casings from bursting during cooking.
-
Curing (Optional): This is another step that some may skip, but I find it crucial for authentic flavor. Cure the links for approximately three days, hanging them horizontally from hooks in a cool, dry place. Make sure to place paper towels or newspaper underneath to catch any drippings. Dangling the chorizos vertically may cause the twisted links to unravel somewhat.
-
Cooking the Chorizo: My favorite cooking method is to place the links in a frying pan with enough water to reach about halfway up the sides of the prone link. Turn your burner to low and allow the chorizo to cook slowly until all the water has evaporated, turning occasionally so all sides cook evenly. After the water has evaporated, the chorizo will look kind of whitish and opaque. Continue to fry until dark brown. The fat from the chorizo mixture will escape through the pinholes and will provide enough of a frying medium so that you do not have to add oil or any other frying agent.
Expert Tips & Tricks
- Meat Temperature: Make sure the pork is very cold before cubing. It will be easier to handle and cut cleanly. You can even partially freeze it for about 30 minutes.
- Spice Level: Adjust the amount of salt and oregano to your liking. If you prefer a spicier chorizo, you can add a pinch of cayenne pepper or some finely chopped chili peppers to the mixture.
- Even Cooking: For more even cooking on the stovetop, use a heavy-bottomed skillet. This will distribute the heat more evenly and prevent hot spots.
- Lemon Juice Addition: The addition of lemon juice in conjunction with the vinegar will enhance the flavor of the pork and help to tenderize it.
Serving & Storage Suggestions
Serve Colombian chorizo hot, alongside arepas (corn cakes), patacones (fried plantains), and aji (Colombian hot sauce). It’s also delicious in stews, soups, or scrambled with eggs.
Storage: Uncooked chorizo can be stored in the refrigerator for up to 20 days. For longer storage, freeze the chorizo. Thaw it in the refrigerator overnight before cooking. Cooked chorizo should be stored in an airtight container in the refrigerator for up to 3-4 days. Reheat in a skillet or microwave until heated through.
Nutritional Information
Note: Nutritional information is an estimate and may vary depending on specific ingredients and portion sizes.
| Nutrient | Amount per Serving | % Daily Value |
|---|---|---|
| Calories | 393.9 kcal | N/A |
| Calories from Fat | 271 g | 69% |
| Total Fat | 30.1 g | 46% |
| Saturated Fat | 10.8 g | 54% |
| Cholesterol | 95.2 mg | 31% |
| Sodium | 1701.5 mg | 70% |
| Total Carbohydrate | 1.5 g | 0% |
| Dietary Fiber | 0.5 g | 2% |
| Sugars | 0.4 g | 1% |
| Protein | 27.3 g | 54% |
Variations & Substitutions
- Smoked Jowls: For a smokier flavor, substitute some of the pork belly with smoked hog jowls.
- Lemon Juice: As mentioned, lemon juice is a great replacement for white vinegar in a pinch.
- Chorizo and Eggs: Mix the chorizo in with your eggs for a delicious breakfast treat.
FAQs (Frequently Asked Questions)
Q: Can I use pre-ground pork for this recipe?
A: While it’s possible, I strongly recommend cubing the pork by hand. The texture of hand-cut pork is essential for authentic Colombian chorizo.
Q: How do I know when the chorizo is cooked through?
A: The internal temperature should reach 160°F (71°C). The casings should also be nicely browned and the juices should run clear.
Q: Can I skip the curing step?
A: Yes, you can, but curing enhances the flavor and texture of the chorizo. If you skip it, cook the chorizo within a day or two of making it.
Q: My casings keep bursting when I’m stuffing them. What am I doing wrong?
A: You’re likely overstuffing the casings. Try filling them more loosely and make sure to prick them with a pin or needle to release any trapped air.
Q: Can I cook these on the grill?
A: Absolutely! Grilling adds a wonderful smoky flavor. Just be sure to cook them over medium-low heat to prevent burning.
Final Thoughts
This Colombian chorizo recipe is more than just a set of instructions; it’s a taste of home, a connection to my heritage, and a celebration of simple, flavorful ingredients. I encourage you to try it, experiment with the spices, and create your own version that reflects your personal taste. Whether you’re enjoying it alongside arepas or adding it to a hearty stew, I hope this chorizo brings a little bit of Colombian sunshine to your table. Let me know what you think, and Buen provecho! (Enjoy!)