
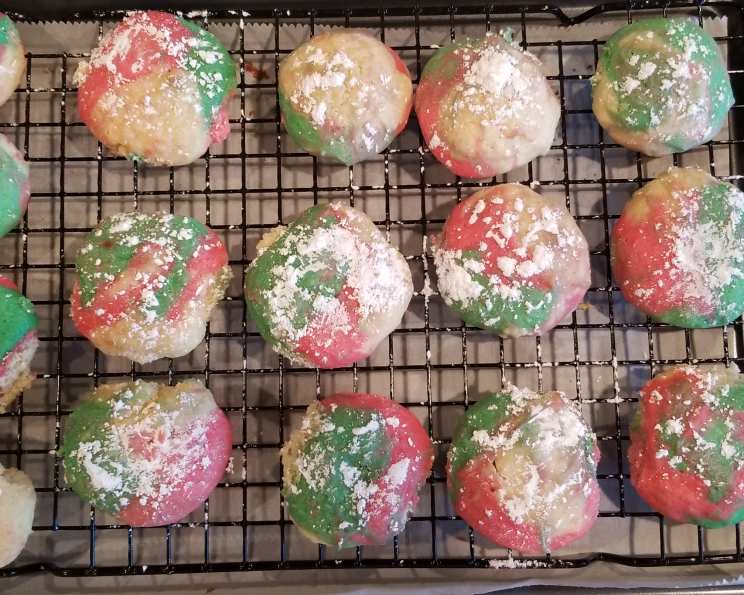
Christmas Cheesecake Cookies: A Festive Twist on a Classic
The first snowfall of the year always makes me crave cookies. Not just any cookies, but the kind that fill the kitchen with warmth and spice, the kind that feel like a hug from the inside out. One year, desperate to impress my family with something new during our annual Christmas Eve baking extravaganza, I stumbled upon a recipe that would become a tradition: Christmas Cheesecake Cookies. These aren’t your average sugar cookies; they’re a tangy, creamy, swirled masterpiece that perfectly captures the spirit of the season. Each bite is a little burst of Christmas magic.
Recipe Overview
- Prep Time: 20 minutes
- Cook Time: 10-11 minutes
- Total Time: 30-31 minutes
- Yields: 3 Dozen
- Dietary Type: Vegetarian
Ingredients
- 8 ounces cream cheese, room temperature
- 1/2 cup butter, room temperature
- 1 1/4 cups granulated sugar
- 2 eggs
- 1 teaspoon vanilla extract
- 2 1/2 cups flour
- 2 teaspoons baking powder
- 1/2 teaspoon salt
- 5 drops red and green food coloring (or as much as needed for desired color)
- 1/2 teaspoon peppermint extract
- 2 tablespoons powdered sugar (optional)
Equipment Needed
- Baking sheets
- Parchment paper or silicone mats
- Mixing bowls (at least 3)
- Electric mixer
- Whisk
- Wire rack
Instructions
- Begin by preheating your oven to 350°F (175°C). Ensure your oven rack is positioned in the center for even baking.
- Line two baking sheets with parchment paper or silicone mats. This prevents the cookies from sticking and makes for easy cleanup.
- In a large mixing bowl, beat together 8 ounces of softened cream cheese and 1/2 cup of softened butter at high speed until the mixture is fluffy and smooth, approximately 1-2 minutes. It is crucial to use room temperature ingredients, as this will ensure a smooth, lump-free batter.
- Add 1 1/4 cups of granulated sugar to the cream cheese mixture and continue beating until fully incorporated and the mixture is light and fluffy, another 1-2 minutes.
- Beat in 2 eggs, one at a time, followed by 1 teaspoon of vanilla extract. Mix for about 1 minute until well combined.
- In a separate, medium-sized bowl, whisk together 2 1/2 cups of flour, 2 teaspoons of baking powder, and 1/2 teaspoon of salt. Whisking ensures even distribution of the baking powder and salt, which is essential for a consistent cookie texture.
- Gradually add the dry ingredients to the wet ingredients, mixing on low speed just until incorporated. Be careful not to over-mix, as this can result in tough cookies.
- Divide the dough into three small bowls. Cover the bowls and refrigerate for 15 minutes. Chilling the dough helps to prevent the cookies from spreading too much during baking.
- Once the dough has chilled, add red food coloring to one bowl of dough and green food coloring to another. Incorporate the food coloring into the dough until you achieve your desired color intensity. Remember, a little food coloring goes a long way! Leave the third bowl of dough plain (white).
- To the bowl of green-colored dough, add 1/2 teaspoon of peppermint extract. Mix until evenly distributed. The peppermint adds a festive, refreshing twist to the cookies.
- The dough will still be slightly sticky after chilling, but it should be easier to work with. If you find the dough too sticky, return it to the refrigerator for a few more minutes.
- To create the marbled effect, take approximately 1/2 tablespoon of each color of dough (red, green, and white) into your hands. Gently roll the dough together between the palms of your hands to create a marbled effect. Be careful not to over-incorporate the dough, as this can muddy the colors.
- Repeat the marbling process for the remaining dough and place the cookie dough balls onto the prepared baking sheets, spacing them about 2 inches apart.
- Bake for 10-11 minutes. The cookies should be light in color, not browned, and just starting to brown on the bottom edges. Remember that baking times can vary depending on your oven, so keep a close eye on them.
- Remove the baking sheets from the oven and let the cookies cool on the baking sheet for a few minutes before transferring them to a wire rack to cool completely.
- Once the cookies are completely cooled, you can optionally dust them with 2 tablespoons of powdered sugar for an extra touch of sweetness and visual appeal.
- Store the cooled cookies in a tightly sealed container for up to a week at room temperature, or in the freezer for up to 3 months.
Expert Tips & Tricks
- For a more intense peppermint flavor, use peppermint extract in both the green and red dough, or even add a few drops to the plain dough.
- If you prefer a tangier flavor, add a teaspoon of lemon juice to the cream cheese mixture.
- To prevent the cookies from spreading too much, make sure your butter and cream cheese are not too soft. They should be softened but still slightly cool to the touch.
- To ensure even baking, rotate the baking sheets halfway through the baking time.
- If you want to add some extra texture, consider incorporating finely chopped nuts, sprinkles, or chocolate chips into the dough.
Serving & Storage Suggestions
These Christmas Cheesecake Cookies are best served at room temperature. They make a delightful addition to any holiday dessert platter or can be enjoyed as a sweet treat with a cup of hot cocoa or coffee.
To store the cookies, place them in an airtight container at room temperature for up to a week. For longer storage, freeze the cookies in a freezer-safe container for up to 3 months. Thaw the cookies at room temperature before serving.
Nutritional Information
| Nutrient | Amount per Serving | % Daily Value |
|---|---|---|
| Calories | 1287.2 kcal | N/A |
| Calories from Fat | 547 g | 43% |
| Total Fat | 60.8 g | 93% |
| Saturated Fat | 35.2 g | 176% |
| Cholesterol | 288.6 mg | 96% |
| Sodium | 1193.3 mg | 49% |
| Total Carbohydrate | 167.2 g | 55% |
| Dietary Fiber | 2.8 g | 11% |
| Sugars | 86.3 g | N/A |
| Protein | 19.8 g | 39% |
Note: Nutritional information is an estimate and may vary based on specific ingredients and serving sizes.
Variations & Substitutions
- Gluten-Free: Substitute the all-purpose flour with a gluten-free blend. Be sure to check the label to ensure it contains xanthan gum or add it separately (about 1 teaspoon per cup of flour).
- Dairy-Free: Use plant-based cream cheese and butter substitutes. Look for brands that are specifically designed for baking for the best results.
- Flavor Variations: Experiment with different extracts, such as almond, lemon, or orange. You can also add spices like cinnamon, nutmeg, or cloves for a warmer flavor profile.
- Color Variations: Use natural food colorings made from fruits and vegetables for a healthier alternative to artificial food colorings. Beet juice can create a vibrant red, and spinach juice can produce a natural green.
FAQs (Frequently Asked Questions)
Q: Why are my cookies spreading too much?
A: Overly soft butter or cream cheese can cause excessive spreading. Make sure your ingredients are softened but still slightly cool. Chilling the dough for a longer period (30 minutes) can also help.
Q: Can I make the dough ahead of time?
A: Yes, you can prepare the dough up to 24 hours in advance. Store it in the refrigerator, tightly wrapped, and allow it to come to room temperature slightly before rolling and baking.
Q: My cookies are dry. What did I do wrong?
A: Overbaking is the most common cause of dry cookies. Be sure to bake them for only 10-11 minutes, or until they are just starting to brown on the bottom.
Q: Can I use gel food coloring instead of liquid?
A: Yes, gel food coloring is often preferred because it’s more concentrated and won’t change the consistency of the dough as much. Start with a very small amount and add more until you achieve your desired color.
Q: How do I get a more defined swirl in my cookies?
A: Avoid over-mixing the dough when creating the marbled effect. Gently roll the dough together a few times, just enough to create a swirl, but not so much that the colors blend completely.
Final Thoughts
Christmas Cheesecake Cookies are more than just a recipe; they are a way to create lasting memories with loved ones. The tangy cheesecake flavor combined with the festive swirls of red and green makes them the perfect treat to share during the holidays. So, gather your ingredients, preheat your oven, and get ready to bake up a batch of Christmas magic. Don’t forget to leave a few out for Santa! And please, share your creations with me – I love seeing how everyone puts their own unique spin on this delightful recipe. Happy baking!