
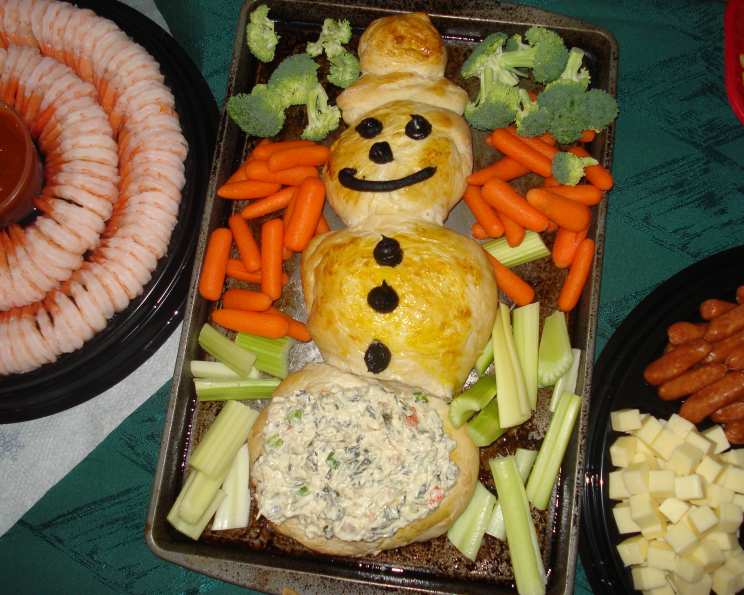
Christmas Snowman Bread for Dip: A Festive Holiday Centerpiece
The scent of baking bread during the holidays is pure magic, instantly transporting me back to childhood Christmases at my grandmother’s house. I remember being mesmerized as she transformed simple ingredients into edible works of art. One year, she crafted a charming snowman entirely out of bread, filled with a creamy spinach dip. It was the highlight of the appetizer spread, a delicious and whimsical creation that sparked joy in everyone, young and old. Now, I’m excited to share my version of this festive treat, a Christmas Snowman Bread that’s as fun to make as it is to devour!
Recipe Overview
- Prep Time: 30 minutes
- Cook Time: 25-30 minutes
- Total Time: 1 hour 5 minutes (includes rising time)
- Servings: 10
- Yield: 1 snowman bread bowl
- Dietary Type: Varies based on dip (can be vegetarian)
Ingredients
- 2 (1 lb) loaves frozen bread dough, thawed
- Black icing or frosting
- 1 egg, lightly beaten
- Ranch dip or spinach dip (about 16 ounces)
- Assorted fresh vegetables (carrots, celery, bell peppers, broccoli florets, cherry tomatoes)
- Crackers
Equipment Needed
- Large baking sheet
- Small bowl
- Pastry brush
- Wire cooling rack
- Sharp knife
- Serrated bread knife
Instructions
-
Prepare the Dough: Gently combine both loaves of thawed bread dough on a lightly floured surface. This creates a larger mass to work with for the snowman’s various parts.
-
Preheat and Prepare: Preheat your oven to 350°F (175°C). Lightly grease a large baking sheet. This will prevent the bread from sticking during baking.
-
Shape the Snowman: To form the snowman’s body, divide the dough into four portions, each slightly larger than the previous one. These will represent the base, the middle, the top, and the hat, from largest to smallest. Roll each portion into a ball. The gradual increase in size creates the characteristic snowman shape.
-
Create the Hat: Take the smallest dough ball to make the snowman’s hat. Shape one small piece of dough into a ball for the top of the hat, and another into a small, round cylinder for the brim. Attach the brim to the base of the hat. Place the finished hat on the prepared baking sheet.
-
Assemble the Body: Flatten each of the remaining three dough balls slightly. Arrange them on the greased baking sheet, one on top of the other, to form the snowman’s body. Leave a little space between each flattened ball to allow for expansion during baking.
-
Egg Wash: In a small bowl, lightly beat the egg. Brush the entire surface of the snowman (body and hat) with the beaten egg. This will give the bread a beautiful golden-brown sheen.
-
Rise Time: Cover the baking sheet with a clean kitchen towel or plastic wrap and let the dough rise in a warm place for about 30-35 minutes, or until doubled in size. The rising time is crucial for a light and airy bread.
-
Bake: Bake in the preheated oven for 25-30 minutes, or until the snowman is golden brown. Keep an eye on it, and if the top starts to brown too quickly, tent it loosely with foil.
-
Cooling: Remove the baked snowman from the oven and transfer it to a wire rack to cool completely. This prevents the bottom from becoming soggy.
-
Prepare the Dip Bowl: Once the snowman has completely cooled, use a sharp knife to cut an oval opening in the lower part of the snowman’s body.
-
Hollow Out: Carefully hollow out the bread inside the oval opening, leaving a shell to hold the dip. Be careful not to puncture the sides or bottom.
-
Cut Dipping Cubes: Cut the bread that you hollowed out into bite-sized cubes for dipping.
-
Decorate: Let the snowman cool completely before decorating. Use black icing or frosting to draw the eyes, nose, mouth, and buttons on the body. If the bread is still warm, the icing will melt.
-
Fill and Serve: Fill the hollowed-out cavity in the snowman’s belly with your choice of dip (ranch or spinach).
-
Arrange and Serve: Surround the entire snowman with the bread cubes, fresh vegetables, and crackers for dipping. Arrange the veggies and crackers artfully around the snowman.
Expert Tips & Tricks
- Dough Handling: Work with the thawed dough on a lightly floured surface to prevent it from sticking.
- Even Baking: To ensure even baking, rotate the baking sheet halfway through the cooking time.
- Customization: Experiment with different types of bread dough, such as whole wheat or sourdough, for a unique flavor.
- Hat Stability: For a more stable hat, you can insert a wooden skewer into the snowman’s head to hold it in place.
- Flavor Boost: Brush the bread with melted garlic butter before baking for an extra layer of flavor.
Serving & Storage Suggestions
Serve the Christmas Snowman Bread immediately after assembling for the best taste and presentation. If you have leftovers, store the dip separately in an airtight container in the refrigerator for up to 3 days. The bread cubes can be stored in an airtight container at room temperature for 1-2 days. The baked snowman itself (without dip) can also be stored at room temperature, wrapped tightly in plastic wrap, for up to 2 days. Reheat bread cubes slightly in a warm oven to refresh.
Nutritional Information
(Estimated values, will vary depending on ingredients used)
| Nutrient | Amount per Serving | % Daily Value |
|---|---|---|
| Calories | 250 kcal | 13% |
| Total Fat | 12g | 18% |
| Saturated Fat | 5g | 25% |
| Cholesterol | 30mg | 10% |
| Sodium | 400mg | 17% |
| Total Carbohydrate | 30g | 10% |
| Dietary Fiber | 2g | 8% |
| Sugars | 4g | – |
| Protein | 6g | 12% |
Variations & Substitutions
- Gluten-Free: Use gluten-free bread dough to make this recipe suitable for those with gluten sensitivities.
- Vegan: Opt for a vegan ranch or spinach dip made with plant-based ingredients. Ensure the bread dough is also vegan-friendly (check for eggs or dairy).
- Different Dips: Instead of ranch or spinach dip, try using hummus, guacamole, or a cheese dip.
- Vegetable Variety: Customize the accompanying vegetables based on your preferences and what’s in season.
- Cheese Topping: Sprinkle shredded cheese over the snowman before baking for a cheesy twist.
FAQs (Frequently Asked Questions)
Q: Can I make the snowman ahead of time?
A: Yes, you can bake the snowman a day ahead and store it at room temperature, wrapped tightly in plastic wrap. Decorate and fill with dip just before serving.
Q: Can I use pre-made bread dough instead of frozen?
A: Absolutely! Just make sure the dough is of similar weight to the frozen dough specified in the recipe (approximately 2 pounds total).
Q: How do I prevent the bread from becoming soggy after filling it with dip?
A: Ensure the snowman is completely cooled before adding the dip. You can also brush the inside of the hollowed-out cavity with melted butter or a thin layer of cream cheese to create a barrier.
Q: What if the top of the snowman is browning too quickly in the oven?
A: Tent the baking sheet loosely with aluminum foil to prevent the top from burning.
Q: Can I use different colors of icing to decorate the snowman?
A: Of course! Get creative with your decorating and use different colors of icing to add personality to your snowman.
Final Thoughts
This Christmas Snowman Bread for Dip is more than just a recipe; it’s an experience. It’s about creating a centerpiece that sparks conversation, delights the taste buds, and brings a touch of whimsy to your holiday gathering. I encourage you to try this recipe and share your own unique creations. Whether you stick to the classic version or add your own personal flair, I hope this snowman brings joy and laughter to your table this holiday season! Happy baking!