
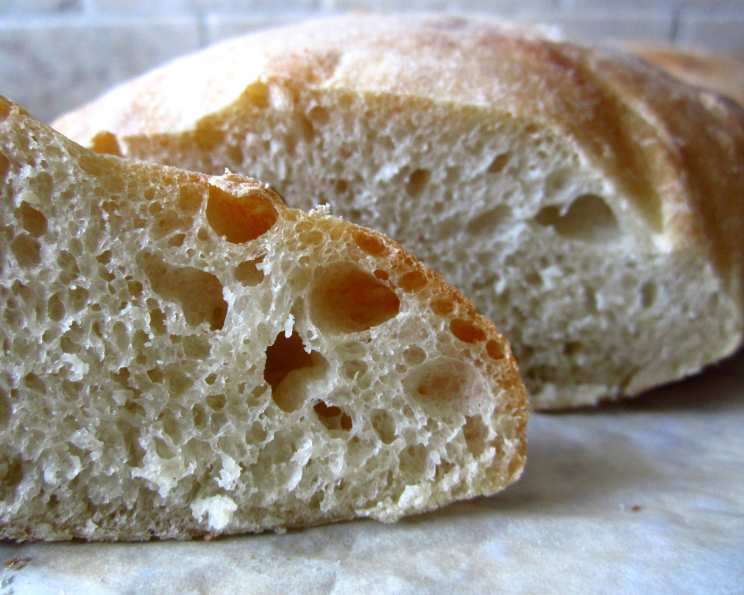
Ciabatta: An Old Italian Bread Recipe
The scent of baking bread holds a special place in my heart, a nostalgic echo of my Nonna’s kitchen. I vividly remember the warmth radiating from her ancient oven as she pulled out loaves of rustic bread, their crusts crackling invitingly. Ciabatta, with its irregular shape and airy interior, was a particular favorite, and I always stole a piece fresh from the oven, the simple taste of flour, water, and salt a comforting embrace. It’s a flavor I’ve spent years trying to recreate, a pursuit culminating in this recipe, a tribute to those cherished memories.
Recipe Overview
- Prep Time: 20 minutes (plus 12-24 hours for sponge)
- Cook Time: 20 minutes
- Total Time: 12 hours 40 minutes to 24 hours 20 minutes
- Servings: 10-12
- Yield: 2 loaves
- Dietary Type: Vegetarian
Ingredients
For the Sponge:
- ⅛ teaspoon active dry yeast
- 2 tablespoons warm water (110°F/45°C)
- ⅓ cup warm water
- 1 cup bread flour
For the Bread:
- ½ teaspoon active dry yeast
- 2 tablespoons warm milk (110°F/45°C)
- ⅔ cup warm water
- 1 tablespoon olive oil
- 2 cups bread flour
- 1 ½ teaspoons salt
Equipment Needed
- Small mixing bowls
- Large mixing bowl
- Plastic wrap
- Standing electric mixer with dough hook (optional but recommended)
- Oiled bowl
- Well-floured work surface
- Parchment paper
- Rimless baking sheet
- Baking stone or tiles
- Dampened kitchen towel
- Wire rack
Instructions
-
Making the Sponge: In a small bowl, stir together ⅛ teaspoon of the yeast and 2 tablespoons of the warm water. Let it stand for 5 minutes, or until creamy and frothy, indicating the yeast is active. This is a crucial step, so don’t skip it!
-
In a separate, larger bowl, stir together the yeast mixture, ⅓ cup of warm water, and 1 cup of bread flour. Stir vigorously for about 4 minutes to develop the gluten structure. The mixture will be somewhat shaggy at this point, and that’s perfectly fine.
-
Cover the bowl tightly with plastic wrap. Let the sponge stand at a cool room temperature (ideally around 65-70°F) for at least 12 hours and up to 24 hours. The longer it ferments, the more complex the flavor of your ciabatta will be. You’ll know it’s ready when it’s bubbly and has a slightly sour aroma.
-
Making the Bread: In a small bowl, stir together ½ teaspoon of the yeast and 2 tablespoons of the warm milk. Let it stand for 5 minutes, or until creamy, just like you did with the sponge starter.
-
In the bowl of a standing electric mixer fitted with the dough hook (or in a large bowl if mixing by hand), blend together the milk mixture, the sponge (it’s okay if it’s sticky!), ⅔ cup of warm water, 1 tablespoon of olive oil, and 2 cups of bread flour at low speed until the flour is just moistened. Be careful not to overmix at this stage.
-
Add 1 ½ teaspoons of salt and continue to mix until the dough is smooth and elastic, about 8 minutes on medium-low speed with the mixer. If mixing by hand, this will take significantly longer, about 10-12 minutes of vigorous kneading. The dough will be very sticky – don’t be tempted to add more flour! This high hydration is what gives ciabatta its characteristic airy texture.
-
Scrape the sticky dough into a lightly oiled bowl, turning it to coat all sides. This will prevent it from drying out during the rising process.
-
Cover the bowl tightly with plastic wrap. Let the dough rise at room temperature until doubled in bulk, about 1 ½ hours. This is where the magic happens! The dough will be very sticky and full of air bubbles.
-
Turn the dough out onto a very well-floured work surface. Generously flour your hands as well. Gently cut the dough in half.
-
Transfer each half to a separate parchment paper sheet. Carefully form each piece into an irregular oval shape, about 9 inches long. Don’t worry about perfection; the rustic shape is part of ciabatta’s charm.
-
Dimple the loaves all over with your floured fingers. This helps to distribute the air bubbles and prevents them from becoming too large during baking. Then, generously dust the tops of the loaves with flour.
-
Cover the loaves loosely with a dampened kitchen towel. Let them rise at room temperature until almost doubled in bulk, about 1 ½ to 2 hours. This is the final proofing stage, allowing the dough to become light and airy.
-
Preheat your oven to 425°F (220°C). At least 45 minutes before baking, place a baking stone or tiles on the oven rack in the lowest position. This helps to create a hot, even baking surface, resulting in a crispier crust.
-
Transfer one loaf, still on its parchment paper, to a rimless baking sheet. Position the baking sheet so that a long side of the loaf is parallel to the far edge of the baking sheet. Line up the far edge of the baking sheet with the far edge of the baking stone or tiles. Then, tilt the baking sheet to gently slide the loaf, still on its parchment, onto the back half of the stone or tiles. Repeat with the remaining loaf, placing it on the front half of the stone.
-
Bake the ciabatta loaves for 20 minutes, or until they are pale golden brown. The color should be a light, inviting golden hue.
-
Cool the loaves completely on a wire rack before slicing and serving. This allows the interior to set properly and prevents a gummy texture.
Expert Tips & Tricks
- Don’t overmix the dough: Overmixing can lead to a tough ciabatta. Mix until just combined, then let time do the work.
- Handle the dough gently: Ciabatta dough is delicate. Be careful not to deflate it during shaping and transferring.
- Use a baking stone: A baking stone is essential for achieving a crispy crust. If you don’t have one, you can use a baking sheet, but the crust won’t be quite as good.
- Proof in a warm place: If your kitchen is cold, proof the dough in a slightly warmed oven (turned off!) or near a warm stovetop.
- For a deeper flavor: Let the sponge ferment for the full 24 hours.
- If the sponge seems dry: Don’t add more water! The sponge will become bubbly and frothy as it ferments.
Serving & Storage Suggestions
Serve ciabatta fresh, sliced, and drizzled with olive oil, or use it to make sandwiches, bruschetta, or panini. It’s also delicious dipped in soups or stews.
Store leftover ciabatta in an airtight container at room temperature for up to 2 days. For longer storage, freeze it whole or sliced for up to 2 months. To reheat, wrap in foil and bake at 350°F (175°C) for 10-15 minutes, or until warmed through. You can also refresh the crust by briefly placing it under the broiler.
Nutritional Information
| Nutrient | Amount per Serving | % Daily Value |
|---|---|---|
| Calories | 150 kcal | 8% |
| Total Fat | 2g | 3% |
| Saturated Fat | 0.5g | 2% |
| Cholesterol | 0mg | 0% |
| Sodium | 300mg | 13% |
| Carbohydrates | 28g | 10% |
| Fiber | 1g | 4% |
| Sugar | 0g | 0% |
| Protein | 4g | 8% |
Nutritional information is an estimate and may vary based on specific ingredients and preparation methods.
Variations & Substitutions
- Whole Wheat Ciabatta: Substitute up to 50% of the bread flour with whole wheat flour for a nuttier flavor and added fiber.
- Herb Ciabatta: Add 1-2 tablespoons of chopped fresh herbs, such as rosemary, thyme, or oregano, to the dough along with the salt.
- Olive Ciabatta: Add ½ cup of pitted and chopped Kalamata olives to the dough along with the salt.
- Garlic Ciabatta: Add 2-3 cloves of minced garlic to the dough along with the salt.
- Gluten-Free Ciabatta: Substitute the bread flour with a high-quality gluten-free bread flour blend. You may need to adjust the amount of water depending on the blend you use.
FAQs (Frequently Asked Questions)
Q: Why is my ciabatta dough so sticky?
A: Ciabatta dough is naturally very sticky due to its high hydration level. Don’t be tempted to add more flour! Embrace the stickiness and use plenty of flour on your work surface and hands.
Q: Can I make the sponge ahead of time?
A: Yes, you can make the sponge up to 2 days in advance. Store it in the refrigerator, covered tightly with plastic wrap. Let it come to room temperature before using it in the bread recipe.
Q: Why isn’t my ciabatta as airy as it should be?
A: Several factors can affect the airiness of ciabatta, including overmixing the dough, not proofing it long enough, or not using a baking stone. Make sure to follow the recipe instructions carefully and be patient during the rising process.
Q: My parchment paper burned in the oven. Is this normal?
A: A little bit of browning on the edges of the parchment paper is normal. However, if it’s burning excessively, you can try lowering the oven temperature slightly or using a double layer of parchment paper.
Q: Can I freeze ciabatta?
A: Yes, ciabatta freezes well. Wrap it tightly in plastic wrap or place it in a freezer bag. It will keep for up to 2 months. Thaw it at room temperature before reheating.
Final Thoughts
Ciabatta is more than just bread; it’s an experience, a journey back to simpler times. Its rustic charm and delightful texture make it a versatile companion to countless meals. Don’t be intimidated by the longer prep time; the active effort is minimal, and the reward is a taste of Italy in your own kitchen. I encourage you to try this recipe, experiment with different variations, and share your creations with friends and family. And, of course, let me know how it turns out! Buon appetito!