
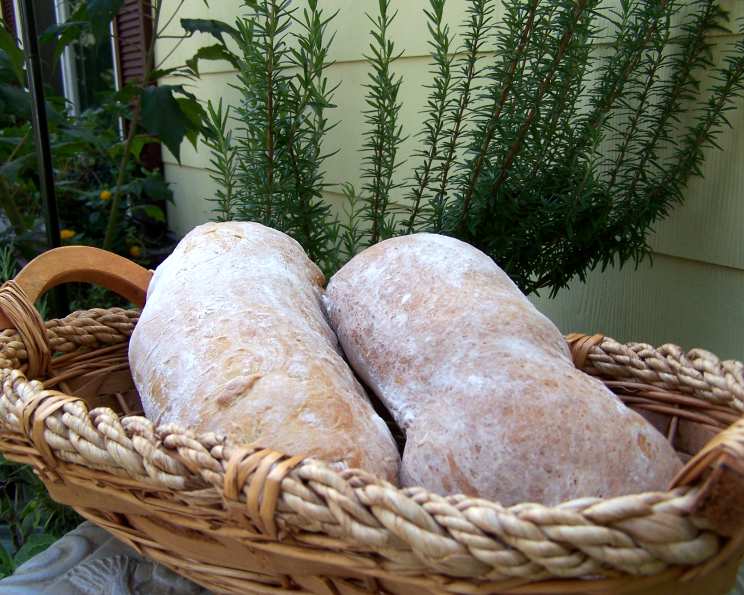
Ciabatta with Hints of Rosemary: An Artisan Bread Made Easy
I remember the first time I tasted true ciabatta. It was in a tiny trattoria tucked away on a cobbled street in Rome. The crust crackled in my hand, yielding to a chewy, airy interior, and the subtle aroma of olive oil and something vaguely herbal filled my senses. It was an epiphany – bread elevated to an art form. I’ve spent years since trying to replicate that rustic perfection, and this bread machine recipe, infused with the fragrant essence of rosemary, is the closest I’ve come to capturing that Roman magic in my own kitchen.
Recipe Overview
- Prep Time: 20 minutes
- Rise Time: Approximately 13 hours
- Cook Time: 25-30 minutes
- Total Time: Approximately 13 hours, 50 minutes
- Yield: 2 loaves
- Servings: 20
- Dietary Type: Vegetarian
Ingredients
For the Biga:
- 7/8 cup water
- 1 1/2 cups bread flour
- 1/2 teaspoon fast-rising active dry yeast
For the Dough:
- 7/8 cup water
- 1/4 cup buttermilk
- 2 tablespoons olive oil
- 3 cups bread flour
- 1/4 teaspoon fresh rosemary, minced
- 1 1/2 teaspoons salt
- 1/2 teaspoon sugar
- 1/4 teaspoon yeast
Equipment Needed
- Bread Machine
- Two large bowls
- Plastic wrap
- Two cookie sheets
- Oven
Instructions
- Prepare the Biga: Add the water, bread flour, and fast-rising active dry yeast to your bread machine pan, following the manufacturer’s instructions for the order of ingredients (typically wet ingredients first, then dry).
- Knead and Rest: Set the bread machine to the dough cycle. Start the machine and allow it to knead the biga ingredients for 5 minutes. After kneading, turn the machine off and let the biga rise in the bread machine for at least 12 hours, or overnight. This extended fermentation is crucial for developing the ciabatta’s characteristic flavor and airy texture.
- Add the Dough Ingredients: Once the biga has risen, add the water, buttermilk, and olive oil to the bread machine pan, pouring them over the biga. Then, add the bread flour and minced rosemary. Place the salt, sugar, and remaining yeast in separate corners of the bread machine pan to prevent them from interacting directly before the kneading process begins.
- Second Kneading and Rise: Set the bread machine to the basic dough setting and press start. Let the machine complete its dough cycle, which includes kneading and a first rise.
- Divide and Shape: When the dough cycle is finished, gently remove the dough from the bread machine. Divide the dough into two equal portions. Place each portion into a separate bowl that has been lightly coated with olive oil. Cover the bowls tightly with oiled plastic wrap.
- First Proof: Place the bowls in a warm, draft-free location and let the dough rise until it has tripled in size, approximately 1 hour. This bulk fermentation is essential for creating the signature air pockets of ciabatta.
- Prepare Baking Sheets: Lightly flour two cookie sheet pans to prevent the dough from sticking.
- Gently Transfer and Shape: Carefully transfer each portion of dough onto the prepared cookie sheets. With lightly floured hands, gently shape each dough portion into a rough rectangle, approximately one inch thick. Be extremely careful not to deflate the dough or release any of the air bubbles formed during the rise. The irregular shape is part of ciabatta’s charm, so don’t aim for perfect uniformity.
- Second Proof: Lightly sprinkle the shaped dough with flour. Cover loosely and let it rise again in a warm, draft-free location for 30 minutes. This final proof allows the dough to relax and expand further.
- Preheat Oven: Preheat your oven to 425 degrees Fahrenheit.
- Bake: Bake the ciabatta loaves for 25-30 minutes, or until they are golden brown and sound hollow when tapped on the bottom.
- Create a Crisp Crust: For a truly authentic, crisp crust, spray the loaves with water several times during the first 10 minutes of baking. Alternatively, you can place a couple of ice cubes on the bottom rack of the oven to create steam, which will also help to achieve a crisp crust.
- Cool: Once baked, transfer the ciabatta loaves to a wire rack to cool completely before slicing and serving.
Expert Tips & Tricks
- Don’t Overmix: Avoid the temptation to add more flour during the kneading process. The dough should be very moist, almost sticky. This high hydration is what creates the open crumb structure.
- Handle with Care: Be gentle when handling the dough to avoid deflating it. Use floured hands and a light touch.
- Steam is Key: The steam generated during baking is essential for a crisp crust. If you don’t have a spray bottle, try placing a pan of hot water on the bottom rack of the oven.
- Experiment with Rosemary: Feel free to adjust the amount of rosemary to suit your taste. You can also add other herbs, such as thyme or oregano.
- Make-Ahead Biga: The biga can be made up to 2 days in advance and stored in the refrigerator. Bring it to room temperature before using.
Serving & Storage Suggestions
Ciabatta is best served fresh, ideally within a few hours of baking. Its rustic charm makes it a perfect accompaniment to soups, salads, and sandwiches. Slice it horizontally and use it for panini, or serve it alongside a cheese board for a delightful appetizer.
To store, wrap cooled ciabatta tightly in a plastic bag or bread bag. It will keep at room temperature for 1-2 days. For longer storage, freeze the bread, tightly wrapped, for up to 2 months. To reheat frozen ciabatta, thaw it at room temperature and then bake it in a preheated oven at 350 degrees Fahrenheit for 5-10 minutes, or until warmed through and the crust is crisp.
Nutritional Information
Here’s an approximate nutritional breakdown per serving:
| Nutrient | Amount per Serving | % Daily Value |
|---|---|---|
| Calories | 117 kcal | N/A |
| Total Fat | 1.7g | 2% |
| Saturated Fat | 0.2g | 1% |
| Cholesterol | 0.1mg | 0% |
| Sodium | 179mg | 7% |
| Total Carbohydrate | 21.9g | 7% |
| Dietary Fiber | 0.8g | 3% |
| Sugars | 0.3g | N/A |
| Protein | 3.1g | 6% |
Note: Nutritional information is an estimate and may vary based on specific ingredients and preparation methods.
Variations & Substitutions
- Garlic Rosemary Ciabatta: Add 1-2 cloves of minced garlic along with the rosemary for a more pungent flavor.
- Olive Ciabatta: Incorporate 1/2 cup of chopped Kalamata olives into the dough for a briny, Mediterranean twist.
- Whole Wheat Ciabatta: Substitute up to 1 cup of the bread flour with whole wheat flour for a nuttier flavor and added fiber.
- Herb Blend: Experiment with different herb combinations, such as thyme and oregano, or basil and parsley.
- Vegan Ciabatta: Replace the buttermilk with a non-dairy alternative, such as almond milk or soy milk.
FAQs (Frequently Asked Questions)
Q: Why is my ciabatta dough so sticky?
A: Ciabatta dough is naturally very hydrated, which makes it sticky. Resist the urge to add more flour, as this will result in a denser bread. Use floured hands to handle the dough and work on a floured surface.
Q: Can I make this recipe without a bread machine?
A: Yes, you can make this recipe by hand or with a stand mixer. Knead the dough for 10-12 minutes until it is smooth and elastic, and then follow the rising and baking instructions.
Q: How do I get those big air pockets in my ciabatta?
A: The key to achieving the characteristic air pockets is the high hydration of the dough, the long fermentation (biga), and gentle handling to avoid deflating the dough.
Q: My ciabatta crust is not as crisp as I’d like. What can I do?
A: Make sure to use the steam method during baking, either by spraying the loaves with water or placing ice cubes in the oven. You can also try increasing the baking temperature slightly during the last few minutes.
Q: Can I freeze ciabatta dough?
A: While it’s best to bake the ciabatta fresh, you can freeze the dough after the first rise. Divide the dough into portions, wrap tightly in plastic wrap, and freeze for up to 2 months. Thaw overnight in the refrigerator and let rise before baking.
Final Thoughts
There’s something deeply satisfying about creating your own bread, and this rosemary-infused ciabatta is no exception. The combination of the simple ingredients, the patient fermentation, and the satisfying aroma that fills your kitchen as it bakes makes it a truly rewarding experience. Don’t be intimidated by the slightly unconventional dough – embrace its stickiness, trust the process, and you’ll be rewarded with a loaf of rustic, flavorful ciabatta that rivals anything you’d find in a Roman bakery. Share it with friends, dip it in olive oil, and savor the simple pleasure of homemade bread. I encourage you to give this recipe a try and share your creations! Buon appetito!