
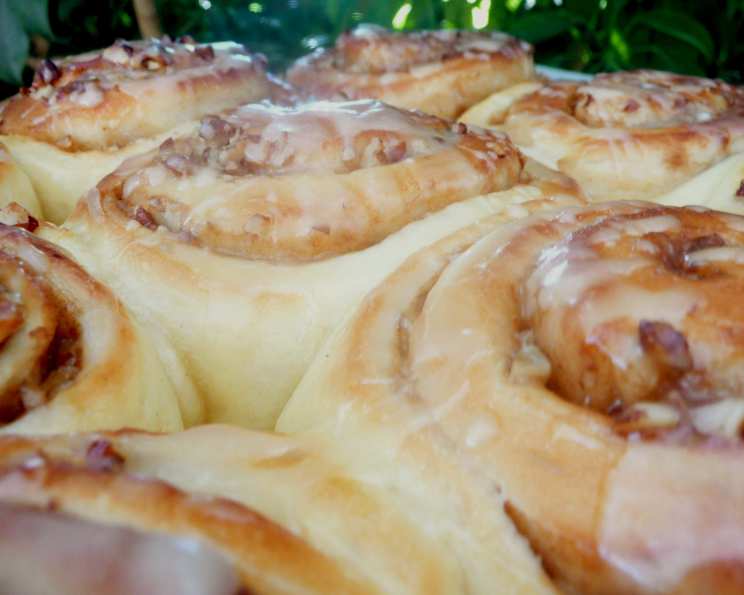
Bread Machine Cinnamon Buns: A Slice of Nostalgia
The scent of cinnamon, sugar, and warm dough baking… it’s a time machine, really. It instantly transports me back to my grandmother’s kitchen, a place perpetually filled with love and the aroma of freshly baked treats. Her cinnamon buns were legendary, a weekend staple that we devoured with gusto. While I can’t replicate her exact touch (it’s always a little magic in grandmothers, isn’t it?), this bread machine recipe comes incredibly close, bringing that same comforting warmth and deliciousness to my own kitchen.
Recipe Overview
- Prep Time: 20 minutes
- Rise Time: 1 hour 45 minutes to 2 hours 15 minutes (including dough cycle)
- Cook Time: 15 minutes
- Total Time: 2 hours 40 minutes to 3 hours
- Yields: 12 buns
- Serves: 12
- Dietary Type: Vegetarian
Ingredients
-
For the Dough:
- ¾ cup water
- 1 egg, lightly beaten
- 2 teaspoons vanilla extract
- 3 cups all-purpose flour
- 6 tablespoons sugar
- ¼ cup softened butter
- 1 teaspoon salt
- 2 tablespoons dry milk
- 1 ½ teaspoons yeast
-
For the Filling:
- ¼ cup butter, melted
- ⅓ cup brown sugar, mixed with
- 1 teaspoon cinnamon
- ½ cup finely chopped pecans (optional) or ½ cup raisins (optional)
-
For the Icing:
- 3 tablespoons butter
- 1 teaspoon vanilla
- 3 tablespoons hot water
- 2 cups confectioners’ sugar
Equipment Needed
- Bread Machine
- Measuring cups and spoons
- Liquid measuring cup
- Mixing bowl
- Rolling pin
- Pastry brush
- Pizza cutter or sharp knife
- Baking sheet
- Medium saucepan
- Whisk
Instructions
- Prepare the Dough: Add the dough ingredients to your bread machine pan in the order recommended by the manufacturer. This is crucial for proper mixing and rising. In most machines, you’ll start with the liquids (water, egg, vanilla extract), followed by the dry ingredients (flour, sugar, softened butter, salt, dry milk), and finally the yeast.
- Start the Dough Cycle: Set your bread machine to the dough cycle. This cycle typically includes kneading and a period for rising. The entire cycle usually takes between 45 minutes to 1 hour and 30 minutes, depending on your machine.
- Prepare for Shaping: Once the dough cycle is complete, gently turn the dough out onto a lightly floured surface.
- Roll Out the Dough: Using a rolling pin, roll the dough into a rectangle approximately 10×18 inches. Aim for an even thickness for consistent baking.
- Add the Filling: Brush the entire surface of the dough rectangle with the melted butter.
- Sprinkle with Cinnamon-Sugar: Evenly sprinkle the cinnamon-sugar mixture over the buttered dough.
- Add Optional Nuts or Raisins: If using, sprinkle the finely chopped pecans or raisins over the cinnamon-sugar mixture.
- Roll Up the Dough: Starting at one of the long ends, carefully and tightly roll up the dough into a log. Pinch the seam to seal it securely. This will prevent the buns from unrolling during baking.
- Slice the Buns: Using a sharp knife or pizza cutter, measure and cut the dough log into 1-inch slices. Try to keep the slices uniform for even baking and a professional look.
- Arrange on Baking Sheet: Place the cut cinnamon bun slices, cut side up, on a buttered baking sheet. Give them some space to expand during the second rise.
- Second Rise: Cover the baking sheet with a slightly dampened towel to prevent the buns from drying out. Place the covered baking sheet in a warm place and let the buns rise for approximately 45 minutes to 1 hour. The buns should nearly double in size.
- Bake: Preheat your oven to 375°F (190°C).
- Bake the Buns: Bake the cinnamon buns for 15 minutes, or until they are golden brown on top. Keep a close eye on them to prevent burning. If they start to brown too quickly, you can loosely tent them with foil.
- Prepare the Icing: While the buns are baking, prepare the icing. In a medium saucepan, melt the butter over low heat.
- Add Hot Water and Vanilla: Remove the saucepan from the heat and stir in the hot water and vanilla.
- Incorporate Confectioners’ Sugar: Gradually add the confectioners’ sugar to the saucepan, stirring continuously until smooth.
- Adjust Consistency (if needed): If the icing is too thick, add more hot water, ½ to 1 teaspoon at a time, until you reach your desired consistency. You want it to be pourable but not too thin.
- Glaze the Buns: Once the cinnamon buns are out of the oven, drizzle them generously with the cinnamon bun glaze while they are still warm. The warmth will help the glaze melt and soak into the buns.
- Serve and Enjoy: Let the glazed cinnamon buns cool slightly before serving. They are best enjoyed warm!
Expert Tips & Tricks
- Yeast is Key: Make sure your yeast is fresh. Expired yeast won’t rise properly, resulting in dense, flat buns. You can test your yeast by adding it to warm water with a pinch of sugar. If it foams up within 5-10 minutes, it’s good to go.
- Soft Butter is Important: Using softened butter (not melted!) in the dough is crucial for a tender crumb. Take the butter out of the fridge about an hour before you start baking.
- Don’t Overbake: Overbaked cinnamon buns will be dry and tough. Check them frequently during the last few minutes of baking.
- Make-Ahead Option: Prepare the cinnamon buns up to the point of baking. Place the unbaked buns on the baking sheet, cover tightly with plastic wrap, and refrigerate overnight. In the morning, let them sit at room temperature for about 30 minutes before baking as directed.
- Spice it Up: Experiment with different spices in the filling, such as nutmeg, cardamom, or ginger. A pinch of allspice can also add a warm, cozy flavor.
- Cream Cheese Icing: For a richer, tangier icing, substitute some of the butter with cream cheese. Use about 2 tablespoons of softened cream cheese and 1 tablespoon of butter.
Serving & Storage Suggestions
Cinnamon buns are best served warm, ideally within a few hours of baking. The warm, gooey filling and soft dough are simply irresistible. To make them even more decadent, you can serve them with a scoop of vanilla ice cream or a dollop of whipped cream. They pair wonderfully with a hot cup of coffee or tea.
To store leftover cinnamon buns, let them cool completely and then wrap them individually in plastic wrap or store them in an airtight container. They will keep at room temperature for up to 2 days, in the refrigerator for up to 4 days, or in the freezer for up to 2 months.
To reheat, wrap the cinnamon buns in foil and bake in a preheated oven at 350°F (175°C) for about 10-15 minutes, or until warmed through. You can also microwave them for 20-30 seconds, but be careful not to overheat them, as they can become tough.
Nutritional Information
| Nutrient | Amount per Serving | % Daily Value |
|---|---|---|
| Calories | 349.9 kcal | N/A |
| Calories from Fat | N/A | N/A |
| Total Fat | 11.6 g | 17% |
| Saturated Fat | 7.1 g | 35% |
| Cholesterol | 44.7 mg | 14% |
| Sodium | 301.1 mg | 12% |
| Total Carbohydrate | 57.1 g | 19% |
| Dietary Fiber | 1.1 g | 4% |
| Sugars | 32.5 g | N/A |
| Protein | 4.4 g | 8% |
Note: Nutritional information is an estimate and may vary based on specific ingredients and portion sizes.
Variations & Substitutions
- Vegan Cinnamon Buns: Substitute the egg with flax egg (1 tablespoon ground flaxseed mixed with 3 tablespoons water, let sit for 5 minutes), the butter with vegan butter, and the dry milk with non-dairy milk powder.
- Gluten-Free Cinnamon Buns: Use a gluten-free all-purpose flour blend. You may need to add a bit more liquid to achieve the right dough consistency.
- Orange Zest: Add 1 teaspoon of orange zest to the dough for a bright, citrusy flavor.
- Apple Cinnamon Buns: Add ½ cup of finely diced apples to the cinnamon-sugar filling for a fall-inspired treat.
- Maple Icing: Replace the vanilla extract in the icing with maple extract and use maple syrup instead of hot water for a richer, more complex flavor.
FAQs (Frequently Asked Questions)
Q: Can I use active dry yeast instead of instant yeast?
A: Yes, you can. However, you’ll need to proof the active dry yeast in warm water with a pinch of sugar for about 5-10 minutes before adding it to the bread machine.
Q: My cinnamon buns are too dry. What did I do wrong?
A: Overbaking is the most common cause of dry cinnamon buns. Be sure to check them frequently during the last few minutes of baking and remove them from the oven as soon as they are golden brown.
Q: Can I freeze the dough?
A: Yes, you can freeze the dough after the first rise (after the dough cycle in the bread machine is complete). Wrap it tightly in plastic wrap and freeze for up to 2 months. Thaw overnight in the refrigerator before rolling out and shaping.
Q: My bread machine doesn’t have a dough cycle. What should I do?
A: If your bread machine doesn’t have a dough cycle, you can use the “sweet bread” or “basic bread” cycle, but be sure to monitor the dough closely and stop the cycle after the kneading and first rise are complete.
Q: Can I make the icing ahead of time?
A: Yes, you can make the icing ahead of time and store it in the refrigerator. However, it will thicken as it cools, so you may need to add a little more hot water to thin it out before using.
Final Thoughts
There’s something truly special about homemade cinnamon buns. The aroma fills your home with warmth and comfort, and the taste is simply divine. This bread machine recipe makes it easier than ever to enjoy these classic treats. So, go ahead, give it a try! Share your creations with friends and family, and don’t forget to leave a comment below to let me know how they turned out. Perhaps pair these warm delights with a frothy cappuccino for the ultimate brunch indulgence. Happy baking!