
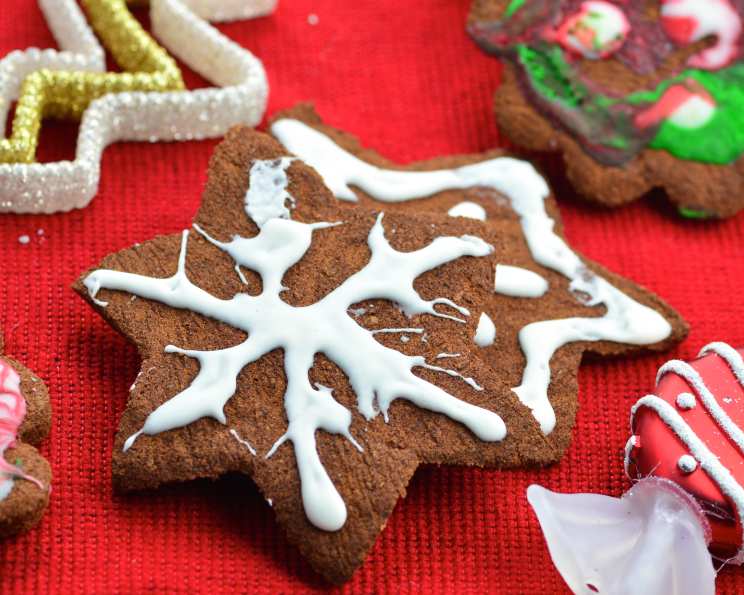
Cinnamon Ornament Dough: A Holiday Tradition
I can still remember the scent of cinnamon clinging to the air as a child, during the holidays. Not from a spice rack, or a hastily-baked batch of cookies, but from a craft project my grandmother orchestrated every year: cinnamon ornaments. We’d gather around her big kitchen table, sticky dough clinging to our fingers, and transform simple ingredients into fragrant keepsakes. Those ornaments, carefully decorated with puffy paint and glitter, adorned our Christmas tree for years, each one a tangible reminder of laughter, love, and the magic of the season.
Recipe Overview
- Prep Time: 10 minutes
- Cook Time: 4 hours
- Total Time: 8 hours 10 minutes (includes drying time)
- Yields: 10 ornaments
- Dietary Type: Vegan (depending on decorating materials)
Ingredients
- ½ cup ground cinnamon
- ½ cup store-bought applesauce
For Decorating (Optional):
- Tulip puffy fabric paint in matte white
- White acrylic paint
- White glue
- Beads or glitter
- Cookie cutters
Equipment Needed
- Mixing bowl
- Rolling pin
- Parchment paper
- Baking sheet
- Straw or skewer
- Oven
Instructions
- In a mixing bowl, pour the ground cinnamon.
- Gradually add the applesauce to the cinnamon, stirring continuously until a stiff dough forms. The consistency should be similar to playdough. If the mixture is too sticky, add a little more cinnamon, a tablespoon at a time.
- Lightly dust your work surface with extra cinnamon. This will prevent the dough from sticking.
- Roll out the dough to a thickness of approximately 1/8 to 1/4 inch. The thinner the dough, the more delicate the ornaments will be, but also the more fragile.
- Cut out your desired shapes using cookie cutters. Get creative! Stars, hearts, gingerbread men, and snowflakes all work wonderfully.
- Using a straw or skewer, punch a hole at the top of each ornament. This hole will be used to hang the ornament on the tree. Make sure the hole is large enough to accommodate your chosen ribbon or hook.
- Preheat your oven to 200°F (93°C).
- Line a baking sheet with parchment paper.
- Carefully transfer the cut-out ornaments to the parchment-lined baking sheet, ensuring they are not touching each other.
- Bake at 200°F (93°C) for approximately 4 hours, or until the ornaments are very dry and very hard. The baking time may vary depending on the thickness of your ornaments and the humidity in your kitchen. Check them periodically, turning them over halfway through the baking time to ensure even drying. The goal is to dehydrate the ornaments, not to bake them like cookies. They should be firm to the touch when they’re done.
- Once baked, allow the ornaments to cool completely to room temperature on the baking sheet. They will harden further as they cool.
- Now for the fun part: decorating! The Tulip puffy fabric paint mimics the look of royal icing, allowing you to create intricate designs on your “cookies.”
- If you used a cookie cutter that imprints a design on your ornaments, you can use a dry paintbrush with white acrylic paint to highlight the design and give your “cookies” a powdered sugar look. Lightly brush the paint over the raised areas of the design, then wipe away the excess with a clean, dry cloth.
- Alternatively, you can decorate your ornaments with beads and glitter for added sparkle. Adhere the beads and glitter to the ornaments using white glue.
- Once the decorations are dry, thread a ribbon, twine, or hook through the hole at the top of each ornament and hang them on your tree!
Expert Tips & Tricks
- Prevent cracking: To minimize cracking during baking, ensure the dough is evenly rolled out and the oven temperature remains consistent. If you notice cracking, slightly reduce the oven temperature.
- Enhance the scent: Add a few drops of cinnamon essential oil to the dough for an extra boost of fragrance.
- Create textured ornaments: Use textured rolling pins or stamps to add depth and interest to your ornaments before baking.
- Customize your cutters: If you don’t have cookie cutters, use a sharp knife to cut out freehand shapes.
- Drying time: If you live in a humid climate, it may take longer for the ornaments to dry completely. Consider placing them in a very low oven (around 170°F) for an extended period or using a dehydrator.
Serving & Storage Suggestions
These cinnamon ornaments are intended for decorative purposes only and are not edible. They make wonderful additions to your Christmas tree, wreaths, garlands, or as gift toppers.
To store the ornaments, wrap them individually in tissue paper or place them in a container with padding to prevent breakage. Store them in a cool, dry place. If stored properly, these ornaments can last for many years. Do not store in a humid environment, as this can cause them to soften or mold.
Nutritional Information
These ornaments are not intended for consumption, so nutritional information is not applicable.
Variations & Substitutions
- Spice it up: Add other spices like ground cloves, nutmeg, or ginger to the dough for a more complex aroma.
- Applesauce Alternatives: While applesauce is recommended, you could experiment with other fruit purees like pear or pumpkin puree, though this may affect the dough’s consistency and require adjustments to the amount of cinnamon used.
- Natural Dyes: Instead of acrylic or puffy paint, try natural dyes. Beet juice can create a pink hue, turmeric a yellow, and spinach juice a green. Experiment with mixing the juices for different colors.
FAQs (Frequently Asked Questions)
Q: Can I eat these cinnamon ornaments?
A: No, these ornaments are intended for decorative purposes only and are not edible. While the ingredients are food-grade, the ornaments are not prepared or intended for consumption.
Q: How long do these ornaments last?
A: If stored properly in a cool, dry place, these ornaments can last for many years.
Q: Can I use different types of cookie cutters?
A: Absolutely! Feel free to use any cookie cutters you like to create a variety of shapes and sizes.
Q: My dough is too sticky. What should I do?
A: If your dough is too sticky, add a little more cinnamon, one tablespoon at a time, until it reaches a manageable consistency.
Q: Can I decorate these with edible icing?
A: While you can decorate them with edible icing, keep in mind that the ornaments themselves are not meant to be eaten. Also, the edible icing might attract insects.
Final Thoughts
I hope this recipe brings the same joy and warmth to your home that it has brought to mine for so many years. Crafting these cinnamon ornaments is a simple yet meaningful way to connect with loved ones, create lasting memories, and add a touch of handmade charm to your holiday decorations. Don’t be afraid to experiment with different shapes, decorations, and spices to make them your own. Happy crafting!