
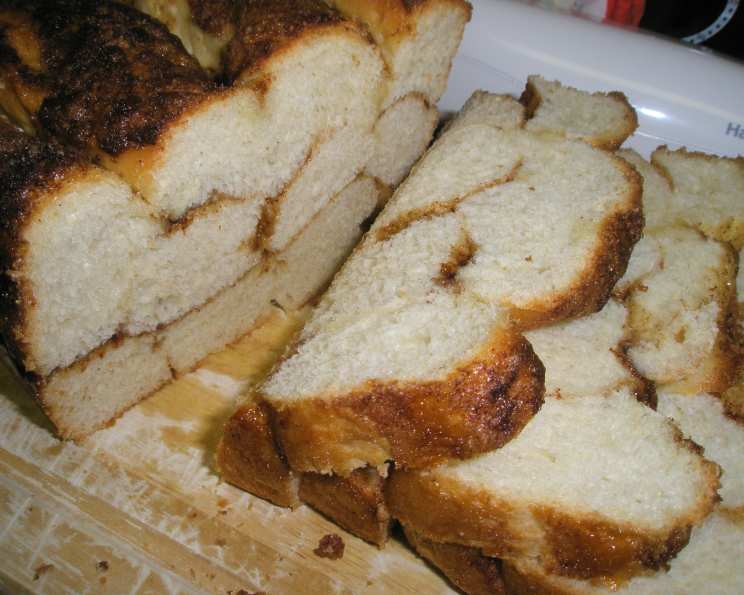
Cinnamon Ribbon Loaf: A Sweet Slice of Nostalgia
The aroma of cinnamon baking in the oven… it’s a scent that instantly transports me back to my grandmother’s kitchen. I can almost see her, flour dusting her apron, humming a little tune as she carefully layered cinnamon sugar between folds of dough. Her cinnamon bread was legendary, and while this Cinnamon Ribbon Loaf isn’t exactly her recipe, it evokes that same feeling of warmth, comfort, and pure, unadulterated happiness with every single bite. It’s the kind of treat that makes any day feel a little bit more special.
Recipe Overview
- Prep Time: 1 hour 30 minutes (includes proofing time)
- Cook Time: 20-25 minutes
- Total Time: 2 hours 20 minutes
- Yields: 3 loaves
- Dietary Type: Vegetarian
Ingredients
For the Dough:
- 3 tablespoons active dry yeast
- ½ cup lukewarm water
- 1 cup milk, scalded and cooled to lukewarm
- ½ cup granulated sugar
- 2 teaspoons salt
- ½ cup vegetable oil or other flavorless salad oil
- 5 cups all-purpose flour (can use 2.5 cups whole wheat and 2.5 cups unbleached white)
- 2 eggs, room temperature, slightly beaten
For the Filling:
- 1 cup granulated sugar
- ½ cup dark brown sugar
- 1 tablespoon ground cinnamon
- Approximately 1 stick plus 3 tablespoons softened butter
Equipment Needed
- Small bowl
- KitchenAid stand mixer (optional)
- Large bowl
- Plastic wrap
- Cotton dish towel
- Floured surface
- Rolling pin
- 3 (9×5) loaf pans
Instructions
- In a small bowl, mix the yeast and lukewarm water. Add about a teaspoon of the granulated sugar and a teaspoon of the flour. Stir and set aside to “proof”.
- Within about 10 minutes, the yeast should be rising up the sides of the bowl, indicating that it is active. If it doesn’t, your yeast may be old and you will need to start over with new yeast.
- While the yeast is proofing, combine the lukewarm milk, the rest of the ½ cup of granulated sugar, the salt, and the vegetable oil in a large bowl or the bowl of your stand mixer.
- Add enough of the flour to make a thick batter (like a thick pancake batter). If using a stand mixer, beat on medium speed for 2 minutes to get some air into it and get the gluten starting to form. This step helps create a light and airy loaf.
- Add the eggs and beat them into the batter until well combined.
- Stir in the proofed yeast mixture.
- Add enough of the remaining flour to make a soft dough. If you are using part whole wheat flour, add that to the batter first. The dough should be soft and pliable, not sticky.
- Turn your oven on so that it preheats to about 200 degrees Fahrenheit (“warm”). Then turn the oven off. This creates the perfect environment for the dough to rise.
- Knead your dough on a lightly floured surface until it is smooth and satiny. Keep working in what’s left of the 5 cups of flour until the dough stops sticking to your hands and you can form a nice round ball out of it that will hold its shape pretty well. It may actually take more than the 5 total cups of flour, depending on the humidity and the flour itself.
- Butter a large bowl (basketball size) or spray it with cooking spray.
- Place dough in bowl and grease the top of your ball of dough. Cover the bowl with plastic wrap that you have greased, and then over that put a cotton dish towel that you have wet down and wrung out. The damp towel helps create a humid environment for optimal rising.
- Slide the bowl into the warm oven, making sure the oven has been turned off for at least 5 minutes before you put the dough in to rise. Rising will take approximately 1.5 hours, but start checking after an hour. When the dough has doubled in size or reached the top of the bowl, it is ready to shape.
- To shape the dough, turn it out onto a lightly floured surface. It will deflate, which is normal. Sprinkle a little flour over the top and roll the dough out to a rectangle that is about 24″ long x 12″ wide.
- Spread the dough with 1 stick of the softened butter, ensuring it covers the entire surface evenly.
- Mix together the filling ingredients (granulated sugar, dark brown sugar, and cinnamon). Save back about 1/4 cup of the filling mixture, and generously sprinkle the rest over the buttered dough. Use your hands to pat the filling mix down into the dough a bit, helping it adhere.
- Fold the dough into thirds, so that you have an oblong about 24″ x 4″. This creates the ribbon effect.
- Cut this into about 15 equal-sized strips.
- Put 1 tablespoon of melted butter into the bottom of each of the 3 (9×5) loaf pans. This will help prevent the loaves from sticking.
- Sprinkle 1/3 of the remaining filling mix over the top of the melted butter in each pan, creating a light layer. This will caramelize during baking and add extra flavor.
- Each pan will hold about 5 of the strips of dough. Turn them on their sides and snake them back and forth into the pan until they fit. It’s not an exact science, so just play with it and arrange them artfully.
- Cover and let rise until the dough reaches the top of the pan – about another 30 minutes or so.
- Bake at 375 degrees Fahrenheit for about 20-25 minutes. (If you have dark pans, reduce the temperature to 350 degrees Fahrenheit). They should be golden brown, but not burnt. If after 20-25 minutes you aren’t sure if they are done in the middle, turn the oven off and let them sit in there for another 5 minutes. The tops will not brown anymore, but the insides will finish cooking. This ensures a perfectly baked loaf.
- Remove from oven and let cool in pans for 10 minutes before transferring to a wire rack to cool completely.
Expert Tips & Tricks
- Room temperature ingredients are key. Ensure your eggs are at room temperature for better emulsification and a more tender crumb.
- Don’t over-knead the dough. Over-kneading can result in a tough loaf. Knead until the dough is smooth and elastic.
- For a richer flavor, use brown butter instead of regular softened butter for spreading on the dough.
- If your oven runs hot, reduce the baking time slightly to prevent burning.
- A simple glaze of powdered sugar and milk can add a beautiful finishing touch. Drizzle it over the cooled loaves.
Serving & Storage Suggestions
Serve the Cinnamon Ribbon Loaf warm or at room temperature. It’s delicious on its own, or alongside a cup of coffee or tea. Leftovers can be stored at room temperature in an airtight container for up to 3 days. For longer storage, wrap the loaves tightly in plastic wrap and freeze for up to 2 months. To reheat, thaw overnight in the refrigerator and warm in a low oven (300°F) for about 10-15 minutes.
Nutritional Information
Note: Nutritional information is an estimate and may vary based on specific ingredients and portion sizes.
| Nutrient | Amount per Serving (estimated) | % Daily Value (estimated) |
|---|---|---|
| Calories | 1747 kcal | N/A |
| Calories from Fat | 407 g | 23% |
| Total Fat | 45.3 g | 69% |
| Saturated Fat | 8 g | 40% |
| Cholesterol | 152.4 mg | 50% |
| Sodium | 1662.7 mg | 69% |
| Total Carbohydrate | 305.1 g | 101% |
| Dietary Fiber | 9.4 g | 37% |
| Sugars | 136.1 g | 544% |
| Protein | 33.1 g | 66% |
Variations & Substitutions
- Gluten-Free: Substitute a gluten-free all-purpose flour blend for the regular flour. You may need to adjust the liquid slightly.
- Dairy-Free: Use a plant-based milk alternative (like almond, soy, or oat milk) for the scalded milk, and a dairy-free butter alternative for the softened butter.
- Nutty Twist: Add chopped pecans or walnuts to the cinnamon sugar filling for extra crunch and flavor.
- Citrus Zest: Add a tablespoon of orange or lemon zest to the dough for a bright, aromatic flavor.
FAQs (Frequently Asked Questions)
Q: Why do I need to scald the milk?
A: Scalding the milk helps to denature the proteins, which contributes to a softer crumb in the bread. It also inhibits enzymes that can weaken the gluten structure.
Q: Can I use instant yeast instead of active dry yeast?
A: Yes, you can. You can add the instant yeast directly to the dry ingredients without proofing it first. Use the same amount as the active dry yeast.
Q: My dough isn’t rising. What could be the problem?
A: There are several reasons why dough might not rise: the yeast could be old or inactive, the water might be too hot or too cold, or the environment might be too cold. Make sure your yeast is fresh, your water is lukewarm (around 105-115°F), and your rising environment is warm.
Q: Can I make the dough ahead of time?
A: Yes, you can prepare the dough and let it rise in the refrigerator overnight. This will slow down the rising process and develop more flavor. Just be sure to bring it to room temperature before shaping and baking.
Q: How do I prevent the bottom of the loaves from getting too dark?
A: Place a baking sheet on the rack below the loaves to deflect some of the heat and prevent the bottoms from burning.
Final Thoughts
This Cinnamon Ribbon Loaf is more than just a recipe; it’s an invitation to create memories. Whether you’re a seasoned baker or just starting out, I encourage you to give it a try. Don’t be afraid to experiment with variations and make it your own. And most importantly, share it with someone you love – because nothing tastes better than a slice of homemade goodness enjoyed with good company. Pair it with a steaming mug of chai latte for a truly decadent experience!