
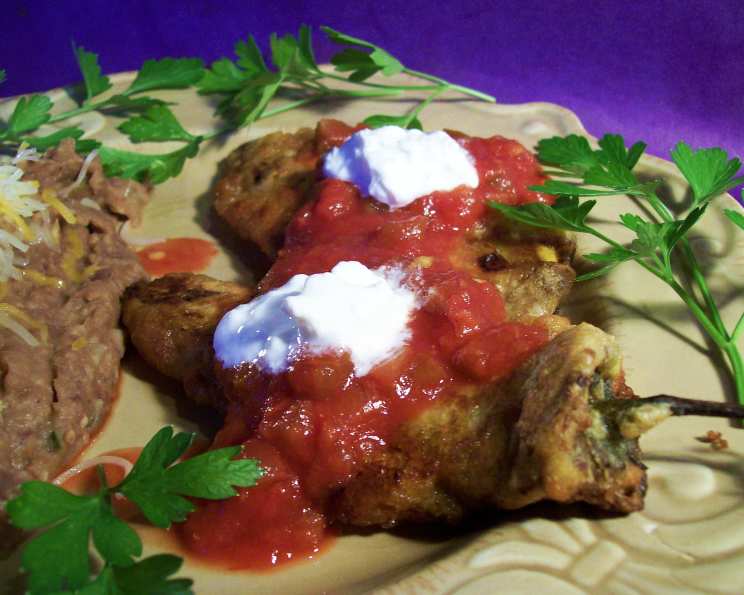
Classic Chili Rellenos With Anaheim Peppers
The memory of my grandmother’s kitchen is forever intertwined with the aroma of roasted chiles. Every autumn, the air would be thick with the smoky fragrance as she charred Anaheim peppers on her ancient gas stove. The blistered skins and that earthy, slightly sweet scent signaled the start of something special – her famous chili rellenos. They weren’t just a meal; they were a symbol of family, tradition, and the warmth of her love, each bite a comforting reminder of home.
Recipe Overview
- Prep Time: 30 minutes
- Cook Time: 15 minutes
- Total Time: 45 minutes
- Servings: 4
- Yield: 4 Rellenos
- Dietary Type: Vegetarian
Ingredients
- 4 large green Anaheim chilies, roasted and peeled, leave stems on
- Cheddar cheese, cut into sticks (or Monterey Jack)
- 3 eggs, separated
- 1 tablespoon water
- 3 tablespoons flour
- 1/4 teaspoon salt
- Salsa (optional)
- Oil, for frying
Equipment Needed
- Baking sheet
- Heavy-duty zip-top plastic bag
- Slotted spoon
- Deep frying pan or pot
- Whisk
- Mixing bowls
Instructions
-
Preheat your broiler and position a rack about 5 inches from the heat source. Place the chile peppers on an aluminum foil-lined baking sheet.
-
Broil the chile peppers for about 5 minutes on each side, or until the skins are blistered and blackened. Keep a close watch, rotating the pan as needed to ensure even charring. If using a gas oven, leave the door slightly ajar during broiling.
-
Transfer the roasted chile peppers to a heavy-duty zip-top plastic bag. Seal the bag tightly and let the peppers stand for 10 minutes. This steams the peppers and loosens the skins, making them easier to peel.
-
After 10 minutes, remove the peppers from the bag. Carefully peel off the blackened skins, leaving the stems attached. A small paring knife can be helpful for stubborn areas.
-
Make a small slit in the side of each chile pepper. Gently remove the seeds and membranes. Wear gloves if you have sensitive skin, as the chiles can cause irritation.
-
Stuff each chile with sticks of cheddar or Monterey Jack cheese. Ensure the cheese is securely nestled inside the pepper.
-
Lightly dredge the stuffed chiles with flour, ensuring they are evenly coated. This will help the egg batter adhere properly.
-
In a clean, dry mixing bowl, beat the egg whites with an electric mixer until stiff peaks form. The bowl and beaters must be grease-free for the whites to whip properly.
-
In a separate mixing bowl, beat the egg yolks with the water, 3 tablespoons of flour, and the salt until the mixture is thick and creamy.
-
Gently fold the egg yolk mixture into the whipped egg whites. Be careful not to overmix, as this will deflate the whites and result in a flat batter.
-
Heat 2-3 inches of oil in a deep frying pan or pot over medium-high heat. The oil should be hot enough to sizzle when a small drop of batter is added, around 350°F (175°C).
-
Dip each cheese-stuffed chile into the egg batter, ensuring it is completely coated.
-
Carefully lower the battered chiles rellenos into the hot oil. Fry for 2-3 minutes per side, or until golden brown and crispy. I often use only about an inch of oil and carefully turn them over to ensure even cooking.
-
Remove the chiles rellenos from the oil with a slotted spoon and place them on a paper towel-lined plate to drain any excess oil.
-
Serve immediately with your favorite salsa, refried beans, and yellow rice for a classic Southwestern meal.
Expert Tips & Tricks
- Roasting the Peppers: For an even more intense smoky flavor, roast the peppers over an open flame on a gas stove or grill. Use tongs to rotate them until the skins are completely blackened.
- Cheese Options: Feel free to experiment with different cheeses. Oaxaca cheese, pepper jack, or even a combination of cheeses can add interesting flavors.
- Batter Consistency: The batter should be light and airy. If it seems too thick, add a tablespoon of water or milk.
- Make-Ahead Tip: The roasted and stuffed peppers can be prepared ahead of time and stored in the refrigerator until ready to batter and fry.
- Preventing Soggy Rellenos: Ensure the oil is hot enough before frying to prevent the rellenos from absorbing too much oil and becoming soggy.
- Flavor Infusion: Add a pinch of garlic powder or onion powder to the flour for an extra layer of flavor.
- Spice Control: Remove seeds and membranes thoroughly for milder rellenos. Leave some seeds for a spicier kick.
Serving & Storage Suggestions
Serve your chili rellenos hot and fresh for the best flavor and texture. They pair perfectly with a side of refried beans, yellow rice, and a dollop of sour cream or Mexican crema. A fresh salsa or pico de gallo adds a bright, flavorful contrast.
Leftover chili rellenos can be stored in an airtight container in the refrigerator for up to 3 days. To reheat, bake in a preheated oven at 350°F (175°C) for about 10-15 minutes, or until heated through. You can also reheat them in a skillet over medium heat, turning occasionally, until warmed. Microwaving is not recommended as it can make the batter soggy. Freezing is not recommended, as the texture of the pepper and batter will change considerably.
Nutritional Information
| Nutrient | Amount per Serving | % Daily Value |
|---|---|---|
| Calories | 300 kcal | 15% |
| Total Fat | 20g | 31% |
| Saturated Fat | 12g | 60% |
| Cholesterol | 150mg | 50% |
| Sodium | 300mg | 13% |
| Total Carbohydrate | 15g | 5% |
| Dietary Fiber | 2g | 8% |
| Sugars | 4g | |
| Protein | 15g | 30% |
Note: Nutritional information is an estimate and may vary based on specific ingredients and cooking methods.
Variations & Substitutions
- Vegan Chili Rellenos: Substitute the cheese with vegan cheese alternatives and use an egg replacement for the batter. A batter made from chickpea flour and water can work well.
- Gluten-Free Chili Rellenos: Use gluten-free flour or a combination of rice flour and cornstarch for dredging and in the batter.
- Spicier Chili Rellenos: Use jalapeños or serrano peppers instead of Anaheim peppers for a spicier kick. You can also add a pinch of cayenne pepper to the batter.
- Different Stuffings: Experiment with different fillings such as shredded chicken, ground beef, or a mixture of vegetables.
- Baked Chili Rellenos: For a healthier option, bake the rellenos instead of frying them. Place the battered peppers on a baking sheet and bake at 375°F (190°C) for 20-25 minutes, or until golden brown.
- Seasonal Twist: Add roasted corn kernels or black beans to the cheese filling for a seasonal variation.
FAQs (Frequently Asked Questions)
Q: Can I use poblano peppers instead of Anaheim peppers?
A: Yes, poblano peppers are a great alternative to Anaheim peppers. They have a similar shape and mild flavor, although they can sometimes be slightly spicier.
Q: How do I prevent the cheese from melting out while frying?
A: Make sure the cheese is securely nestled inside the pepper and the batter completely coats the relleno. Also, ensure the oil is hot enough before frying.
Q: Can I make the batter ahead of time?
A: It’s best to make the batter fresh just before frying, as the whipped egg whites can deflate over time.
Q: What if I don’t have a broiler?
A: You can roast the peppers directly over a gas flame or in a hot oven (450°F/230°C) until the skins are blistered.
Q: How can I tell if the oil is hot enough for frying?
A: Use a thermometer to check that the oil is around 350°F (175°C). If you don’t have a thermometer, drop a small amount of batter into the oil. If it sizzles and turns golden brown quickly, the oil is ready.
Final Thoughts
Chili rellenos are more than just a delicious dish; they are a celebration of flavor, tradition, and culinary creativity. Don’t be intimidated by the process – with a little practice, you’ll be whipping up these cheesy, flavorful peppers like a pro. So, gather your ingredients, roll up your sleeves, and get ready to create a truly unforgettable meal. I hope this recipe brings you as much joy as it has brought my family for generations. I encourage you to try this recipe and share your culinary creations with friends and family, maybe even with a refreshing agua fresca on the side!