
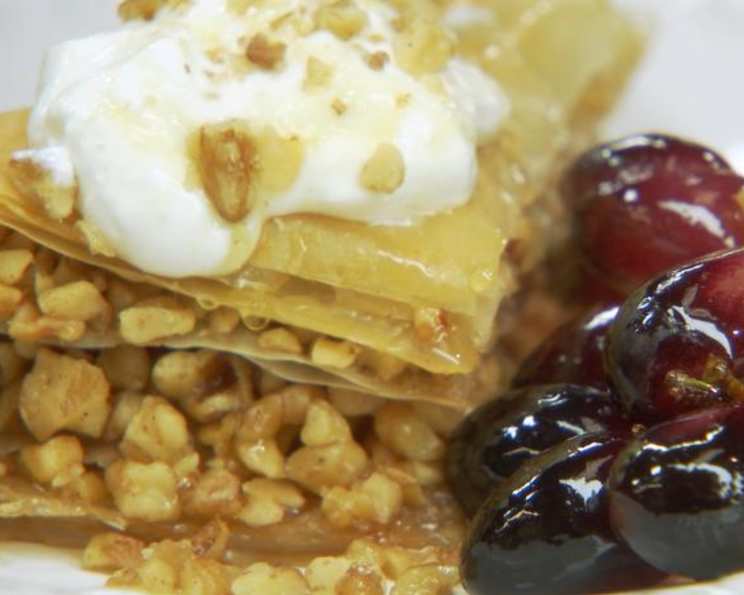
Classic Greek Baklava: A Symphony of Sweetness and Crunch
The scent of cinnamon, toasted nuts, and honey… it instantly transports me back to my childhood. I remember watching my Yiayia, my Greek grandmother, meticulously layering paper-thin sheets of phyllo, each brushed with melted butter, a tradition passed down through generations. The rhythmic clinking of her jewelry as she worked, the warmth radiating from the oven, and the anticipation of that first bite – crisp, flaky, and intensely sweet – are some of my most cherished culinary memories. Baklava is more than just a dessert; it’s a connection to my heritage, a symbol of love and celebration, and a taste of pure, unadulterated joy.
Recipe Overview
- Prep Time: 1 hour 30 minutes
- Cook Time: 1 hour
- Total Time: 2 hours 30 minutes
- Servings: 6-8
- Yield: 1 (9×13 inch) pan
- Dietary Type: Vegetarian (easily adaptable to vegan – see variations)
Ingredients
- 6 cups chopped walnuts
- 1 teaspoon ground cinnamon
- 2 1/4 cups sugar
- 1 cup melted butter
- 1 (16 ounce) package phyllo pastry
- 2 cups water
- 1 cup honey
- 1 teaspoon vanilla extract
- 4 cups grapes (recommended — Corinthian)
- 3 tablespoons extra-virgin olive oil
- 1 cup Greek yogurt (optional, for serving)
Equipment Needed
- 9×13 inch baking pan
- Pastry brush
- Sharp knife
- Mixing bowls
- Saucepan
- Baking sheet
Instructions
-
Preheat your oven to 350 degrees F (175 degrees C).
-
Thoroughly butter the bottom and sides of a 9 by 13-inch pan. This will prevent the baklava from sticking and ensure even browning.
-
In a large bowl, mix together the chopped walnuts, cinnamon, 1/4 cup of sugar, and 1/4 cup of the melted butter. Ensure all the nuts are evenly coated with the butter and spices. This mixture will form the delicious filling layers of the baklava. Set aside.
-
Unroll the phyllo pastry. Since most phyllo sheets are larger than the pan, cut the whole stack in half to fit the dimensions of your 9×13-inch pan. It’s crucial to keep the phyllo from drying out, as it becomes brittle and difficult to work with. Therefore, cover the phyllo with a dampened clean kitchen towel while you’re assembling the baklava.
-
Lay 2 phyllo sheets in the prepared pan and using a pastry brush, thoroughly butter the top sheet. Be generous with the butter; it’s what gives the baklava its signature flakiness. Repeat this process until you have 6 sheets layered at the bottom.
-
Sprinkle 1 1/2 cups of the nut mixture evenly on top of the phyllo layers. This creates the first layer of filling.
-
Layer with 2 more phyllo sheets, again brushing each layer with melted butter. Add another 1 1/2 cups of the nut mixture. Repeat this process to end up with a total of 4 layers of nuts and dough.
-
The top layer should consist of about 6 to 8 phyllo sheets, each carefully buttered. This thicker top layer will provide a beautiful golden crust.
-
Using a sharp knife, cut diamond or square shapes all the way to the bottom of the pan before baking. This allows the syrup to penetrate the baklava completely and prevents the phyllo from puffing up unevenly. You can cut 4 long rows and then make diagonal cuts to create diamond shapes.
-
Bake the baklava in the preheated oven for about 50 minutes, or until it is golden brown and crisp. Keep a close eye on it during the last 10-15 minutes to prevent burning.
-
While the baklava is baking, prepare the syrup. In a saucepan, boil the water and remaining 2 cups of sugar until the sugar is completely dissolved.
-
Add the honey and vanilla extract to the sugar syrup and simmer for about 10 minutes. This will thicken the syrup slightly and allow the flavors to meld.
-
Once the baklava is removed from the oven, immediately spoon the hot syrup evenly over it. The sizzle is a good sign that the syrup is being absorbed properly.
-
Let the baklava cool completely before serving. This allows the syrup to fully soak into the layers, resulting in a more flavorful and less soggy baklava.
-
In the meantime, prepare the baked grapes. Place the grapes on a baking sheet, drizzle with the olive oil, and sprinkle with the remaining 2 tablespoons of sugar.
-
Bake the grapes in the oven for about 10 minutes, or until they start to burst and caramelize slightly.
-
To serve, cut the cooled baklava along the pre-cut lines. Serve each piece with a dollop of Greek yogurt, the baked grapes, a drizzle of honey, and some crushed walnuts.
Expert Tips & Tricks:
- Preventing Soggy Baklava: Ensure the baklava is thoroughly baked and crisp before adding the syrup. The hot syrup needs to be poured over the hot baklava for optimal absorption without making it soggy.
- Working with Phyllo: Handle phyllo pastry gently and keep it covered with a damp towel. If it tears, don’t worry – you can still use it! Simply piece it together in the layers.
- Nut Toasting (Optional): Toasting the walnuts lightly before chopping them enhances their flavor and aroma.
- Cutting Neat Shapes: Using a sharp, thin-bladed knife helps to create clean, precise cuts.
- Syrup Consistency: The syrup should be slightly thickened but still pourable. If it becomes too thick, add a tablespoon or two of water.
- Even Baking: Rotate the pan halfway through baking to ensure even browning.
Serving & Storage Suggestions
Baklava is best served at room temperature. Its intense sweetness makes it a perfect pairing with a slightly tart Greek yogurt and the burst of flavor from the baked grapes. Store leftover baklava in an airtight container at room temperature for up to 3 days. It can also be stored in the refrigerator for up to a week, although the phyllo may soften slightly. You can also freeze baklava for up to 2 months. Thaw it in the refrigerator overnight before serving. Reheating is not generally recommended, as it can further soften the phyllo.
Nutritional Information
| Nutrient | Amount per Serving | % Daily Value |
|---|---|---|
| Calories | 405 kcal | 20% |
| Total Fat | 22.5 g | 35% |
| Saturated Fat | 5.3 g | 27% |
| Cholesterol | 10 mg | 3% |
| Sodium | 261 mg | 11% |
| Total Carbohydrate | 50 g | 17% |
| Dietary Fiber | 2.4 g | 10% |
| Sugars | 34 g | N/A |
| Protein | 5.5 g | 11% |
Nutritional information is an estimate and may vary based on specific ingredients and portion sizes.
Variations & Substitutions
- Vegan Baklava: Substitute the butter with a vegan butter alternative or coconut oil. Ensure the phyllo pastry is also vegan-friendly (some brands contain dairy). Omit the Greek yogurt or replace it with a plant-based yogurt.
- Gluten-Free Baklava: While traditional baklava is not gluten-free due to the phyllo pastry, some companies now offer gluten-free phyllo alternatives. Look for these in specialty stores or online.
- Different Nuts: Walnuts can be replaced with other nuts like pistachios, almonds, or pecans, or a combination of your favorites.
- Citrus Zest: Add the zest of an orange or lemon to the nut mixture for a brighter flavor.
- Spice Variations: Experiment with different spices like cardamom, cloves, or nutmeg in the nut filling.
- Honey Alternatives: While honey is traditional, you can substitute it with agave nectar or maple syrup, adjusting the amount to taste.
- Fruit Filling Additions: Consider incorporating other cooked fruits such as dried apricots, dates, or figs into the nut filling for added texture and flavor depth.
FAQs (Frequently Asked Questions)
Q: Why is my baklava soggy?
A: Soggy baklava is usually caused by underbaking or adding the syrup before the baklava is fully crisp. Make sure to bake it until golden brown and crisp and pour the hot syrup over the hot baklava immediately after it comes out of the oven.
Q: How do I keep the phyllo dough from drying out?
A: The key is to keep the phyllo dough covered with a damp (not wet) kitchen towel while you are working with it. This will prevent it from becoming brittle and tearing.
Q: Can I make baklava ahead of time?
A: Yes, baklava can be made a day or two in advance. Store it at room temperature in an airtight container.
Q: Can I freeze baklava?
A: Yes, you can freeze baklava for up to 2 months. Wrap it tightly in plastic wrap and then in foil or place it in a freezer-safe container. Thaw it in the refrigerator overnight before serving.
Q: What is the best way to cut baklava?
A: It’s best to cut the baklava before baking. This allows the syrup to penetrate the layers more easily. Use a sharp knife and cut all the way to the bottom of the pan.
Final Thoughts
Baklava is a true labor of love, but the effort is well worth the reward. This recipe, passed down through generations, offers a taste of authentic Greek tradition. Don’t be intimidated by the layers – with a little patience and attention to detail, you can create a truly spectacular dessert that will impress your friends and family. I encourage you to try this recipe, embrace the process, and share your own variations and experiences. Kali Orexi! (Good appetite!)