
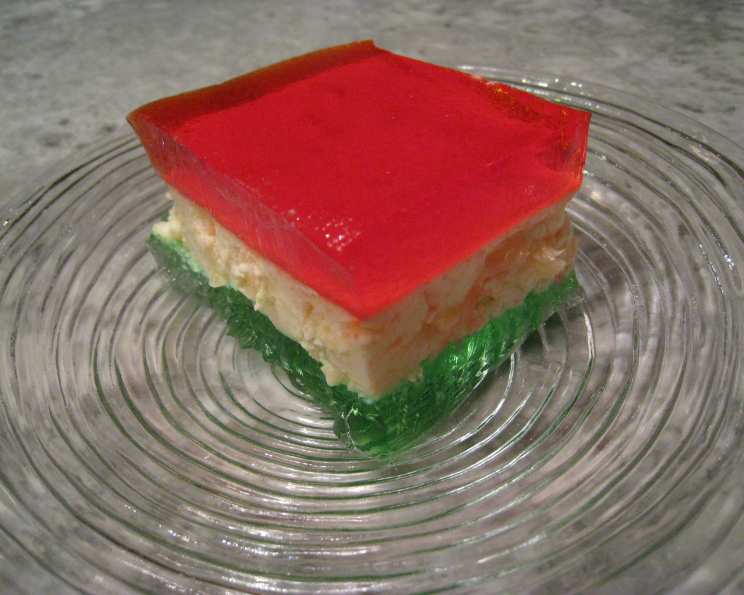
Classic Holiday Ribbon Squares: A Festive Jello Delight
Every Christmas, as the scent of pine needles and cinnamon filled our home, there was one dessert that always held a special place on the buffet table: Ribbon Jello Squares. Not a fancy cake or elaborately decorated cookies, but these wiggly, colorful squares of gelatin magic. My grandmother, a woman who could make anything taste like love, would carefully layer the red, white, and green, a tangible representation of the holiday spirit. It wasn’t just about the taste; it was about the shared laughter as we tried to cut perfect squares, the sticky fingers, and the anticipation of that first cool, creamy bite. To this day, the sight of Ribbon Jello instantly transports me back to those cherished moments, a sweet reminder of family, tradition, and the simple joys of the season.
Recipe Overview
- Prep Time: 45 minutes
- Cook Time: 0 minutes
- Total Time: 4 hours 30 minutes
- Servings: 9
- Yield: 9 servings
- Dietary Type: Not specified (contains dairy)
Ingredients
- 3 cups boiling water
- 1 (3 ounce) package Jell-O gelatin, any red flavor
- 1 (3 ounce) package lemon Jell-O gelatin
- 1 (3 ounce) package lime Jell-O gelatin
- 1 1/2 cups cold water
- 1 (8 ounce) package Philadelphia Cream Cheese, softened
- 1 (8 ounce) can crushed pineapple in juice, undrained
- 1 cup Cool Whip, thawed
- 1/2 cup Kraft mayonnaise
Equipment Needed
- Medium bowls
- 9-inch square pan
- Large bowl
- Whisk
- Blender (optional)
Instructions
-
Begin by preparing the gelatin layers. In three separate medium bowls, add 1 cup of boiling water to each flavor of Jell-O gelatin: the red flavor, the lemon Jell-O, and the lime Jell-O. Stir each bowl for at least 2 minutes, ensuring the gelatin is completely dissolved. This step is crucial for achieving a smooth, even texture in each layer.
-
For the first layer, add 3/4 cup of cold water to the bowl with the red gelatin. Stir to combine.
-
Pour the red gelatin mixture into a 9-inch square pan. Ensure the pan is placed on a level surface to create an even layer.
-
Refrigerate the pan for approximately 45 minutes, or until the gelatin is set but still slightly sticky to the touch. The gelatin should stick to your finger when touched but not be liquid. This partial setting is essential for the next layer to adhere properly.
-
While the red gelatin is chilling, prepare the creamy middle layer. In a large bowl, gradually stir the lemon gelatin into the softened cream cheese using a whisk until the mixture is smooth. This step requires patience and a steady hand to avoid lumps.
-
(Optional) For an ultra-smooth texture, use a blender for this step. Combine the softened cream cheese and lemon gelatin mixture and blend until smooth. This will eliminate any lumps and create a perfectly creamy layer.
-
Stir in the crushed pineapple with its juice into the cream cheese mixture. The pineapple adds sweetness, texture, and moisture to the middle layer.
-
Refrigerate the cream cheese mixture for about 45 minutes, or until it has slightly thickened to the consistency of unbeaten egg whites. This thickening prevents the creamy layer from sinking into the red gelatin layer.
-
Gently fold in the thawed Cool Whip and mayonnaise into the thickened cream cheese mixture. The Cool Whip adds lightness and airiness, while the mayonnaise provides a subtle tanginess that complements the sweetness of the gelatin and pineapple.
-
Carefully spoon the cream cheese mixture over the red gelatin layer in the pan, spreading it evenly.
-
Refrigerate the pan again for approximately 30 minutes, or until the creamy layer is set but not firm. It should stick to your finger when touched and should mound slightly.
-
In the remaining bowl, add the remaining 3/4 cup of cold water to the lime gelatin. Stir to combine.
-
Refrigerate the lime gelatin for about 30 minutes, or until it has slightly thickened to the consistency of unbeaten egg whites.
-
Spoon the lime gelatin over the cream cheese mixture in the pan, spreading it evenly.
-
Refrigerate the entire pan for a final chilling period of at least 4 hours, or until the Jello is completely firm.
-
To unmold, carefully loosen the edges of the Jello from the pan with a knife or spatula. You can also dip the bottom of the pan briefly in warm water (be careful not to melt the Jello). Invert the pan onto a serving platter.
-
Cut the Jello into squares and garnish with a small dollop of Cool Whip on each square, if desired.
Expert Tips & Tricks
- Speed up chilling time: Place each bowl or pan over a larger bowl filled with ice water. This can reduce chilling time to about 15-20 minutes per stage.
- Achieving the right texture: Don’t rely solely on timing. Check the texture of each layer by gently touching it. The gelatin should be set but not firm, sticking slightly to your finger.
- Preventing lumps in the cream cheese layer: Ensure the cream cheese is fully softened before mixing with the lemon gelatin. Using a blender guarantees a smooth consistency.
- Creating clean layers: Partially setting each layer before adding the next prevents the colors from bleeding and ensures distinct ribbons.
Serving & Storage Suggestions
Serve the Classic Holiday Ribbon Squares chilled. They can be attractively displayed on a platter or individual plates. Leftovers should be stored in an airtight container in the refrigerator. The Jello will last for up to 3 days, although the texture may change slightly over time. Avoid freezing, as it will alter the texture and consistency of the gelatin.
Nutritional Information
Please note that these values are estimates and can vary based on specific ingredients and portion sizes.
| Nutrient | Amount per Serving | % Daily Value |
|---|---|---|
| Calories | 288.5 kcal | N/A |
| Calories from Fat | 137 g | 48% |
| Total Fat | 15.3 g | 23% |
| Saturated Fat | 8 g | 39% |
| Cholesterol | 31.1 mg | 10% |
| Sodium | 304.2 mg | 12% |
| Total Carbohydrate | 35.3 g | 11% |
| Dietary Fiber | 0.2 g | 0% |
| Sugars | 30.8 g | N/A |
| Protein | 4.4 g | 8% |
Variations & Substitutions
- Vegan version: While challenging due to the gelatin, you can experiment with agar-agar as a substitute. Ensure you adjust the ratios according to the agar-agar package instructions. Use plant-based cream cheese, whipped topping, and mayonnaise alternatives.
- Lower sugar: Opt for sugar-free Jell-O and consider using unsweetened crushed pineapple.
- Different flavors: Feel free to experiment with other Jell-O flavors to match different holidays or color schemes. For example, use blue raspberry and white chocolate for a winter-themed dessert.
- Fruit additions: Incorporate other fruits like mandarin oranges or maraschino cherries into the creamy layer for added texture and flavor.
FAQs (Frequently Asked Questions)
Q: Can I use a different size pan?
A: Yes, but keep in mind that using a larger pan will result in thinner layers, and a smaller pan will create thicker layers. Adjust chilling times accordingly.
Q: Why is my cream cheese layer lumpy?
A: Ensure your cream cheese is fully softened before mixing it with the gelatin. Using a blender is the best way to guarantee a smooth texture.
Q: Can I make this ahead of time?
A: Absolutely! The Ribbon Jello Squares can be made up to 2 days in advance. Store them covered in the refrigerator.
Q: My layers are bleeding together. What did I do wrong?
A: This usually happens when the layers aren’t chilled enough before adding the next layer. Make sure each layer is partially set before proceeding.
Q: Can I use fresh pineapple instead of canned?
A: Fresh pineapple contains an enzyme that can prevent the gelatin from setting properly. Canned pineapple is processed to eliminate this enzyme, so it’s the better choice for this recipe.
Final Thoughts
There’s something undeniably comforting about a dish that’s been passed down through generations, a tangible link to our past. These Classic Holiday Ribbon Squares are more than just a dessert; they’re a symbol of tradition, family, and the simple joys of the season. I encourage you to try this recipe and create your own memories. Don’t be afraid to experiment with flavors and colors to make it your own. And, as always, I’d love to hear your feedback and see your creations! Consider pairing this dessert with a rich cup of coffee or a light sparkling wine for a truly festive experience.