
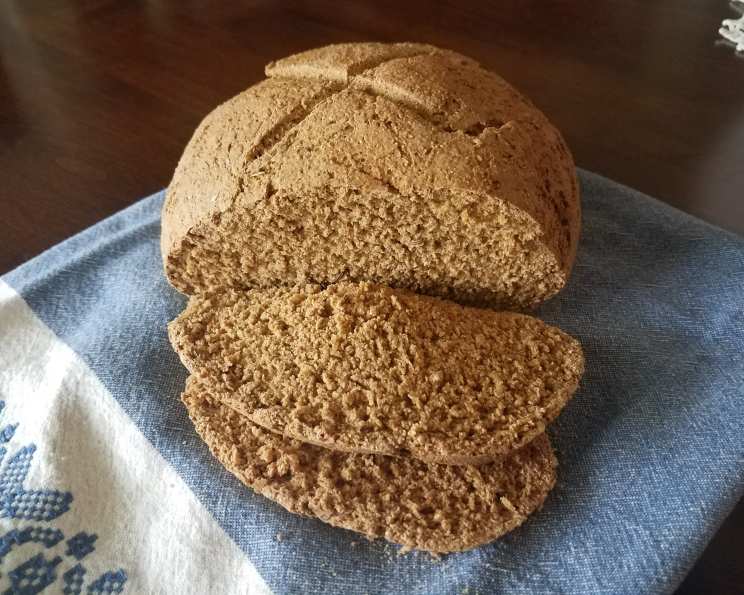
Classic Pumpernickel Bread: A Baker’s Embrace
The first time I truly understood the magic of bread, I was standing in my grandmother’s kitchen, the air thick with the aroma of molasses and rye. She was a woman of few words, but her hands spoke volumes as she coaxed life into a humble dough, transforming it into a dark, fragrant loaf of pumpernickel. Every slice was a taste of home, a connection to generations past, and a reminder that the simplest things can be the most profound. Now, I share her legacy with you.
Recipe Overview
- Prep Time: 45 minutes
- Cook Time: 30-35 minutes
- Rise Time: 2.5 hours
- Total Time: 3 hours 50 minutes
- Yield: 2 loaves
- Dietary Type: Vegetarian
Ingredients
- 1 1/2 cups warm water, divided (105 to 115 degrees F.)
- 3 (1/4 ounce) packages active dry yeast
- 2 teaspoons sugar
- 1/2 cup molasses
- 1 1/2 tablespoons kosher salt
- 2 tablespoons vegetable shortening
- 2 tablespoons caraway seeds
- 2 3/4 cups rye flour
- 3 cups unbleached all-purpose flour (approx.)
- Cornmeal, for dusting
Equipment Needed
- Small bowl
- Large mixing bowl (or stand mixer with dough hook)
- Measuring cups and spoons
- Clean kitchen cloths
- Large baking sheet
- Sharp knife
- Cooling rack
Instructions
-
Activate the Yeast: In a small bowl, combine 1/2 cup of the warm water, yeast, and sugar. Let it sit in a warm place until the yeast mixture turns bubbly, about 5-10 minutes. This step is crucial to ensure your yeast is alive and active. If it doesn’t bubble, your yeast may be old or the water too hot, preventing it from activating. Start with fresh yeast for the best results.
-
Combine Wet Ingredients: In a large mixing bowl (a stand mixer with a dough hook works wonders, but you can certainly knead by hand!), combine the remaining 1 cup of warm water, molasses, salt, shortening, caraway seeds, and the yeast mixture. Beat until smooth. The molasses not only adds sweetness but also contributes to the bread’s characteristic dark color and rich flavor.
-
Incorporate the Flours: Slowly beat in the rye flour into the wet ingredients mixture. Once combined, gradually mix in the all-purpose flour, adding just enough until a soft, smooth dough ball forms. The amount of all-purpose flour needed can vary depending on humidity. Aim for a dough that is slightly tacky but not overly sticky.
-
Knead the Dough: Turn the dough out onto a lightly floured surface. If the dough is too moist, add a little more flour. If the dough is too dry, add a little more water, a teaspoon at a time. Knead the dough for 5 minutes. Kneading develops the gluten, giving the bread its structure and chewiness.
-
First Rise: Lightly grease a large bowl (or spray with cooking spray). Add the dough, turning once to coat the entire surface with oil. This prevents the dough from drying out during the rise. Cover the bowl with a clean cloth and let it rise in a warm place until almost doubled in size, about 1 1/2 hours. A warm, draft-free environment is ideal for rising.
-
Shape the Loaves: Punch down the dough to release the air. Separate the dough into 2 equal parts. Form each part into a round, slightly flattened loaf.
-
Score the Loaves: Score a 3/4 inch deep “X” into the tops of both loaves with a sharp knife. Scoring allows the bread to expand evenly during baking and prevents it from cracking in undesirable places.
-
Second Rise: Grease a large baking sheet (or spray) and sprinkle it with cornmeal. The cornmeal prevents the loaves from sticking and adds a subtle, delightful texture to the bottom crust. Place the loaves on top, cover with a clean cloth, and let them rise until doubled in size, about an hour.
-
Bake the Bread: Preheat your oven to 375 degrees F (190 degrees C). Bake for 30-35 minutes, or until the crusts are dark brown and the loaves sound hollow when tapped on the bottom. Baking time may vary depending on your oven. Keep an eye on the color of the crust; it should be a deep, rich brown.
-
Cool and Enjoy: Remove the loaves from the baking sheet and cool them completely on a rack before slicing. This prevents the bread from becoming soggy. Resist the urge to cut into it immediately!
Expert Tips & Tricks
- Molasses Matters: Use a good quality molasses for the best flavor. Dark molasses will give a more intense flavor.
- Rye Flour Storage: Rye flour can go rancid quickly. Store it in the freezer to extend its shelf life.
- Steam for Crust: For an extra-crispy crust, create steam in the oven during the first 10 minutes of baking. You can do this by placing a pan of hot water on the lower rack.
- Dough Consistency: Pumpernickel dough can be a bit sticky. Don’t be tempted to add too much flour, as this will result in a dry, dense loaf.
- Resting is Key: Allow the baked loaves to cool completely before slicing. This allows the crumb to set properly, resulting in a cleaner slice and improved texture.
Serving & Storage Suggestions
Pumpernickel is a versatile bread that pairs well with many foods. Serve it warm with butter, alongside soups and stews, or as the base for open-faced sandwiches. It’s especially delicious with smoked salmon, cream cheese, or hearty cheeses like Swiss or Gruyere.
Store cooled pumpernickel bread at room temperature in a breadbox or tightly sealed plastic bag for up to 3 days. For longer storage, wrap the loaf tightly in plastic wrap and freeze it for up to 2 months. To thaw, leave it at room temperature for several hours or overnight. To refresh frozen bread, wrap it in foil and warm it in a 350°F (175°C) oven for about 15-20 minutes.
Nutritional Information
| Nutrient | Amount per Serving (estimated) | % Daily Value* |
|---|---|---|
| Calories | 200 kcal | 10% |
| Total Fat | 3g | 4% |
| Saturated Fat | 0.5g | 3% |
| Cholesterol | 0mg | 0% |
| Sodium | 650mg | 28% |
| Total Carbohydrate | 40g | 15% |
| Dietary Fiber | 4g | 16% |
| Sugars | 7g | – |
| Protein | 5g | 10% |
*Percent Daily Values are based on a 2,000 calorie diet. Your daily values may be higher or lower depending on your calorie needs.
Variations & Substitutions
- Darker Color: Add a tablespoon of instant coffee granules to the wet ingredients for an even deeper color and subtle coffee flavor.
- Sweetener Swap: Substitute honey or maple syrup for molasses, though the flavor will be slightly different.
- Seed Sensations: Experiment with different seeds, such as sunflower seeds or poppy seeds, in addition to or instead of caraway seeds.
- Spicier Kick: Add a pinch of red pepper flakes to the dough for a subtle warmth.
- Rye Flour Ratio: Adjust the ratio of rye to all-purpose flour for a milder or more intense rye flavor. Just be mindful of how it affects the gluten development.
FAQs (Frequently Asked Questions)
Q: Why is my pumpernickel bread so dense?
A: Several factors can contribute to dense bread, including using old yeast, not kneading the dough enough, or adding too much flour. Make sure your yeast is fresh, knead the dough for the recommended time, and avoid adding excess flour.
Q: Can I make this recipe with a bread machine?
A: While this recipe is designed for traditional baking, you can adapt it for a bread machine. Follow your bread machine’s instructions, but be mindful of the order in which ingredients are added.
Q: What is the best way to tell if my pumpernickel bread is done?
A: The best way to check for doneness is to tap the bottom of the loaf. If it sounds hollow, it’s ready. You can also use a thermometer; the internal temperature should be around 200-210°F (93-99°C).
Q: Can I freeze pumpernickel bread?
A: Yes, pumpernickel bread freezes well. Wrap it tightly in plastic wrap and then in foil, or place it in a freezer bag. It can be stored in the freezer for up to 2 months.
Q: Why is my pumpernickel bread crumbly?
A: A crumbly texture can be caused by under-kneading or using too little liquid. Make sure to knead the dough for the recommended time and measure the liquid ingredients accurately.
Final Thoughts
Baking pumpernickel bread is more than just following a recipe; it’s an act of creation, a connection to tradition, and a way to bring warmth and comfort into your home. Don’t be intimidated by the process – embrace the journey, trust your instincts, and enjoy the rewarding experience of transforming simple ingredients into a truly special loaf. Invite friends and family to share a slice and relish in the heartwarming flavor of homemade pumpernickel. I encourage you to try it and let me know how it goes. Happy baking!