
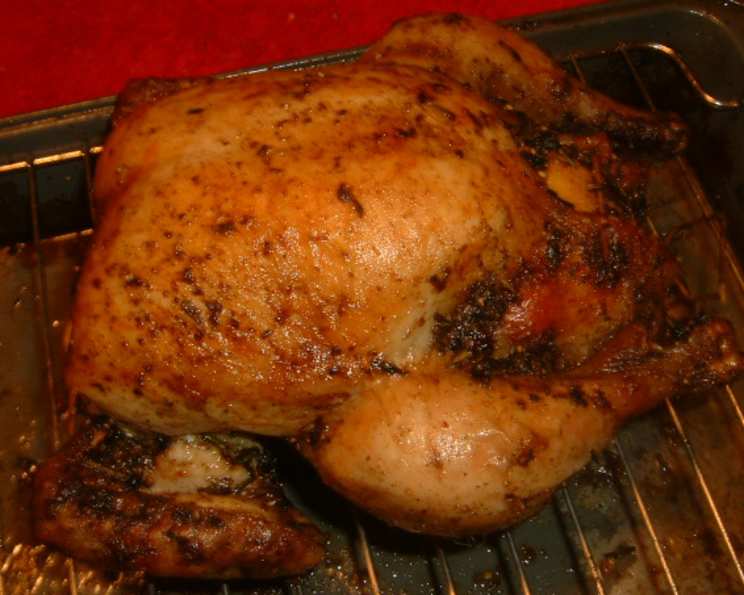
The Comfort of Home: Mastering Classic Roast Chicken and Gravy
The aroma of roast chicken is more than just a scent; it’s a memory. For me, it’s the echo of Sunday dinners past, the warmth of my grandmother’s kitchen, and the shared laughter around a table laden with food. It’s a simple dish, yes, but one that speaks of love, tradition, and the pure joy of good food shared. This recipe embodies that comforting feeling, a timeless classic perfected over time.
Recipe Overview
- Prep Time: 15 minutes
- Cook Time: 3 hours
- Total Time: 3 hours 15 minutes
- Servings: 6
- Yield: 1 whole chicken with gravy
- Dietary Type: Generally Dairy-Free (check stock), Gluten-Free (if gravy is thickened with cornstarch instead of flour)
Ingredients
- 1 (5 lb) chicken
- ½ onion
- 4 cloves garlic
- ½ lemon
- 1 tablespoon extra virgin olive oil or 1 tablespoon butter
- ¾ teaspoon dried thyme
- ½ teaspoon salt
- ¼ teaspoon crumbled dried rosemary
- ¼ teaspoon rubbed dried sage or ¼ teaspoon dried savory (optional)
- ¼ teaspoon pepper
- 2 tablespoons all-purpose flour
- ¾ cup chicken stock
Equipment Needed
- Roasting pan with rack
- Kitchen string
- Meat thermometer
- Whisk
- Gravy boat (optional)
- Kitchen scissors or carving knife
Instructions
-
Begin by preparing the chicken. Remove any giblets and the neck from the cavity, if present. Rinse the chicken thoroughly inside and out under cold water. Use paper towels to pat the chicken completely dry. A dry bird is key to crispy skin.
-
Prepare the aromatics. Place the halved onion and whole garlic cloves inside the chicken cavity. Squeeze the juice from the lemon half into a small bowl and set the juice aside; then add the squeezed lemon half to the cavity as well.
-
Truss the chicken. Use kitchen string to tie the legs together securely. This helps the chicken cook more evenly and maintain its shape. Tuck the wing tips under the back of the chicken to prevent them from burning during roasting.
-
Season generously. Brush the entire chicken with olive oil or melted butter, ensuring even coverage. This helps the skin crisp up beautifully. Sprinkle the chicken all over with dried thyme, crumbled dried rosemary, salt, and pepper. If desired, add dried sage or dried savory for an extra layer of flavor.
-
Place the chicken, breast side up, on a rack in a roasting pan. The rack allows air to circulate, promoting even cooking and crisping of the skin on all sides.
-
Roast the chicken, uncovered, in a preheated 325°F (160°C) oven for 1 ½ hours. The lower temperature allows for a more even cook.
-
Continue to roast the chicken, basting it occasionally with the pan juices, until the juices run clear when the thigh is pierced with a fork and a meat thermometer inserted into the thickest part of the thigh registers 185°F (85°C). This usually takes about another 1 ½ hours. Basting helps to keep the chicken moist and flavorful.
-
Once the chicken is cooked through, transfer it to a platter and tent it loosely with foil. Let the chicken stand for 10 minutes before carving. This allows the juices to redistribute throughout the meat, resulting in a more tender and flavorful final product.
-
While the chicken is resting, prepare the gravy. Skim the excess fat from the pan juices. You can use a spoon or a fat separator for this.
-
Sprinkle the flour over the pan juices. Cook over medium-high heat, whisking constantly, for 1 minute. This creates a roux, which is the base for the gravy. Cooking the flour removes the raw taste.
-
Gradually pour in the chicken stock and the reserved lemon juice, whisking continuously until the gravy is smooth and thickened, about 3 minutes. The lemon juice adds a subtle brightness to the gravy.
-
Pour the finished gravy into a warmed gravy boat.
-
To serve, cut the string holding the legs together and discard the onion, lemon, and garlic from the cavity. Using kitchen scissors or a carving knife, cut the chicken into 2 breast portions and 2 leg portions. Cut each breast portion in half diagonally. Cut through each leg at the joint to separate it into drumsticks and thighs. Serve the chicken immediately with the gravy.
Expert Tips & Tricks
- Brining: For an even more succulent chicken, consider brining it for a few hours or overnight before roasting. A simple brine of salt, sugar, and water can make a world of difference.
- Dry Brining (Salting): If you don’t have time for a wet brine, generously salting the chicken 1-2 days before roasting and leaving it uncovered in the fridge will achieve a similar effect, resulting in crispy skin and well-seasoned meat.
- Elevate with Vegetables: Roast the chicken on a bed of root vegetables like carrots, potatoes, and parsnips. They’ll soak up the pan juices and become incredibly flavorful.
- Gravy Consistency: If your gravy is too thick, add a little more chicken stock. If it’s too thin, whisk together a tablespoon of cornstarch with a tablespoon of cold water, and then whisk that slurry into the gravy while it simmers.
- Doneness is Key: Always use a meat thermometer to ensure the chicken is cooked to a safe internal temperature.
Serving & Storage Suggestions
Serve the roast chicken hot, drizzled generously with the homemade gravy. It pairs perfectly with mashed potatoes, roasted vegetables, stuffing, or a simple green salad.
Leftover roast chicken can be stored in an airtight container in the refrigerator for up to 3-4 days. The gravy should also be stored separately in the refrigerator.
To reheat, you can either microwave the chicken (though it may dry out slightly) or gently warm it in a covered skillet with a little chicken broth to keep it moist. Reheat the gravy in a saucepan over low heat, whisking occasionally, until heated through.
You can freeze cooked chicken for longer storage (up to 2-3 months). Wrap the chicken tightly in plastic wrap and then place it in a freezer bag. Thaw overnight in the refrigerator before reheating.
Nutritional Information
| Nutrient | Amount per Serving | % Daily Value |
|---|---|---|
| Calories | 543.6 kcal | N/A |
| Calories from Fat | 336 g | 62% |
| Total Fat | 37.3 g | 57% |
| Saturated Fat | 10.3 g | 51% |
| Cholesterol | 173.4 mg | 57% |
| Sodium | 398.8 mg | 16% |
| Total Carbohydrate | 5.7 g | 1% |
| Dietary Fiber | 0.8 g | 3% |
| Sugars | 0.9 g | 3% |
| Protein | 44.1 g | 88% |
Note: Nutritional information is an estimate and may vary based on specific ingredients and cooking methods.
Variations & Substitutions
- Herb Variations: Experiment with different herbs! Try adding fresh rosemary sprigs to the cavity or using a blend of Italian herbs for a different flavor profile.
- Citrus Infusion: Instead of lemon, use an orange or a grapefruit for a different citrus note.
- Spiced Chicken: Add a pinch of smoked paprika or chili powder to the rub for a hint of smokiness and spice.
- Gravy Thickening: For a gluten-free gravy, use cornstarch instead of flour to thicken it. Whisk together equal parts cornstarch and cold water to create a slurry, then whisk it into the pan juices while the gravy simmers.
- Wine-Infused Gravy: Add a splash of dry white wine to the pan juices after skimming the fat for a more complex gravy flavor.
FAQs (Frequently Asked Questions)
Q: How do I know when the chicken is cooked through?
A: The best way to ensure the chicken is cooked through is to use a meat thermometer. Insert it into the thickest part of the thigh, avoiding the bone. The internal temperature should reach 185°F (85°C).
Q: Why is my chicken skin not crispy?
A: Ensuring the chicken is completely dry before roasting is key to crispy skin. Pat it dry with paper towels and consider salting it a day or two in advance. Also, avoid overcrowding the pan, as this can create steam and prevent the skin from crisping.
Q: Can I roast the chicken without a rack?
A: While using a rack is recommended for even cooking, you can roast the chicken directly in the roasting pan. However, the bottom of the chicken may not get as crispy.
Q: Can I make the gravy ahead of time?
A: Yes, you can make the gravy ahead of time and store it in the refrigerator for up to 2 days. Reheat it gently on the stovetop, whisking occasionally, until heated through.
Q: What can I do with the leftover chicken carcass?
A: Don’t throw it away! Use the carcass to make a delicious and flavorful chicken stock. Simply simmer it with vegetables and herbs for a few hours.
Final Thoughts
Roast chicken is more than just a meal; it’s an experience, a connection to simpler times, and a testament to the power of good, honest cooking. Don’t be intimidated by the process; with a little patience and attention to detail, you can create a truly memorable dish. I encourage you to try this recipe, experiment with different flavors, and make it your own. And, of course, share your culinary creations with loved ones—the joy of sharing a home-cooked meal is the greatest reward of all. Pair this dish with a crisp Sauvignon Blanc or a hearty Pinot Noir to elevate the experience. Bon appétit!