
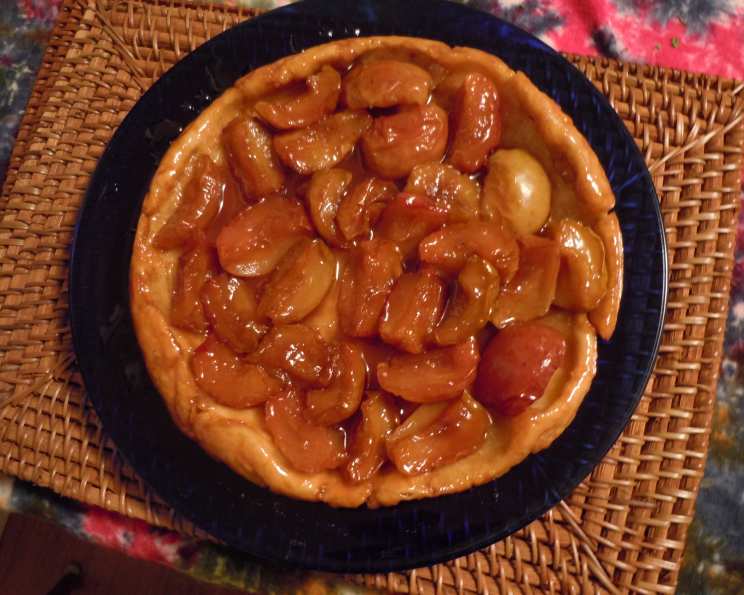
Classic Tarte Tatin in a Cast-Iron Skillet
The first time I ever tasted Tarte Tatin, I was a wide-eyed culinary student on an exchange program in Lyon, France. The rustic bistro, with its checkered tablecloths and the comforting aroma of browned butter and apples, felt like stepping into a postcard. One bite of that warm, caramelized apple tart, its buttery crust melting in my mouth, and I was hooked. It wasn’t just a dessert; it was a memory etched in sweetness and warmth, a reminder of the magic that can happen when simple ingredients are transformed with a little patience and a lot of love. And to think, this masterpiece was “invented” by accident!
Recipe Overview
- Prep Time: 45 minutes
- Cook Time: 45 minutes
- Total Time: 1 hour 30 minutes (including chilling)
- Servings: 8
- Yield: 1 pie
- Dietary Type: Vegetarian
Ingredients
For the Dough:
- 1 1/4 cups all-purpose flour
- 1 tablespoon sugar
- 1/2 teaspoon salt
- 4 tablespoons cold unsalted butter, cut into 3/4 inch pieces
- 3 tablespoons very cold water
For the Filling:
- 4 tablespoons unsalted butter, cut into 4 pieces
- 3/4 cup sugar
- 8 golden delicious apples, about 2 lbs. total, peeled, quartered lengthwise and cored
Equipment Needed
- Food processor (optional)
- Mixing bowl
- Pastry blender or 2 knives (if making dough by hand)
- Plastic wrap
- Work surface
- Rolling pin
- Dough scraper or icing spatula
- Rimless baking sheet
- 10-inch straight-sided, ovenproof fry pan, preferably cast iron
- Wire rack
- Large flat serving plate
Instructions
-
Prepare the dough: If using a food processor, combine the flour, sugar, and salt in the bowl. Add the butter and pulse until reduced to ½ inch pieces. Add the water a little at a time and pulse until the dough just begins to come together in a rough mass.
-
Prepare the dough by hand (alternative method): In a bowl, combine the flour, sugar, and salt. Add the butter and toss to coat with the flour mixture. Using a pastry blender or 2 knives, cut the pieces of fat into the flour mixture until they are no larger than small peas. Distribute the water over the mixture and toss with a fork until the dough is evenly moist and begins to come together in a rough mass.
-
Shape and chill the dough: Transfer the dough to a work surface and shape into a 5-inch disk. Wrap with plastic wrap and refrigerate until well chilled, at least 2 hours. This is crucial for a flaky crust!
-
Roll out the dough: Lightly dust a work surface and rolling pin with flour. Roll out the chilled dough into a 12-inch round, a scant ¼ inch thick. Lift and turn the dough several times as you roll to prevent sticking, and dust the surface and rolling pin with additional flour as needed. Use a dough scraper or icing spatula to loosen the pastry if it sticks.
-
Trim and chill the dough round: Trim the dough into an 11-inch round. Slide a rimless baking sheet under the dough, cover with plastic wrap, and refrigerate until needed. Keeping the pastry cold prevents shrinkage during baking.
-
Preheat the oven: Preheat an oven to 375 degrees Fahrenheit (190 degrees Celsius).
-
Caramelize the sugar: To make the filling, set a 10-inch straight-sided, ovenproof fry pan (preferably cast iron) over medium heat and melt the butter. When it melts, sprinkle the sugar evenly over the butter and continue cooking until the sugar melts and turns amber colored, about 3 to 4 minutes. Shake and swirl the pan frequently to redistribute the sugar for even melting and caramelization. Watch it carefully to avoid burning!
-
Arrange the apples: Arrange the apples, side up, in the caramel in a snug, even layer. This is where the visual appeal begins!
-
Cook the apples: Increase the heat to medium-high and cook until the apples are just tender, about 15 minutes. The caramel will bubble up around the apples. Remove the pan from the heat.
-
Top with pastry: Uncover the pastry round. When the bubbling has subsided, slide both hands under the pastry round and carefully place it on top of the apples, tucking in the edges and being careful not to burn your fingers.
-
Bake: Bake until the crust is golden brown, about 30 minutes. The crust should be beautifully browned and cooked through.
-
Cool and invert: Transfer the pan to a wire rack and let cool for 6 minutes. Place a large flat serving plate upside down on top of the pan and invert the pan and plate together. Lift off the pan. This is the moment of truth!
-
Serve: Slice and serve warm, ideally with a scoop of vanilla ice cream or a dollop of crème fraîche.
Expert Tips & Tricks
- Cold ingredients are key: Keeping the butter and water ice-cold is essential for creating a flaky pie crust. The cold fat creates steam pockets that separate the layers of dough.
- Don’t overwork the dough: Overworking the dough develops the gluten, resulting in a tough crust. Handle it gently and mix only until it just comes together.
- Caramelization is an art: Watch the caramel carefully as it cooks. It should be a deep amber color, but not burnt. Burnt caramel will taste bitter.
- Use firm apples: Golden Delicious are traditional, but other firm apples like Honeycrisp or Granny Smith also work well. Softer apples will turn to mush during cooking.
- If the apples release too much liquid during the cooking process, continue cooking them uncovered for a few more minutes to allow some of the moisture to evaporate.
- Make the dough ahead: The dough can be made up to 2 days in advance and stored in the refrigerator, tightly wrapped. You can also freeze it for up to 2 months. Thaw in the refrigerator overnight before using.
Serving & Storage Suggestions
Serve Tarte Tatin warm, straight from the oven, or slightly cooled. A scoop of vanilla ice cream, a dollop of whipped cream, or a spoonful of crème fraîche complements the richness of the caramel and apples perfectly.
Leftovers can be stored at room temperature for up to 2 days or in the refrigerator for up to 4 days. To reheat, warm individual slices in a toaster oven or microwave. Reheating in a regular oven can dry out the crust. If reheating the whole tart, tent it loosely with foil to prevent the crust from burning.
Nutritional Information
| Nutrient | Amount per Serving | % Daily Value |
|---|---|---|
| Calories | 346 kcal | N/A |
| Calories from Fat | 108 | 31% |
| Total Fat | 12 g | 18% |
| Saturated Fat | 7.4 g | 36% |
| Cholesterol | 30.5 mg | 10% |
| Sodium | 149.3 mg | 6% |
| Total Carbohydrate | 60.4 g | 20% |
| Dietary Fiber | 4.9 g | 19% |
| Sugars | 39.3 g | N/A |
| Protein | 2.6 g | 5% |
Note: Nutritional information is an estimate and may vary based on specific ingredients and portion sizes.
Variations & Substitutions
- Gluten-Free Tarte Tatin: Use a gluten-free all-purpose flour blend for the dough. You may need to add a little extra water to bring the dough together.
- Spice it up: Add a pinch of cinnamon, nutmeg, or cardamom to the apples for a warmer flavor.
- Pear Tarte Tatin: Substitute pears for the apples for a different flavor profile. Bosc pears work particularly well.
- Salted Caramel Tarte Tatin: Sprinkle a pinch of sea salt over the caramel before adding the apples for a delicious salty-sweet contrast.
- Bourbon Caramel Tarte Tatin: Add a tablespoon of bourbon to the caramel for an extra layer of flavor.
FAQs (Frequently Asked Questions)
Q: Can I use a different type of apple?
A: Yes, you can use other firm apples like Honeycrisp or Granny Smith. Softer apples will become too mushy.
Q: Can I make the Tarte Tatin ahead of time?
A: While best served fresh, you can assemble the tart up to a few hours ahead of time and bake it just before serving. The crust might not be as crisp.
Q: My caramel burned. What do I do?
A: Unfortunately, there’s no saving burnt caramel. You’ll need to discard it and start again. Watch the caramel carefully and remove it from the heat as soon as it reaches a deep amber color.
Q: The crust is browning too quickly. What can I do?
A: Tent the tart loosely with foil to prevent the crust from burning.
Q: Do I have to use a cast-iron skillet?
A: While a cast-iron skillet is ideal for even heat distribution, any oven-safe skillet of the same size will work.
Final Thoughts
There you have it: a classic Tarte Tatin, baked to golden perfection in a cast-iron skillet. This is more than just a dessert; it’s an experience, a journey of simple ingredients transformed into something truly extraordinary. Don’t be intimidated by the process; embrace the imperfections, savor the aromas, and enjoy the satisfaction of creating something delicious. I hope you’ll give this recipe a try and share your own Tarte Tatin triumphs with friends and family. Bon appétit!