
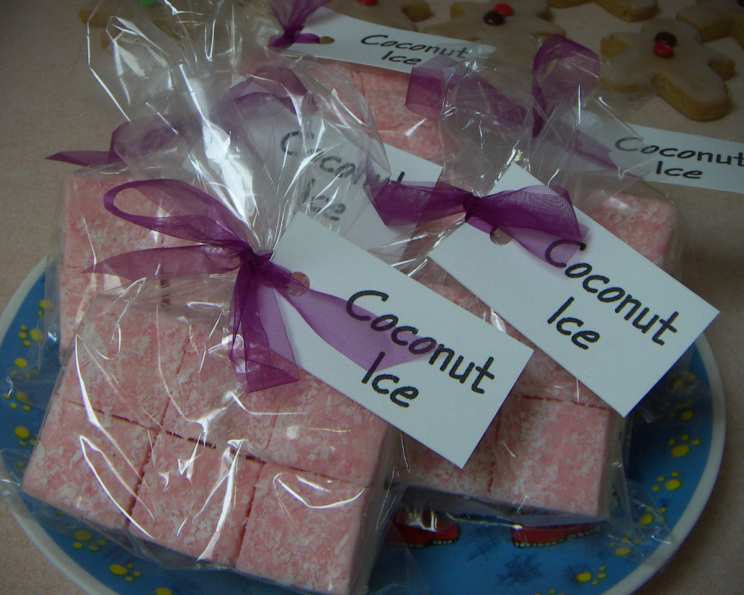
No-Cook Coconut Ice: A Sweet Slice of Nostalgia
The first time I tasted coconut ice, I was at a church bazaar, a dizzying swirl of hand-knitted blankets, raffles, and the insistent hum of social chatter. My eyes, however, were glued to a table laden with homemade treats. It was there, nestled amongst the fudge and gingerbread men, that I spotted it: a two-toned pink and white confection, dusted with sugar and cut into perfect little squares. One bite, and I was transported. The creamy, coconutty sweetness melted on my tongue, leaving me with a profound sense of joy and a sugar rush that lasted the entire afternoon. This recipe captures that memory perfectly – simple, sweet, and utterly irresistible.
Recipe Overview
- Prep Time: 15 minutes
- Cook Time: 1 hour (setting time)
- Total Time: 1 hour 15 minutes
- Servings: Varies depending on cut size
- Yield: Approximately 700 grams
- Dietary Type: Vegetarian, Gluten-Free (check food coloring ingredients for vegan suitability)
Ingredients
- 150 ml sweetened condensed milk
- 250 g icing sugar, sieved (also known as powdered or confectioner’s sugar)
- 175 g desiccated coconut (finely grated and dried)
- 2-5 drops red food coloring or pink food coloring (optional)
- Extra icing sugar, for dusting
Equipment Needed
- Square pan (size will determine thickness of coconut ice)
- Large mixing bowl
- Sieve
- Measuring jug or cups
- Oiled knife
Instructions
- Begin by preparing your pan. Generously dust the inside of a square pan with extra icing sugar. This prevents the coconut ice from sticking and makes it easier to remove later. The size of your pan will determine the thickness of your final product; a smaller pan will yield thicker squares, while a larger pan will result in thinner ones.
- In a large mixing bowl, combine the sweetened condensed milk, sieved icing sugar, and desiccated coconut. It’s essential to sift the icing sugar to remove any lumps, ensuring a smooth and creamy texture in the final product.
- Mix the ingredients together thoroughly until they are fully combined and form a stiff mixture. This may require a bit of elbow grease, but it’s crucial to ensure that all the ingredients are evenly distributed. The mixture should hold its shape when pressed.
- Divide the mixture in half. This step allows you to create the classic two-toned effect.
- Tint one half of the mixture pink using the red or pink food coloring. Add the food coloring drop by drop, mixing well after each addition, until you achieve the desired shade. Be careful not to add too much, as it can affect the consistency of the mixture.
- Press one of the mixtures (either the plain or the pink) into the prepared pan. Use your fingers or the back of a spoon to gently but firmly press the mixture evenly across the bottom of the pan.
- Top with the other mixture and press it down firmly. Ensure that the second layer is evenly distributed and that it adheres well to the first layer. Press down gently but firmly to create a compact and uniform block of coconut ice.
- Leave the coconut ice to set at room temperature for at least an hour, or until it is firm to the touch. The setting time may vary depending on the temperature and humidity of your environment. You can also place it in the refrigerator to speed up the setting process.
- Once the coconut ice has set completely, cut it into cubes or fingers using an oiled knife. Oiling the knife prevents the coconut ice from sticking and ensures clean, even cuts.
- Store the coconut ice by wrapping it individually or layering it with waxed or greaseproof paper in an airtight container. This prevents it from drying out and helps it maintain its freshness.
Expert Tips & Tricks
- For an extra smooth texture, pulse the desiccated coconut in a food processor before adding it to the mixture. This will create an even finer coconut texture.
- If your mixture seems too dry, add a tiny splash (literally a teaspoon at a time) more of sweetened condensed milk. If it’s too wet, add a tablespoon of sifted icing sugar.
- Don’t overmix the coconut ice mixture. Overmixing can result in a tough or chewy texture. Mix just until the ingredients are combined.
- Experiment with different food colorings to create unique and vibrant coconut ice variations.
- For a richer flavor, add a teaspoon of vanilla extract or almond extract to the mixture.
Serving & Storage Suggestions
Coconut ice is best served at room temperature. Arrange the cubes or fingers on a platter for an elegant presentation. It makes a delightful addition to dessert tables, afternoon tea spreads, or as a sweet treat to enjoy with a cup of coffee or tea.
Store the coconut ice in an airtight container at room temperature for up to a week, or in the refrigerator for up to two weeks. It can also be frozen for longer storage; wrap it tightly in plastic wrap and then place it in a freezer bag for up to three months. Thaw it in the refrigerator before serving.
Nutritional Information
| Nutrient | Amount per Serving* | % Daily Value |
|---|---|---|
| Calories | Approximately 100 kcal | 5% |
| Total Fat | 5g | 8% |
| Saturated Fat | 4g | 20% |
| Cholesterol | 1mg | 0% |
| Sodium | 5mg | 0% |
| Total Carbohydrate | 15g | 5% |
| Dietary Fiber | 1g | 4% |
| Sugars | 14g | – |
| Protein | 1g | 2% |
*Nutritional information is an estimate and can vary based on serving size and specific ingredients used.
Variations & Substitutions
- Vegan Coconut Ice: To make this recipe vegan, substitute the sweetened condensed milk with a vegan sweetened condensed milk alternative. Ensure the food coloring is also vegan-friendly.
- Flavor Variations: Experiment with different extracts, such as peppermint, orange, or lemon, to create unique flavor profiles.
- Nutty Coconut Ice: Add chopped nuts, such as almonds, walnuts, or pecans, to the mixture for added texture and flavor.
- Chocolate Coconut Ice: Add a tablespoon of cocoa powder to one half of the mixture for a chocolatey twist.
- Tropical Coconut Ice: Incorporate finely diced dried mango or pineapple for a tropical flavor.
FAQs (Frequently Asked Questions)
Q: Why is my coconut ice crumbly?
A: This usually indicates that there isn’t enough moisture. Try adding a very small amount of sweetened condensed milk (a teaspoon at a time) until the mixture binds together properly.
Q: Can I use fresh coconut instead of desiccated coconut?
A: While you could, desiccated coconut is recommended for its dry texture, which is crucial for the right consistency. Fresh coconut has too much moisture and will result in a softer, less stable product.
Q: How can I prevent my coconut ice from sticking to the pan?
A: Ensure you generously dust the pan with icing sugar before pressing in the mixture. You can also line the pan with parchment paper, leaving an overhang to easily lift the coconut ice out.
Q: My coconut ice is too sweet. Can I reduce the sugar?
A: Reducing the icing sugar significantly will affect the texture of the coconut ice. It’s best to stick to the recipe for optimal results. You can try adding a pinch of salt to balance the sweetness.
Q: How long does coconut ice last?
A: Coconut ice can last for up to a week at room temperature or up to two weeks in the refrigerator, stored in an airtight container. Freezing extends its shelf life to about three months.
Final Thoughts
This no-cook coconut ice recipe is a simple yet satisfying treat that’s perfect for any occasion. Its ease of preparation makes it a great option for beginner bakers, and its customizable nature allows for endless creative possibilities. Don’t be afraid to experiment with different flavors and colors to create your own signature version. So go ahead, whip up a batch of this delightful confection and share the sweet joy of coconut ice with your friends and family. And be sure to let me know how yours turns out!