
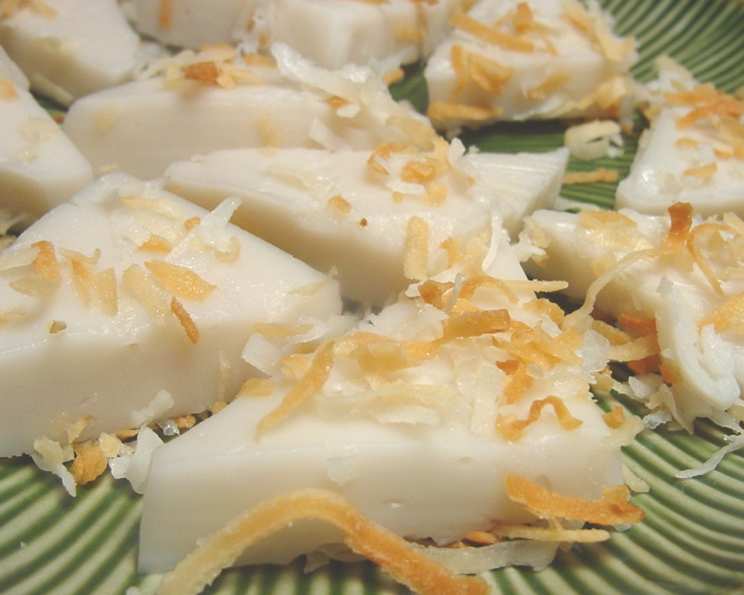
Coconut Pudding Triangles (Haupia): A Taste of Aloha
My first experience with Haupia was at a small family gathering on Oahu. The host, a sweet elderly woman with a mischievous twinkle in her eye, proudly presented a platter of these pristine white triangles. The creamy, melt-in-your-mouth texture and delicate coconut flavor transported me instantly to a tropical paradise. It was more than just dessert; it was a tangible expression of the aloha spirit – simple, pure, and utterly delightful. From that moment on, Haupia has held a special place in my heart, a reminder of warm breezes, friendly faces, and the sweet, simple pleasures of island life.
Recipe Overview
- Prep Time: 15 minutes
- Cook Time: 6-8 minutes to toast coconut + 4-6 minutes to cook pudding + 1 hour chill time
- Total Time: 1 hour 25 minutes
- Servings: 12
- Yields: 22-24 triangles
- Dietary Type: Gluten-Free, Vegetarian (easily adaptable to Vegan)
Ingredients
- ½ cup sweetened flaked coconut
- Vegetable oil, for oiling baking dish
- 1 (14 ounce) can coconut milk
- 6 tablespoons cornstarch
- ⅓ cup sugar
- ½ teaspoon vanilla
- ⅛ teaspoon salt
Equipment Needed
- Baking sheet
- 8-inch square baking dish
- Small bowl
- Medium nonstick saucepan
- Whisk
- Plastic wrap
Instructions
-
Preheat your oven to 325°F (160°C). This relatively low temperature is key to gently toasting the coconut without burning it.
-
Spread the flaked coconut evenly on a baking sheet. Bake in the preheated oven until golden brown, approximately 6 to 8 minutes. Keep a close watch; coconut can go from toasted to burnt very quickly. The aroma of toasted coconut is your best indicator of doneness. Remove from the oven and set aside to cool.
-
Lightly oil an 8-inch square baking dish with vegetable oil. This will prevent the Haupia from sticking and make it easier to remove and cut into triangles later. Use a neutral-tasting oil to avoid affecting the delicate flavor of the coconut.
-
In a small bowl, whisk together ½ cup of the coconut milk and the cornstarch until completely smooth. Ensure there are no lumps of cornstarch remaining, as these can create an unpleasant texture in the final product. This cornstarch slurry is crucial for thickening the Haupia to the perfect pudding-like consistency.
-
In a medium nonstick saucepan, combine the remaining 1 ½ cups coconut milk (if you don’t have enough from the can, augment with water to reach the required amount) and the sugar. Stir over medium heat until the sugar has completely dissolved. A nonstick saucepan is highly recommended to prevent the Haupia from sticking and burning.
-
Once the sugar is dissolved, slowly drizzle the cornstarch mixture into the saucepan, whisking constantly. Continue whisking vigorously while adding the vanilla and salt. The constant whisking is essential to prevent lumps from forming.
-
Cook the mixture over medium heat, whisking continuously and vigorously. Do not allow the mixture to boil. Continue cooking until the mixture becomes very thick, pulling away from the sides of the pan, and no longer tastes floury, which should take about 4 to 6 minutes. The “floury” taste is the raw cornstarch, and it needs to be fully cooked out for the best flavor and texture. The mixture should have a smooth, glossy appearance when it’s ready.
-
Pour the thickened Haupia mixture into the prepared baking dish and spread it evenly. Ensure the surface is smooth for a more professional presentation.
-
Let the Haupia cool briefly at room temperature, then cover it tightly with plastic wrap, pressing the plastic wrap directly onto the surface of the Haupia to prevent a skin from forming.
-
Chill in the refrigerator until completely set, which will take at least 1 hour, but preferably longer (2-3 hours is ideal). This chilling time is crucial for the Haupia to firm up properly.
-
Once the Haupia is firm, cut it into 22 to 24 triangles. A sharp knife dipped in warm water will make clean cuts.
-
Sprinkle each triangle with a pinch of the toasted coconut. This adds a delightful textural contrast and enhances the coconut flavor.
Expert Tips & Tricks
- Toasting Coconut Perfection: Watch the coconut very carefully while toasting. It burns easily! Spread it in a thin, even layer on the baking sheet for consistent toasting.
- Lump-Free Haupia: The key to a smooth, lump-free Haupia is to thoroughly dissolve the cornstarch in cold coconut milk before adding it to the hot mixture and whisking constantly while cooking.
- Vegan Variation: Ensure your sugar is vegan-friendly (some refined sugar is processed using bone char). The recipe is naturally dairy-free.
- Level Surface: For even thickness, place the baking dish on a level surface while the Haupia sets.
- Flavor Boost: A tiny pinch of lime zest added with the vanilla can brighten the flavor.
Serving & Storage Suggestions
Serve the Haupia triangles chilled. They are best enjoyed fresh. You can arrange them attractively on a platter or individual plates, garnished with extra toasted coconut or fresh tropical fruit like mango or pineapple.
Leftover Haupia should be stored in an airtight container in the refrigerator. It will last for up to 3 days. The texture may change slightly over time, becoming a bit softer. It’s not recommended to freeze Haupia, as it can affect the texture significantly.
Nutritional Information
| Nutrient | Amount per Serving | % Daily Value |
|---|---|---|
| Calories | 179.9 kcal | N/A |
| Calories from Fat | N/A | 35% |
| Total Fat | 7 g | 10% |
| Saturated Fat | 6.6 g | 32% |
| Cholesterol | 0 mg | 0% |
| Sodium | 47.2 mg | 1% |
| Total Carbohydrate | 29.4 g | 9% |
| Dietary Fiber | 0.3 g | 1% |
| Sugars | 25 g | N/A |
| Protein | 0.5 g | 1% |
Variations & Substitutions
- Extra Coconutty: Infuse the coconut milk with shredded coconut overnight for an even more intense coconut flavor. Strain before using.
- Chocolate Haupia: Add 2 tablespoons of unsweetened cocoa powder to the saucepan along with the sugar for a decadent chocolate twist.
- Fruit Infusion: Puree a small amount of mango or passion fruit and swirl it into the Haupia just before chilling for a burst of tropical flavor.
- Agar-Agar: For a firmer texture, experiment with using agar-agar as the setting agent instead of cornstarch. Follow the package instructions for proper usage.
FAQs (Frequently Asked Questions)
Q: Can I use unsweetened coconut flakes instead of sweetened?
A: Yes, you can use unsweetened coconut flakes, but you may want to increase the amount of sugar in the recipe to compensate for the reduced sweetness. Taste the mixture before pouring it into the baking dish and adjust accordingly.
Q: How do I prevent a skin from forming on top of the Haupia while it chills?
A: Press plastic wrap directly onto the surface of the Haupia as it cools. This prevents air from reaching the surface and forming a skin.
Q: Can I use a different size baking dish?
A: Yes, but the thickness of the Haupia will vary. A smaller dish will result in thicker triangles, while a larger dish will result in thinner ones. Adjust the chilling time accordingly.
Q: Why is my Haupia grainy?
A: Grainy Haupia can result from improperly dissolved cornstarch or overcooking. Ensure the cornstarch is fully dissolved in the cold coconut milk before adding it to the hot mixture, and avoid boiling the mixture.
Q: Can I make this ahead of time?
A: Absolutely! Haupia is a great make-ahead dessert. It can be prepared up to 2 days in advance and stored in the refrigerator.
Final Thoughts
Haupia is more than just a dessert; it’s a taste of the islands, a symbol of simple pleasures, and a reminder of the aloha spirit. I encourage you to try this recipe and experience the creamy, dreamy coconut goodness for yourself. Don’t be afraid to experiment with variations and make it your own. And, if you do, I’d love to hear about your creations! Serve it at your next gathering, share it with friends, and let the sweet taste of Haupia transport you to a tropical paradise. Pair it with a refreshing glass of iced tea or a scoop of mango sorbet for a truly delightful culinary experience.