
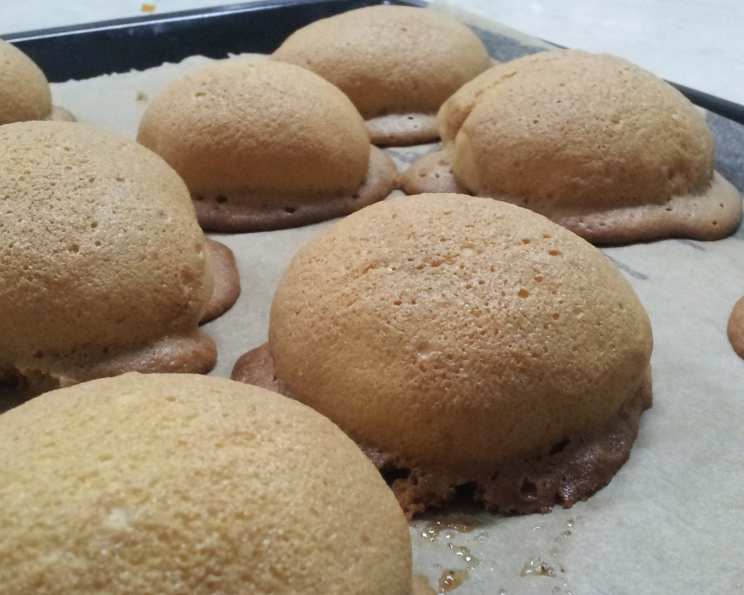
Coffee Cookie Buns: A Taste of Malaysia at Home
I remember the first time I tried a Coffee Cookie Bun. It was in a bustling Malaysian bakery, the air thick with the aroma of freshly baked bread and sweet coffee. The crisp, coffee-infused topping shattered with the slightest pressure, giving way to a soft, buttery interior. That first bite was pure bliss – a perfect harmony of textures and flavors that transported me to a world of warmth and comfort. Ever since, I’ve been on a quest to recreate that experience, and this recipe is as close as I’ve gotten to capturing that magic at home.
Recipe Overview
Here’s a quick look at what you can expect:
- Prep Time: 4 hours 3 minutes (includes resting/rising time)
- Cook Time: 18 minutes
- Total Time: 4 hours 21 minutes
- Yields: 22 buns
- Serves: 22
- Dietary Type: Not specified
Ingredients
Get ready to assemble your ingredients for this delightful treat!
Pre-Dough:
- ½ cup water
- ½ cup bread flour
Sponge Dough:
- 2 ½ cups bread flour
- 2 ¼ teaspoons instant yeast
- 2 teaspoons caster sugar
- ¾ – 1 cup warm water
Final Dough:
- ½ cup caster sugar
- 1 teaspoon salt
- 4 tablespoons unsalted butter, room temperature
- ½ teaspoon vital wheat gluten
- 1 ½ eggs
- 2 crushed ice cubes
- 1 ¾ cups bread flour
- 1 tablespoon liquid honey
- 4 tablespoons powdered milk or 4 tablespoons dry buttermilk
Filling:
- ¾ cup salted butter, cut into 22 pieces (approximately 1 ½ sticks) – freeze the cut pieces for 30-45 minutes to firm up.
Topping:
- 6 tablespoons unsalted butter, room temperature
- 1 cup minus 2 tablespoons icing sugar
- 4 teaspoons instant coffee
- 1 tablespoon hot water
- 1 ½ eggs
- ⅔ cup all-purpose flour
- 2 tablespoons powdered milk
Equipment Needed
- Large mixing bowl
- Plastic wrap or damp kitchen towel
- Baking sheet
- Parchment paper
- Electric mixer
- Piping bag with round or star-shaped nozzle (or disposable piping bag)
- Cooling rack
Instructions
Let’s get baking! Follow these detailed instructions to create your own delicious Coffee Cookie Buns.
-
Prepare the Pre-Dough: Heat ½ cup water on the stove over high heat until hot (but not boiling). Reduce the heat to low, add ½ cup bread flour, and stir until well combined. Place the mixture in a bowl, cover with plastic wrap, and refrigerate for at least 2 hours.
-
Make the Sponge Dough: In a large mixing bowl, combine 2 ½ cups bread flour, 2 ¼ teaspoons instant yeast, 2 teaspoons caster sugar, and ¾ to 1 cup warm water. Knead for 6 minutes. The dough should be very soft and slightly sticky.
-
First Rise: Shape the sponge dough into a ball, cover the bowl with plastic wrap or a damp kitchen towel, and let it rest in a warm place for 90 minutes to rise.
-
Combine Doughs: Add the pre-dough mixture to the sponge dough and knead for 30 seconds.
-
Add Dry Ingredients: Add ½ cup caster sugar, 1 teaspoon salt, 4 tablespoons powdered milk, and ½ teaspoon vital wheat gluten to the dough. Knead for another 30 seconds.
-
Add Wet Ingredients: Add 1 ½ eggs, 1 tablespoon liquid honey, and 2 crushed ice cubes to the dough. Knead for 1 minute.
-
Incorporate Flour: Add 1 ¾ cups bread flour and knead for 1 minute.
-
Add Butter: Add 4 tablespoons unsalted butter (room temperature) and knead for about 10 minutes until the dough becomes elastic. You may need to add additional bread flour, 1 tablespoon at a time, if the dough is too sticky. Be careful not to add too much flour, as this can make the buns tough.
-
Kneading Trick: If the dough remains slightly sticky, knead for 30 seconds, then pick up the ball of dough and throw it down hard in the mixing bowl or on the counter 3-4 times. Repeat this process 4-5 times, kneading for 30 seconds to 1 minute between each set of throws. This technique helps to develop the gluten and make the dough less sticky.
-
Second Rise: Shape the dough into a ball, place it back in the mixing bowl, cover with plastic wrap or a damp towel, and let it rest for 10 minutes.
-
Divide the Dough: Grease your hands with some butter or oil, and divide the dough into 22 equal pieces.
-
Prepare the Filling: Take the salted butter pieces from the freezer.
-
Assemble the Buns: Shape each piece of dough into a ball, flatten it slightly, and place one piece of frozen salted butter in the center. Pinch the dough around the butter to enclose it completely, then roll it back into a ball.
-
Shape and Place: Flatten each filled dough ball to about ½ inch thickness. Place the buns on a baking sheet lined with parchment paper, placing the pinched side down (this prevents the buns from caving in during baking). Keep each bun about 2-3 inches apart.
-
Third Rise: Cover the baking sheet with a damp kitchen towel and let the buns rest/rise for 45-50 minutes.
-
Preheat Oven: About 15 minutes before the end of the rising time, preheat your oven to 350°F (175°C).
-
Prepare the Topping: Dissolve 4 teaspoons instant coffee in 1 tablespoon hot water.
-
Make the Coffee Cookie Topping: With an electric mixer on low speed, beat 6 tablespoons unsalted butter (room temperature), 1 cup minus 2 tablespoons icing sugar, and the dissolved coffee mixture for 30 seconds to 1 minute until smooth.
-
Add Eggs: Add 1 ½ eggs and beat for another 30 seconds.
-
Incorporate Flour and Milk Powder: Slowly add ⅔ cup all-purpose flour and 2 tablespoons powdered milk to the topping mixture. Beat on low for 30 seconds, then increase the speed to high and beat for another minute or so until well combined.
-
Fill the Piping Bag: Transfer the coffee cookie topping to a piping bag fitted with a round or star-shaped nozzle (or a disposable piping bag with a small hole cut in the end).
-
Pipe the Topping: Pipe the topping onto each bun in a twirly circular pattern, covering the entire surface.
-
Bake: Bake the buns for around 18 minutes, or until they are lightly golden brown.
-
Cool and Serve: Remove the buns from the oven and place them on a cooling rack. Let them rest for only a minute or two – the topping will still be slightly soft but will crisp up as it cools. Enjoy the Coffee Cookie Buns while they are still hot or warm.
Expert Tips & Tricks
- Temperature is Key: Ensure your ingredients, especially butter, are at the correct temperature for optimal mixing.
- Don’t Overmix: Be careful not to overmix the topping, as this can lead to a tough crust.
- Adjust Sweetness: If you prefer a less sweet topping, reduce the amount of icing sugar slightly.
- Freezing Dough: For longer storage, freeze the unbaked, shaped buns after the second rise. Thaw them overnight in the refrigerator before baking.
Serving & Storage Suggestions
Serve these delectable buns warm for the best experience. The contrast between the crisp coffee crust and the soft, buttery interior is truly irresistible.
- Room Temperature: The buns are best enjoyed fresh. They can be stored at room temperature in an airtight container for up to 2 days, but the crust will soften.
- Refrigeration: For longer storage, refrigerate the buns in an airtight container for up to 4 days.
- Reheating: To restore the crispness of the crust, reheat the buns in a preheated oven at 350°F (175°C) for about 4-5 minutes. Let them cool for a minute or two after removing from the oven for the topping to crisp up again.
Nutritional Information
Here’s an estimate of the nutritional content per bun:
| Nutrient | Amount per Serving | % Daily Value |
|---|---|---|
| Calories | 279 kcal | – |
| Total Fat | 13 g | 20% |
| Saturated Fat | 8 g | 39% |
| Cholesterol | 58 mg | 19% |
| Sodium | 181 mg | 7% |
| Total Carbohydrate | 36 g | 11% |
| Dietary Fiber | 1 g | 3% |
| Sugars | 12 g | – |
| Protein | 5 g | 9% |
Note: Nutritional information is an estimate and may vary based on specific ingredients and portion sizes.
Variations & Substitutions
- Chocolate Coffee Buns: Add 1-2 tablespoons of cocoa powder to the topping mixture for a chocolatey twist.
- Nutty Topping: Add chopped nuts (such as almonds or walnuts) to the topping for added texture and flavor.
- Dairy-Free Option: Substitute the butter in the dough and topping with a vegan butter alternative. Use plant-based milk powder or a suitable substitute.
FAQs (Frequently Asked Questions)
Q: Why is my dough sticky even after kneading?
A: This dough is naturally slightly sticky due to the high hydration. Make sure you’re using accurate measurements and try the kneading trick mentioned in the instructions. Adding a tablespoon of bread flour at a time during the final kneading stage can also help.
Q: Can I use regular sugar instead of caster sugar?
A: Caster sugar is preferred because it dissolves more easily. However, you can use regular granulated sugar if you grind it slightly in a food processor before using.
Q: My topping spread too much during baking. What did I do wrong?
A: Ensure the topping ingredients are at the correct temperature (butter should be softened but not melted). Overmixing the topping can also cause it to spread.
Q: Can I make the dough ahead of time?
A: Yes, you can prepare the final dough and let it rise in the refrigerator overnight. This will slow down the fermentation process and develop more flavor. Let the dough come to room temperature before shaping and baking.
Q: How can I prevent the butter filling from leaking out during baking?
A: Make sure the butter is thoroughly frozen and that you pinch the dough tightly around the butter when shaping the buns. Placing the pinched side down on the baking sheet also helps.
Final Thoughts
These Coffee Cookie Buns, a delightful homage to Malaysian Roti Boy, are more than just a recipe; they’re an experience. The combination of textures and flavors – the crisp coffee crust, the soft, buttery interior, and the hidden pocket of salted butter – is simply divine. Don’t be intimidated by the multiple steps; the end result is well worth the effort. So go ahead, gather your ingredients, and embark on this baking adventure. Share your creations with friends and family, and let the aroma of freshly baked coffee buns fill your home with warmth and joy. Happy baking!