
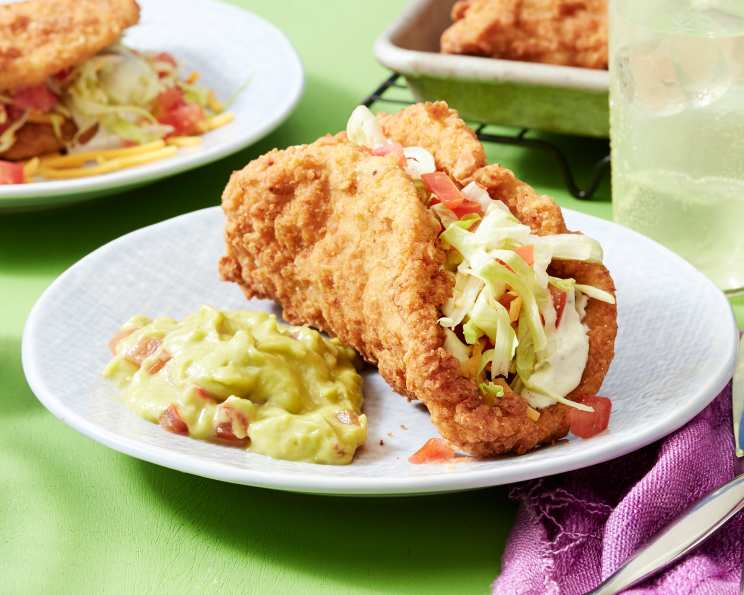
Copycat Taco Bell Naked Chicken Chalupa: A Culinary Adventure
The first time I ever had a Naked Chicken Chalupa, I was completely bewildered. Chicken… as the shell? It sounded like something out of a fever dream, yet there I was, biting into this crispy, juicy creation, a symphony of flavors exploding in my mouth. The creamy avocado ranch, the cool lettuce, the tangy tomatoes, all nestled within that perfectly seasoned, golden-fried chicken shell. It was a revelation, a fast-food masterpiece that sparked a culinary curiosity within me – one that eventually led me down the path of recreating this marvel at home.
Recipe Overview
- Prep Time: 1 hour
- Cook Time: 30 minutes
- Total Time: 1 hour 30 minutes
- Servings: 12
- Yields: 12 Copycat Taco Bell Naked Chicken Chalupas
- Dietary Type: Not Gluten-Free
Ingredients
Creamy Avocado Ranch Sauce
- 1 (1 ounce) envelope ranch dressing mix, such as Hidden Valley Ranch
- ¾ cup sour cream
- 1 small avocado, pitted and diced
- 4 tomatoes, seeded and chopped
- 1 head iceberg lettuce, shredded
- 3 cups cheddar cheese, shredded
Naked Chicken Chalupa Shell
- 2 lbs ground chicken, white meat
- ⅔ cup all-purpose flour, plus more for rolling
- ½ cup cornstarch
- 2 teaspoons kosher salt
- 1 teaspoon granulated sugar
- 1 teaspoon white vinegar
- ½ teaspoon Accent seasoning
- ½ teaspoon garlic powder
- ½ teaspoon onion powder
- 1 (6 ounce) can cooking spray
Wet Ingredients
- ¼ cup buttermilk
- 2 large eggs
Dry Ingredients
- 2 cups all-purpose flour
- 1 cup unseasoned breadcrumbs
- 1 teaspoon kosher salt
- 2 ½ teaspoons baking powder
- ½ teaspoon baking soda
- ⅛ teaspoon garlic powder
- ⅛ teaspoon onion powder
- ⅛ teaspoon sweet paprika
- 6 cups vegetable oil, for frying
Equipment Needed
- Blender or Food Processor
- Small Container
- 2 Rimmed Baking Sheets
- Parchment Paper
- Washable Cutting Board
- Rolling Pin
- Pie Dish or Shallow Rimmed Platter
- Large Heavy Bottomed Pot or Dutch Oven
- Deep Frying Thermometer
- Kitchen Twine
- Kitchen Scissors
- Tongs
- Paper Towel Lined Plate
Instructions
-
To begin, prepare the Creamy Avocado Ranch Sauce. In the bowl of a blender or food processor, combine the ranch dressing mix, sour cream, avocado, and tomatoes. Blend until completely smooth. Transfer the sauce to a small container, cover it tightly, and refrigerate until you’re ready to assemble your chalupas. This allows the flavors to meld and deepen.
-
Now, let’s move onto the Naked Chicken Chalupa Shell. In the bowl of a food processor, combine the ground chicken, all-purpose flour, cornstarch, kosher salt, granulated sugar, white vinegar, Accent seasoning, garlic powder, and onion powder. Process the mixture until everything is thoroughly combined, and the chicken forms a paste, which should take about three minutes. Transfer this mixture to a separate bowl.
-
Line two rimmed baking sheets with parchment paper and generously dust them with all-purpose flour. This step is crucial to prevent the chicken from sticking.
-
Using a ⅓ cup measure lightly sprayed with cooking spray to prevent sticking, divide the chicken mixture into 12 equal portions. Place each portion onto a floured baking sheet. Place both baking sheets into the freezer while you roll out the chicken shells. The freezing process helps the chicken hold its shape.
-
Liberally flour a washable cutting board with all-purpose flour. Transfer one chicken portion to the cutting board, and also flour the top of the chicken portion. Use a rolling pin to roll the chicken mixture into a 6-inch circle. If the mixture is too sticky to roll, return it to the freezer for a bit longer. Make sure both the rolling pin and the work surface are well-floured to prevent sticking. Place the rolled-out chicken rounds back into the freezer, dividing each with a sheet of parchment paper to prevent them from sticking together. This chilling step is vital for maintaining the chalupa shape during frying.
-
In a pie dish or shallow rimmed platter, thoroughly whisk together the buttermilk and eggs to create the Wet Ingredients.
-
In another shallow dish, stir together the all-purpose flour, unseasoned breadcrumbs, kosher salt, baking powder, baking soda, garlic powder, onion powder, and sweet paprika for the Dry Ingredients.
-
In a large, heavy-bottomed pot or Dutch oven, attach a deep frying thermometer to the side. Heat the vegetable oil over medium-high heat until it reaches 340°F (170°C). Maintaining the correct oil temperature is essential for achieving a crispy and evenly cooked chicken shell.
-
Working one at a time, remove a rolled-out chicken round from the freezer. Dust off any excess flour, then dip it into the egg mixture, coating both sides. Next, dredge it in the dry mixture, ensuring both sides are completely covered.
-
Using kitchen twine, carefully tie the chicken round into a “taco” shape, creating the signature chalupa curve. If the chicken becomes too soft after breading, pop it back into the freezer for a few minutes to firm up before proceeding with the remaining rounds.
-
Before you start frying, make sure you have kitchen scissors and tongs readily available.
-
Carefully place the chalupa shells into the hot oil one at a time, ensuring not to overcrowd the pot. Fry for 1 ½ minutes undisturbed, allowing the bottom to set. Then, using tongs, gently lift the chalupa to the surface of the oil. Snip the kitchen twine with your scissors and gently remove it. The chalupa should now hold its shape. Continue to fry until golden brown and cooked through, approximately another 2 ½ to 3 minutes.
-
Transfer the fried chicken chalupas to a plate lined with paper towels to drain any excess oil.
-
Finally, fill each chalupa shell with the prepared Creamy Avocado Ranch Sauce, shredded lettuce, chopped tomatoes, and shredded cheddar cheese. Serve immediately and enjoy your homemade Taco Bell Naked Chicken Chalupa!
Expert Tips & Tricks
- Freezing is key: Don’t skip the freezing steps! They are crucial for maintaining the chalupa’s shape and preventing it from falling apart during rolling and frying.
- Oil temperature: Maintaining a consistent oil temperature is critical. Use a deep-frying thermometer and adjust the heat as needed. If the oil is too hot, the outside will burn before the inside is cooked. If it’s too cold, the chalupa will absorb too much oil and become greasy.
- Breadcrumb adhesion: For a better breadcrumb coating, try using a double-dredging method. Dip the chicken in the egg mixture, then the dry mixture, back into the egg, and then back into the dry mixture.
- Make-ahead prep: You can prepare the creamy avocado ranch sauce and even roll out the chicken shells ahead of time. Store the sauce in the refrigerator and the chicken shells in the freezer until ready to fry.
Serving & Storage Suggestions
Serve these copycat Naked Chicken Chalupas immediately after frying for the best taste and texture. The crispy chicken shell and the fresh, cool fillings are a delightful combination.
Leftovers can be stored in an airtight container in the refrigerator for up to 24 hours, but the chicken shell will lose its crispness. It’s best to store the fillings separately to prevent the shell from becoming soggy. Reheating is not recommended, as it can further compromise the texture. They are best enjoyed fresh.
Nutritional Information
Note: Nutritional information is an estimate and can vary based on specific ingredients and portion sizes.
| Nutrient | Amount per Serving | % Daily Value |
|---|---|---|
| Calories | 475 kcal | 24% |
| Total Fat | 30g | 46% |
| Saturated Fat | 8g | 40% |
| Cholesterol | 11mg | 36% |
| Sodium | 86mg | 3% |
| Carbohydrates | 30g | 10% |
| Fiber | 2g | 8% |
| Sugar | 5g | — |
| Protein | 25g | 50% |
Variations & Substitutions
- Spicy Chicken: Add a pinch of cayenne pepper or a dash of hot sauce to the ground chicken mixture for a spicy kick.
- Gluten-Free Option: While it significantly changes the recipe, you can attempt a gluten-free version by using gluten-free flour and breadcrumbs, though the shell may be more fragile.
- Cheese Variety: Experiment with different cheeses, such as Monterey Jack or Pepper Jack, for a change in flavor.
- Topping Variations: Add other toppings like black olives, sour cream, or guacamole.
- Healthier Option: Consider using ground chicken breast for a lower-fat version, but be aware that this may make the mixture drier.
FAQs (Frequently Asked Questions)
Q: Can I bake the chicken shells instead of frying them?
A: While frying yields the most authentic texture, you can try baking them at 400°F (200°C) for about 20-25 minutes, flipping halfway through. However, the baked version won’t be as crispy.
Q: How can I prevent the chicken shells from sticking to the rolling pin?
A: Make sure to flour your work surface and rolling pin generously. You can also place a piece of parchment paper on top of the chicken while rolling.
Q: Can I use ground turkey instead of ground chicken?
A: Yes, ground turkey can be used as a substitute, but be aware that it may have a slightly different flavor and texture.
Q: What is Accent seasoning?
A: Accent seasoning is a brand name for monosodium glutamate (MSG), which enhances the savory flavor of the chicken. You can omit it if you prefer, but it does contribute to the overall taste.
Q: Can I make the creamy avocado ranch sauce ahead of time?
A: Absolutely! The sauce can be made up to 24 hours in advance and stored in the refrigerator. In fact, making it ahead of time allows the flavors to meld together even more.
Final Thoughts
So, there you have it – a step-by-step guide to recreating the legendary Taco Bell Naked Chicken Chalupa in your own kitchen. It might seem a bit involved, but trust me, the end result is well worth the effort. The combination of crispy, savory chicken, creamy avocado ranch, and fresh toppings is an explosion of flavor that will tantalize your taste buds. Gather your ingredients, roll up your sleeves, and embark on this culinary adventure. Once you’ve mastered this recipe, you’ll never have to rely on the drive-through again! Don’t hesitate to experiment with different toppings and variations to make it your own. And most importantly, have fun!