
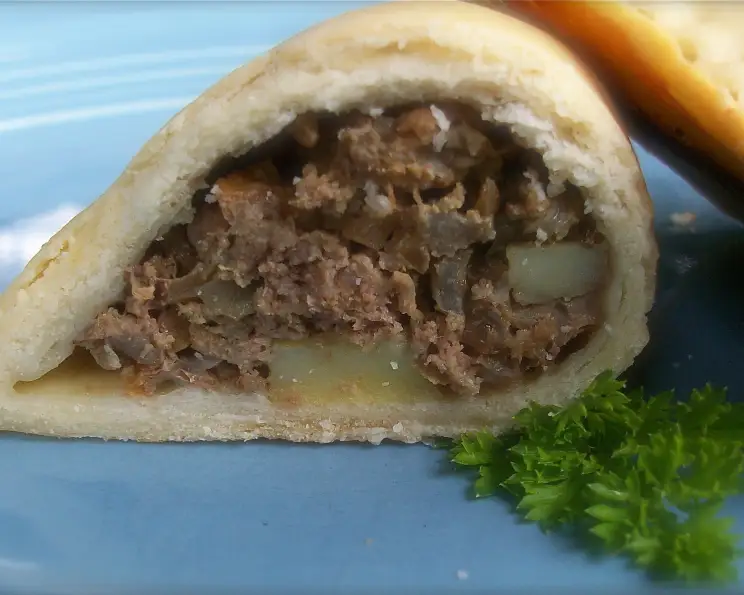
Cornish Pasties: A Taste of Tradition
The scent of a warm, savory pastry can transport me back to childhood faster than any time machine. My grandmother, a woman whose hands were as strong as her spirit, used to make pasties every autumn after the harvest. I remember sitting at her kitchen table, watching her nimble fingers crimp the edges of the dough, sealing in a hearty mixture of meat and vegetables. The anticipation while they baked, the way the golden crust gleamed under the kitchen light… it was pure magic. These weren’t just meals; they were edible love letters, passed down through generations.
Recipe Overview
- Prep Time: 30 minutes
- Cook Time: 1 hour
- Total Time: 1 hour 30 minutes
- Servings: 10 pasties
- Yields: 10 pasties
- Dietary Type: Not specified – contains meat
Ingredients
For the Short Crust Pastry:
- 4 cups all-purpose flour
- 1 cup vegetable shortening
- 6 tablespoons ice water (or more, as needed)
- 1 teaspoon salt
For the Filling:
- 8 ounces lean ground beef
- 6 ounces boiling potatoes, peeled and cut into 1/2 inch dice
- 1 medium onion, finely chopped
- 4-5 tablespoons beef gravy or 4-5 tablespoons beef stock
- 1 teaspoon dried herbs (thyme, marjoram, sage)
- Salt and pepper to taste
- Milk for brushing
Equipment Needed
- Large bowl
- Large whisk or wooden spoon
- Rolling pin
- 5-6 inch round cutter
- Baking sheet
- Pastry brush
Instructions
-
Begin by preparing the pastry. In a large bowl, combine ½ cup of the all-purpose flour, the vegetable shortening, 6 tablespoons of ice water, and the salt. Beat this mixture well with a large whisk or wooden spoon until roughly combined.
-
Using your fingertips, blend in the remaining flour until the mixture resembles coarse meal. This step is crucial for creating a flaky crust. Avoid overworking the dough.
-
If the dough appears too dry, add up to 2 tablespoons more of ice water, a few drops at a time, until it just comes together. The amount of water needed can vary depending on the humidity.
-
Gather the dough into a ball. Wrap it in plastic wrap and refrigerate for at least 1 hour. This resting period allows the gluten to relax, resulting in a more tender crust.
-
While the dough is chilling, prepare the filling. In a separate bowl, combine the lean ground beef, diced potatoes, finely chopped onion, and dried herbs.
-
Season the meat and vegetable mixture generously with salt and pepper. Don’t be shy with the seasoning; it will mellow out during baking.
-
Stir in enough beef gravy (or beef stock) to bind the mixture together. The filling should be moist but not swimming in liquid. This is important for creating a cohesive and flavorful center.
-
Once the dough has chilled, roll it out on a lightly floured surface to a thickness of about 1/8 of an inch. It’s best to work on a cool surface to prevent the dough from becoming too soft.
-
Using a 5-6 inch diameter round cutter, cut out 10 circles from the rolled-out dough. If you don’t have a round cutter, you can use a bowl or plate as a guide and cut around it with a knife.
-
Preheat your oven to 400°F (200°C). Lightly grease a baking sheet to prevent the pasties from sticking.
-
Mound the meat mixture lightly in the center of each dough circle. Be careful not to overfill the pasties, as this can make them difficult to seal.
-
Brush the border of each circle with milk. This will help the dough adhere when you fold it over.
-
Fold the dough in half over the filling, creating a semi-circular shape. Pinch the edges together firmly to seal. You can also crimp the edges with a fork for a decorative touch and to ensure a tight seal.
-
Brush the tops of the pasties with milk. This will give them a beautiful golden-brown color during baking.
-
Arrange the pasties on the prepared baking sheet, leaving a little space between each one.
-
Bake for 10 minutes at 400°F (200°C), then reduce the oven temperature to 340°F (170°C) and continue baking until the pasties are light brown, about 45-50 minutes longer. Keep an eye on them, as baking times can vary depending on your oven. The crust should be golden brown, and the filling should be cooked through.
-
Serve the pasties hot or at room temperature. They are delicious on their own or with a side of gravy or chutney.
Expert Tips & Tricks
- For an even flakier crust, use very cold ingredients. You can even chill the flour and shortening before starting.
- If you don’t have beef gravy, you can make a quick gravy by whisking together beef stock with a little cornstarch and seasoning. Simmer until thickened.
- To prevent the bottom crust from becoming soggy, place the baking sheet on the lowest rack of the oven.
- If the pasties start to brown too quickly, tent them with foil during the last 15-20 minutes of baking.
- For a richer flavor, use a combination of ground beef and ground pork or lamb in the filling.
- You can add other vegetables to the filling, such as carrots, turnips, or swedes. Just be sure to dice them small enough so they cook through during baking.
Serving & Storage Suggestions
Cornish pasties are best served warm, straight from the oven. Their hearty filling makes them a complete meal on their own, but they also pair well with a side salad or some pickled vegetables. For a more traditional touch, serve them with a dollop of gravy or a spoonful of chutney.
Leftover pasties can be stored at room temperature for up to 2 hours. To store them for longer, refrigerate them in an airtight container for up to 3 days. They can also be frozen for up to 3 months. To reheat, bake them in a preheated oven at 350°F (175°C) until heated through, or microwave them in short intervals until warm.
Nutritional Information
| Nutrient | Amount per Serving | % Daily Value |
|---|---|---|
| Calories | 425.4 kcal | N/A |
| Calories from Fat | 210 g | 50% |
| Total Fat | 23.4 g | 36% |
| Saturated Fat | 7 g | 34% |
| Cholesterol | 14.9 mg | 4% |
| Sodium | 282.5 mg | 11% |
| Total Carbohydrate | 42.9 g | 14% |
| Dietary Fiber | 1.9 g | 7% |
| Sugars | 0.8 g | 3% |
| Protein | 10.4 g | 20% |
Variations & Substitutions
- Vegetarian Pasties: Substitute the ground beef with lentils, beans, or a mix of root vegetables. Increase the amount of herbs and spices for extra flavor.
- Gluten-Free Pasties: Use a gluten-free all-purpose flour blend to make the pastry. You may need to add a binder, such as xanthan gum, to help hold the dough together.
- Spicy Pasties: Add a pinch of chili flakes or a dash of hot sauce to the filling for a bit of heat.
- Cheese Pasties: Sprinkle some grated cheese, such as cheddar or Gruyere, over the filling before sealing the pasties.
- Sweet Pasties: Fill the pasties with fruit, such as apples, berries, or cherries. Add some sugar and spices for a delicious dessert.
FAQs (Frequently Asked Questions)
Q: Can I make the pastry ahead of time?
A: Yes, you can make the pastry up to 2 days in advance and store it in the refrigerator. Just be sure to wrap it tightly in plastic wrap to prevent it from drying out.
Q: Can I freeze the pasties before baking?
A: Absolutely! Assemble the pasties, place them on a baking sheet lined with parchment paper, and freeze them until solid. Then, transfer them to a freezer bag or container. When ready to bake, bake them from frozen, adding about 10-15 minutes to the baking time.
Q: What if my pastry is too dry?
A: If your pastry is too dry, add a little more ice water, a few drops at a time, until it comes together. Be careful not to add too much water, or the pastry will become tough.
Q: Can I use a different type of meat in the filling?
A: Yes, you can use any type of ground meat you like, such as ground lamb, pork, or chicken. You can also use diced cooked meat, such as leftover roast beef or chicken.
Q: Why are my pasties leaking during baking?
A: Leaking usually happens when the pasties are overfilled or not sealed properly. Make sure to pinch the edges tightly and crimp them with a fork. Also, avoid overfilling the pasties.
Final Thoughts
Cornish pasties are more than just a delicious meal; they’re a piece of history, a taste of tradition, and a symbol of home. They are a testament to the ingenuity of cooks throughout history to create a meal that’s both satisfying and portable. So, gather your ingredients, roll up your sleeves, and give this recipe a try. I hope you enjoy making and sharing these delightful pastries with your loved ones as much as I do. Perhaps you can even create your own memories centered around this simple, yet wonderful dish. And please, feel free to share your experience and any tips you may have!