
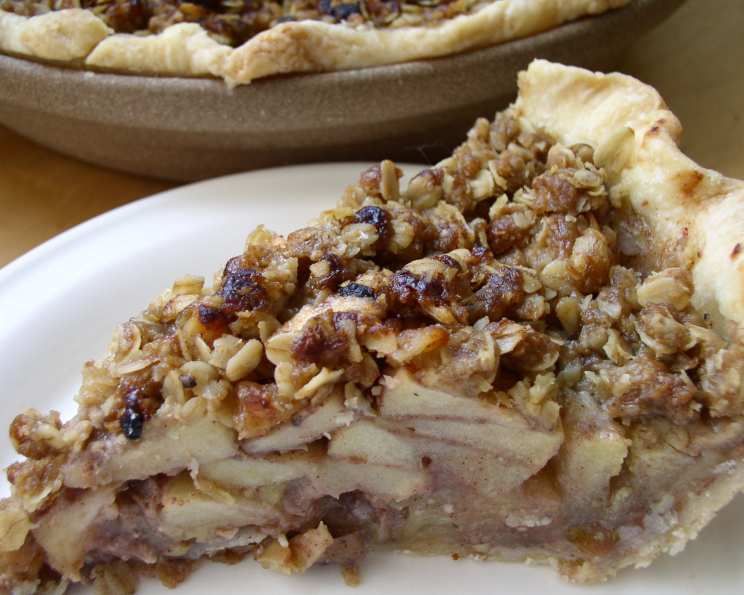
Country Apple Crisp Pie: A Delicious Hybrid
My grandmother, bless her heart, was never one for choosing sides. Whether it was politics, ice cream flavors, or, most importantly, desserts, she always found a way to blend the best of both worlds. That’s how her legendary apple crisp pie came to be – a glorious marriage of the comforting familiarity of apple pie with the rustic charm of a crisp topping. The aroma alone, a symphony of cinnamon, baked apples, and buttery oats, would fill her cozy kitchen and draw us all in like moths to a flame. To this day, a single whiff of that scent instantly transports me back to her sun-drenched kitchen, filled with laughter, love, and the promise of something truly special.
Recipe Overview
- Prep Time: 20 minutes
- Cook Time: 50 minutes
- Total Time: 1 hour 10 minutes
- Servings: 8
- Yield: 1 pie
- Dietary Type: Vegetarian
Ingredients
- 1 9-inch pie shell, store-bought or homemade
- 7 medium apples, sliced (Granny Smith or other firm variety)
- 1/2 cup granulated sugar
- 3 tablespoons all-purpose flour
- 1 teaspoon ground cinnamon
- 1/2 teaspoon ground nutmeg (or 1/2 teaspoon ground clove)
- 1/8 teaspoon salt
- 1/2 cup chopped walnuts
- 1/2 cup packed brown sugar
- 1/3 cup all-purpose flour
- 1 cup quick-cooking rolled oats
- 1/2 cup (1 stick) cold butter, cut into cubes
Equipment Needed
- 9-inch pie plate
- Large mixing bowl
- Small mixing bowl
- Pastry blender or fork
- Measuring cups and spoons
- Aluminum foil
Instructions
-
Prepare the crust: Place the pie shell in a 9-inch pie plate. If using a store-bought crust, ensure it is thawed according to package directions. For a homemade crust, blind bake if desired to ensure a crisp bottom.
-
Make the apple filling: In a large mixing bowl, combine the sliced apples, granulated sugar, 3 tablespoons of flour, cinnamon, nutmeg (or clove), and salt. Gently toss until the apples are evenly coated. The flour helps to thicken the juices as the pie bakes.
-
Assemble the pie: Transfer the apple mixture to the prepared pie crust, arranging the slices evenly.
-
Prepare the crisp topping: In a small mixing bowl, combine the brown sugar, 1/3 cup flour, and rolled oats.
-
Add the butter: Cut in the cold, cubed butter using a pastry blender or a fork until the mixture resembles coarse crumbs. The cold butter is crucial for creating a crumbly texture. You can also use your fingers, but work quickly to prevent the butter from melting.
-
Sprinkle the topping: Sprinkle the crumb mixture evenly over the apple filling in the pie. Make sure to distribute it well for a consistent crisp topping.
-
Protect the edges: Cover the edges of the pie with aluminum foil to prevent them from burning during the first part of baking. This is especially important if your crust tends to brown quickly.
-
Bake the pie: Bake in a preheated oven at 375 degrees Fahrenheit (190 degrees Celsius) for 50 minutes.
-
Remove the foil: After 25 minutes of baking, carefully remove the foil from the pie edges. This will allow the crust to brown nicely.
-
Continue baking: Continue baking for the remaining 25 minutes, or until the filling is bubbling and the topping is golden brown. A knife inserted into the center of the filling should meet little resistance, indicating that the apples are tender.
-
Cool and serve: Let the pie cool completely on a wire rack before slicing and serving. This allows the filling to set properly, preventing a messy slice. Serve warm or at room temperature, either solo or with a scoop of vanilla ice cream or a dollop of whipped cream.
Expert Tips & Tricks
- Apple Variety: While Granny Smith apples are a classic choice for baking due to their tartness and firm texture, feel free to experiment with other varieties or a combination. Honeycrisp, Braeburn, or Fuji apples also work well.
- Preventing a Soggy Bottom Crust: To ensure a crisp bottom crust, you can blind bake the pie shell before adding the filling. This involves pre-baking the crust partially or fully before adding the filling. Use pie weights or dried beans to prevent the crust from puffing up during baking.
- Adjusting Sweetness: If you prefer a less sweet pie, you can reduce the amount of granulated sugar in the filling. Taste the apple mixture before adding it to the crust and adjust the sweetness to your liking.
- Make Ahead Tip: The apple filling can be prepared a day in advance and stored in the refrigerator. This can save time on the day you plan to bake the pie. Similarly, the crisp topping can also be made ahead and stored in an airtight container in the refrigerator.
- Reviving Leftovers: If you find that the crisp topping has lost some of its crispness after being stored, you can revive it by briefly broiling the pie (watch carefully to prevent burning!) or placing it in a toaster oven for a few minutes.
Serving & Storage Suggestions
This Country Apple Crisp Pie is best served slightly warm, allowing the flavors to meld together beautifully. A scoop of vanilla ice cream or a dollop of freshly whipped cream complements the warmth of the pie perfectly. You can also drizzle a little caramel sauce or sprinkle some extra chopped walnuts on top for added richness.
Leftover pie can be stored at room temperature for up to 2 days, covered loosely with plastic wrap or foil. For longer storage, refrigerate the pie for up to 5 days. To reheat, you can warm individual slices in the microwave for 30-60 seconds, or reheat the entire pie in a preheated oven at 350 degrees Fahrenheit (175 degrees Celsius) for 10-15 minutes, or until warmed through.
Nutritional Information
| Nutrient | Amount per Serving | % Daily Value |
|---|---|---|
| Calories | 499.9 kcal | N/A |
| Calories from Fat | 205 g | 41% |
| Total Fat | 22.8 g | 35% |
| Saturated Fat | 9.7 g | 48% |
| Cholesterol | 30.5 mg | 10% |
| Sodium | 234.2 mg | 9% |
| Total Carbohydrate | 73.2 g | 24% |
| Dietary Fiber | 6.4 g | 25% |
| Sugars | 43.5 g | 174% |
| Protein | 5.1 g | 10% |
Note: Nutritional information is an estimate and may vary based on specific ingredients and portion sizes.
Variations & Substitutions
- Gluten-Free Option: Use a gluten-free pie crust and substitute the all-purpose flour in the filling and topping with a gluten-free flour blend. Ensure that the rolled oats are also certified gluten-free.
- Vegan Adaptation: Substitute the butter in the crisp topping with vegan butter or coconut oil. Ensure the pie shell is also vegan-friendly.
- Nut-Free Version: Omit the walnuts from the filling and topping. You can replace them with sunflower seeds or pepitas for added texture.
- Spice Variations: Experiment with different spices such as cardamom, ginger, or allspice to create a unique flavor profile.
- Fruit Combinations: Add other fruits to the apple filling, such as pears, cranberries, or blueberries, for a delicious twist.
FAQs (Frequently Asked Questions)
Q: Can I use frozen apples for this recipe?
A: While fresh apples are preferred for the best texture, you can use frozen apples in a pinch. Be sure to thaw them completely and drain any excess liquid before adding them to the filling.
Q: How do I prevent the pie crust from shrinking during baking?
A: To prevent shrinking, make sure the pie crust is properly fitted into the pie plate and crimped along the edges. You can also dock the bottom of the crust with a fork to prevent it from puffing up. Blind baking the crust is another effective method.
Q: My crisp topping is browning too quickly. What should I do?
A: If the crisp topping is browning too quickly, you can loosely tent the pie with aluminum foil to shield it from the heat.
Q: Can I freeze the baked apple crisp pie?
A: Yes, you can freeze the baked apple crisp pie. Let it cool completely, then wrap it tightly in plastic wrap and aluminum foil. Freeze for up to 3 months. Thaw in the refrigerator overnight before reheating.
Q: Can I make this recipe without oats?
A: Yes, if you don’t have oats you can increase the flour and brown sugar to 2/3 cup each to compensate, and add some chopped nuts for texture if desired.
Final Thoughts
This Country Apple Crisp Pie is more than just a dessert; it’s a warm hug on a plate. It’s a reminder of simpler times, of family gatherings, and of the joy that comes from sharing homemade goodness. I encourage you to try this recipe and create your own memories around it. Don’t be afraid to experiment with different variations and make it your own. And most importantly, share it with those you love. After all, the best desserts are the ones that are shared. Feel free to pair this beauty with a hot cup of cider or a scoop of vanilla ice cream for a complete and comforting experience!