
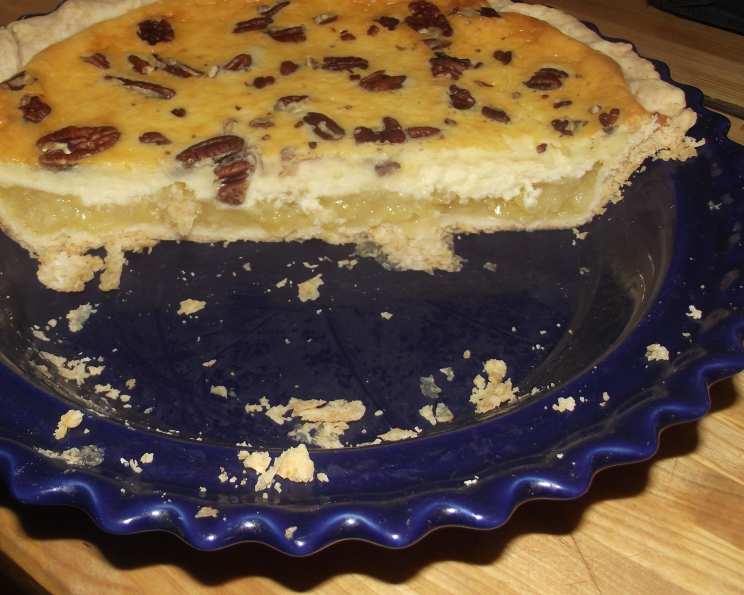
Cream Cheese Pineapple Pie: A Slice of Sunshine
The first time I tasted this pie was at my Aunt Carol’s house, during a summer potluck that stretched late into a balmy evening. Fireflies blinked in the darkening yard as cousins chased each other, their laughter punctuated by the crickets’ chirping symphony. But amidst the barbecue and potato salad, it was Aunt Carol’s Cream Cheese Pineapple Pie that stole the show. Its delicate sweetness, the slight tang of the cream cheese, and the tropical burst of pineapple were so perfectly balanced that it tasted like pure sunshine distilled into a single bite. I’ve been making it ever since, and every slice takes me right back to that idyllic summer night.
Recipe Overview
- Prep Time: 20 minutes
- Cook Time: 1 hour
- Total Time: 1 hour 20 minutes
- Servings: 8
- Yield: 1 pie
- Dietary Type: Not Gluten-Free
Ingredients
Pineapple Layer:
- 1/3 cup sugar
- 1 tablespoon cornstarch
- 1 (8 ounce) can crushed pineapple, with juice
Cream Cheese Layer:
- 1 (8 ounce) package cream cheese, softened
- 1/2 cup sugar
- 1/4 teaspoon salt
- 2 eggs
- 1/2 cup milk
- 1/2 teaspoon vanilla
- 1 9″ unbaked pie shell
- 1/4 cup chopped pecans
Equipment Needed
- Small saucepan
- Mixing bowl
- Electric mixer
- 9″ pie dish
- Measuring cups and spoons
Instructions
-
Begin by preparing the pineapple layer. In a small saucepan, combine 1/3 cup sugar, 1 tablespoon cornstarch, and the 8-ounce can of crushed pineapple (including the juice).
-
Place the saucepan over medium heat. Cook, stirring constantly, until the mixture thickens and becomes clear. This will typically take about 5-7 minutes.
-
Remove the saucepan from the heat and let the pineapple mixture cool completely. This is crucial, as adding it hot to the cream cheese layer could affect the pie’s texture. Set aside.
-
Preheat your oven to 400 degrees F (200 degrees C). This initial high temperature will help set the crust.
-
In a mixing bowl, combine the softened 8-ounce package of cream cheese, 1/2 cup sugar, and 1/4 teaspoon salt.
-
Using an electric mixer, blend the cream cheese mixture until smooth and creamy. Ensure there are no lumps for the best texture in the final pie.
-
Add the 2 eggs, one at a time, beating well after each addition. This helps to incorporate air into the mixture, resulting in a lighter, more delicate filling.
-
Blend in 1/2 cup milk and 1/2 teaspoon vanilla. Mix until just combined. Be careful not to overmix at this stage.
-
Note: If the cream cheese mixture appears slightly curdled at this point, don’t be alarmed! This is perfectly normal and will bake out during the cooking process.
-
Spread the cooled pineapple layer evenly over the bottom of the unbaked pie shell. This creates a delicious tropical base for the cream cheese filling.
-
Gently pour the cream cheese mixture over the pineapple layer, ensuring it is distributed evenly throughout the pie shell.
-
Sprinkle 1/4 cup of chopped pecans evenly over the top of the cream cheese filling. These add a lovely nutty crunch and visual appeal.
-
Place the pie in the preheated oven and bake at 400 degrees F (200 degrees C) for 10 minutes.
-
After 10 minutes, reduce the oven temperature to 325 degrees F (160 degrees C) and continue baking for an additional 50 minutes.
-
To check for doneness, the pie should be set around the edges but may still have a slight jiggle in the center. This is normal, as the pie will continue to set as it cools.
-
Remove the pie from the oven and let it cool completely at room temperature. This can take a couple of hours.
-
Once cooled, refrigerate the pie for at least 2-3 hours before serving. This allows the filling to firm up completely and the flavors to meld together beautifully.
Expert Tips & Tricks
- Soften the Cream Cheese Properly: Make sure your cream cheese is truly softened before starting. Leave it at room temperature for at least an hour, or even longer if your kitchen is cool. This will ensure a smooth and lump-free filling.
- Prevent a Soggy Crust: To further protect against a soggy crust, you can pre-bake the pie shell for about 10 minutes before adding the fillings. Just make sure to let it cool slightly before adding the pineapple layer.
- Gently Tap the Pie: Before baking, gently tap the pie dish on the counter a few times. This helps release any trapped air bubbles and ensures a more even filling.
- Check Your Oven Temperature: Ovens can vary in temperature. If you find your pies consistently browning too quickly, invest in an oven thermometer to ensure accurate temperature readings.
Serving & Storage Suggestions
This Cream Cheese Pineapple Pie is best served chilled. A dollop of whipped cream or a scoop of vanilla ice cream makes a delightful addition.
To store leftovers, cover the pie tightly with plastic wrap or aluminum foil and refrigerate. It will keep well for up to 3-4 days. While you can freeze the pie, the texture of the cream cheese filling may change slightly upon thawing. If freezing, wrap it tightly in several layers of plastic wrap and then foil. Thaw overnight in the refrigerator before serving. It is not recommended to leave the pie at room temperature for more than 2 hours due to the dairy content.
Nutritional Information
| Nutrient | Amount per Serving | % Daily Value |
|---|---|---|
| Calories | 301.6 kcal | N/A |
| Calories from Fat | 166 g | 55% |
| Total Fat | 18.5 g | 28% |
| Saturated Fat | 8.2 g | 41% |
| Cholesterol | 86.2 mg | 28% |
| Sodium | 249.4 mg | 10% |
| Total Carbohydrate | 29.7 g | 9% |
| Dietary Fiber | 0.6 g | 2% |
| Sugars | 21.1 g | N/A |
| Protein | 5.3 g | 10% |
Note: Nutritional information is an estimate and may vary based on specific ingredients and portion sizes.
Variations & Substitutions
- Gluten-Free: Use a gluten-free pie crust. Many store-bought options are readily available, or you can make your own using a gluten-free flour blend.
- Dairy-Free: Substitute the cream cheese with a dairy-free cream cheese alternative (made from nuts or soy). Use a plant-based milk (such as almond or oat milk) in place of regular milk.
- Nut-Free: Omit the pecans altogether or substitute them with toasted coconut flakes for a different textural element.
- Lemon Zest: Add a teaspoon of lemon zest to the cream cheese filling for a brighter, more citrusy flavor.
- Spiced Pineapple: For a warmer flavor profile, add a pinch of cinnamon or nutmeg to the pineapple layer.
FAQs (Frequently Asked Questions)
Q: Can I use fresh pineapple instead of canned?
A: While you can use fresh pineapple, canned crushed pineapple is recommended because it has a softer texture and holds its shape better after baking. If you do use fresh, be sure to drain it well.
Q: My cream cheese filling cracked while baking. What did I do wrong?
A: Cracking can sometimes occur if the pie bakes too quickly or at too high a temperature. Make sure your oven is at the correct temperature, and avoid overbaking. Minor cracks don’t affect the taste!
Q: How can I prevent the pie crust from burning?
A: If you notice the crust browning too quickly, you can cover the edges with aluminum foil or use a pie shield.
Q: Can I make this pie ahead of time?
A: Absolutely! In fact, this pie benefits from chilling in the refrigerator for several hours or even overnight, allowing the flavors to meld together beautifully.
Q: The pineapple layer seems a bit watery. What should I do?
A: Ensure you are using crushed pineapple with juice, as specified in the recipe. If your canned pineapple seems extra juicy, you can drain off a tablespoon or two before combining it with the sugar and cornstarch. The cornstarch is essential for thickening.
Final Thoughts
This Cream Cheese Pineapple Pie is more than just a dessert; it’s a little slice of nostalgia, a burst of sunshine on a plate. It’s surprisingly easy to make and guaranteed to impress. I encourage you to give it a try – whether you’re baking it for a special occasion or simply craving a sweet treat. And don’t be afraid to experiment with the variations! Let me know how it turns out, and if you discover any new twists of your own! Pair it with a refreshing iced tea or a light, crisp white wine for the perfect finish to any meal. Happy baking!