
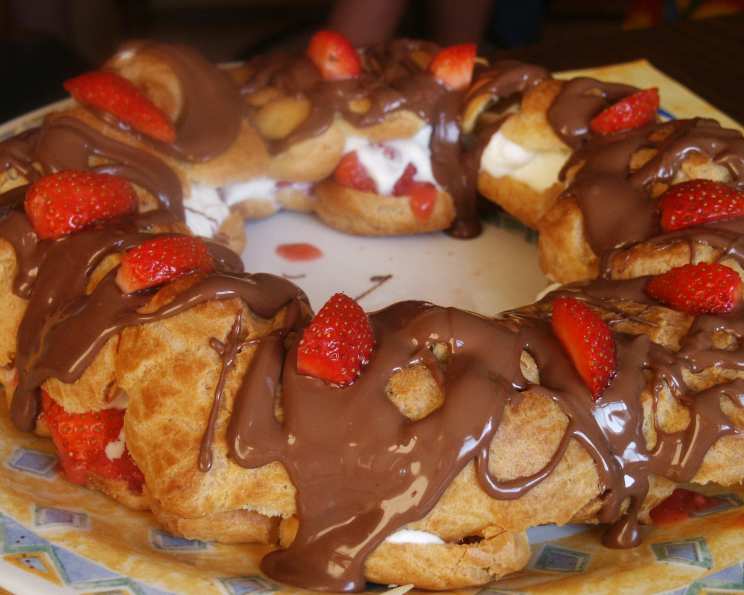
The Humble Cream Puff: A Culinary Canvas
The first time I ever tasted a cream puff, it was at my grandmother’s kitchen table. I was a small child, mesmerized as she carefully sliced open the delicate pastry with a serrated knife. The sight of the fluffy custard spilling out, studded with bright red strawberries, felt like pure magic. The choux pastry was slightly crisp on the outside, yielding to a soft, almost ethereal interior. That simple cream puff, shared with my grandmother, sparked a lifelong passion for baking and the transformative power of food to create lasting memories. I’ve been chasing that perfect cream puff ever since, and I’m thrilled to share my version with you.
Recipe Overview
- Prep Time: 20 minutes
- Cook Time: 45-50 minutes
- Total Time: 1 hour 10 minutes
- Servings: 8
- Yields: 18-24 small balls or 1 ring
- Dietary Type: Not suitable for Vegan, Gluten-Free, or Dairy-Free
Ingredients
- 50 g butter
- 150 ml water
- 65 g plain flour (sifted)
- 2 eggs (beaten)
- 100 g chocolate (melted), optional
- Baking paper to line baking sheet (cookie sheet)
- Lemon juice, optional
- Custard, optional
- Strawberries, optional
- 1 (125 g) can of sliced peaches (juice drained off), optional
- 1 (125 g) can of apricots (juice drained off), optional
- Icing sugar, optional
Equipment Needed
- Saucepan
- Wooden spoon
- Baking sheet (cookie sheet)
- Baking paper
- Wire cooling rack
- Mixing Bowls
- Whisk or Electric Mixer
Instructions
- Begin by preparing the choux pastry. In a saucepan, gently heat the butter and water together.
- Bring the mixture to a boil over medium heat, ensuring the butter is fully melted. Once boiling, immediately remove the saucepan from the heat.
- Now for the crucial step: quickly tip in all the sifted plain flour into the saucepan. Using a wooden spoon, vigorously beat the mixture together to form a smooth paste. Continue beating until the paste comes together into a ball that pulls away from the sides of the pan.
- Allow the paste to cool slightly for several minutes. This step is critical, as adding eggs to a too-hot mixture will cause them to cook prematurely.
- Preheat your oven to 200°C (400°F). Line a baking sheet (cookie sheet) with baking paper. Lightly wet the paper with cold water, leaving small droplets on the surface. This helps prevent the pastry from sticking.
- Gradually add the beaten eggs to the slightly cooled paste, incorporating them a little at a time. Continue beating the mixture until it develops a glossy sheen. The consistency should be thick but pipeable. If the mixture appears too liquid, continue beating; it will thicken as you incorporate air. It should be a thick, pipeable paste.
- For a cream puff ring: Spoon the paste onto the prepared baking sheet in the shape of a clock face, creating twelve mounds. Lift the top of each mound into a small peak and join the mounds together to form a circle.
- For individual cream puffs: Spoon the paste onto the baking sheet in small, evenly spaced balls.
- Bake in the preheated oven for 45-50 minutes. Avoid opening the oven door during baking, as this can cause the puffs to deflate. The puffs should be golden brown and well-risen.
- Once cooked, carefully cut the cream puff ring in half horizontally to create a top and bottom layer. For individual cream puffs, cut a small slit in the side of each puff to release steam.
- Transfer the choux pastry to a wire cooling rack and allow it to cool completely.
- Now for the fun part: filling! For the ring, spread a layer of custard (homemade or store-bought) over the bottom half of the ring. Arrange sliced peaches or apricots on top of the custard, then add another layer of custard to fill any spaces. Gently place the top half of the choux pastry ring back on.
- Drizzle melted chocolate in a zig-zag pattern over the top of the ring. Dust with icing sugar, if desired.
- Alternatively, fill with fresh strawberries and whipped cream.
- For individual cream puffs, fill with your choice of whipped cream, custard, pastry cream, or even savory fillings. Dip the filled puffs in melted chocolate for an extra touch of indulgence.
Expert Tips & Tricks
- Perfecting the Dough: The key to successful choux pastry is getting the dough consistency just right. It should be smooth, glossy, and able to hold its shape. If the dough is too dry, it won’t rise properly. If it’s too wet, the puffs will be flat and greasy.
- Egg Incorporation: Add the eggs gradually, beating well after each addition. This helps to emulsify the mixture and create a smooth, consistent dough.
- Baking Time: Don’t be tempted to open the oven door during baking. This can cause the puffs to deflate. Bake until they are golden brown and sound hollow when tapped.
- Preventing Soggy Puffs: Cut a small slit in the side of each puff immediately after baking to release steam. This helps prevent them from becoming soggy.
- Make-Ahead Tip: The choux pastry shells can be made ahead of time and stored in an airtight container at room temperature for up to 2 days. Fill them just before serving. You can also freeze the baked shells.
Serving & Storage Suggestions
Serve cream puffs immediately after filling for the best texture. The crispness of the shell contrasts beautifully with the soft filling.
- Serving: Dust with icing sugar or cocoa powder for an elegant presentation. Arrange on a platter with fresh berries or a scoop of ice cream.
- Storage: Filled cream puffs are best eaten the same day. Unfilled shells can be stored in an airtight container at room temperature for up to 2 days or frozen for up to 2 months. Thaw frozen shells completely before filling. Avoid refrigerating filled cream puffs, as this will cause the shells to become soggy.
Nutritional Information
Please note that nutritional information is an estimate and may vary based on specific ingredients and portion sizes.
| Nutrient | Amount per Serving | % Daily Value |
|---|---|---|
| Calories | 250 kcal | 13% |
| Total Fat | 15g | 23% |
| Saturated Fat | 9g | 45% |
| Cholesterol | 80mg | 27% |
| Sodium | 50mg | 2% |
| Total Carbohydrate | 20g | 7% |
| Dietary Fiber | 1g | 4% |
| Sugars | 8g | |
| Protein | 4g | 8% |
Variations & Substitutions
- Chocolate Choux: Add 2 tablespoons of cocoa powder to the dry ingredients for a chocolate-flavored choux pastry.
- Savory Cream Puffs: Fill with savory fillings such as cream cheese and smoked salmon, chicken salad, or cheese and herbs. Omit the optional sugar.
- Craquelin Topping: For added texture and sweetness, top the puffs with craquelin before baking. Craquelin is a thin, crisp topping made from butter, sugar, and flour.
- Gluten-Free: While this recipe is not inherently gluten-free, you can experiment with gluten-free flour blends, but the texture may vary.
- Dairy-Free: Substitute the butter with a plant-based butter alternative. Use a dairy-free custard or whipped cream for the filling.
FAQs (Frequently Asked Questions)
Q: Why did my cream puffs not rise?
A: There are several reasons why cream puffs might not rise. The most common is that the dough was not cooked properly, or the oven temperature was too low. Ensure the dough is cooked to a smooth paste before adding the eggs and that your oven is accurately calibrated.
Q: How do I prevent my cream puffs from collapsing after baking?
A: Allow the cream puffs to cool completely in the oven with the door slightly ajar. This helps them to set properly and prevents them from collapsing. Make sure they are baked enough before taking them out.
Q: Can I make cream puffs ahead of time?
A: Yes, you can make the choux pastry shells ahead of time and store them in an airtight container at room temperature for up to 2 days or frozen for up to 2 months. Fill them just before serving.
Q: What is the best filling for cream puffs?
A: The best filling for cream puffs is a matter of personal preference. Traditional fillings include custard, pastry cream, and whipped cream. Savory fillings are also a delicious option.
Q: Can I use a stand mixer to make the choux pastry?
A: Yes, you can use a stand mixer to make the choux pastry. Use the paddle attachment and follow the recipe instructions. Be careful not to overmix the dough.
Final Thoughts
I hope this recipe inspires you to create your own cream puff masterpiece! Don’t be intimidated by the process; with a little practice, you’ll be whipping up these delightful treats in no time. Feel free to experiment with different fillings and toppings to create your own signature cream puff. Baking should be fun, so embrace the process and enjoy the delicious results! And please, share your feedback – I’d love to hear how it turned out for you! Perhaps pair your cream puffs with a delicate cup of Earl Grey tea for a truly delightful experience.