
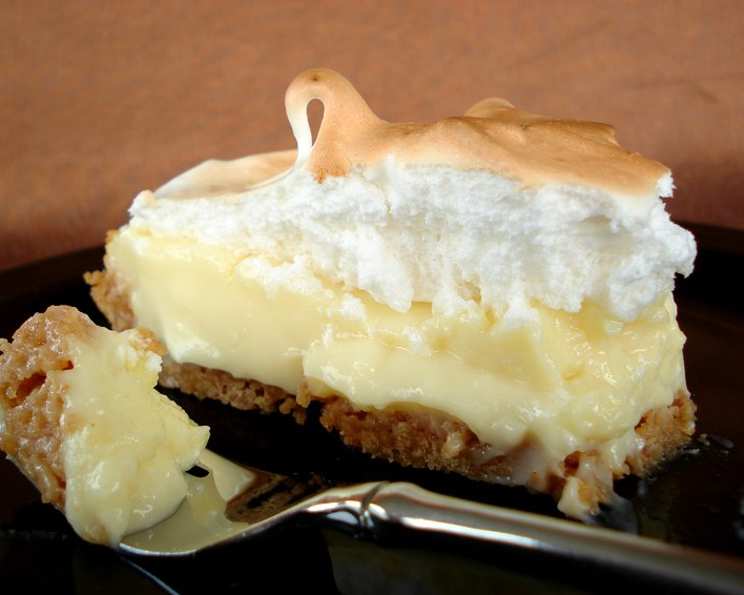
Creamy Vanilla Pudding Pie: A Slice of Nostalgia
Vanilla pudding pie. Just the words themselves conjure up images of childhood. I remember summer afternoons spent at my grandmother’s house, the air thick with the scent of baking. While everyone else clamored for her famous apple pie, I always made a beeline for the vanilla pudding pie. It wasn’t fancy, but its simple sweetness and creamy texture were pure comfort. The memory of that first bite, the cool, smooth vanilla against the slightly crumbly crust, is forever etched in my mind – a taste of pure, unadulterated happiness. This recipe is my attempt to recreate that magic.
Recipe Overview
- Prep Time: 15 minutes
- Cook Time: 12-15 minutes (for meringue)
- Total Time: 27-30 minutes + chilling time
- Servings: 8
- Yield: 1 pie
- Dietary Type: Not specified
Ingredients
- 1 2⁄3 cups water
- 3 tablespoons cornstarch
- 1 (14 ounce) can sweetened condensed milk
- 3 egg yolks, beaten
- 2 tablespoons butter
- 1 teaspoon vanilla extract
- 1 (9 inch) baked pie crust (pastry or graham cracker)
For the Meringue:
- 3 egg whites
- 1⁄4 teaspoon cream of tartar
- 1⁄2 tablespoon vanilla extract
- 6 tablespoons sugar
Equipment Needed
- Saucepan (or microwave-safe bowl)
- Whisk
- Electric mixer (for meringue)
- 9-inch pie plate
- Measuring cups and spoons
Instructions
- In a saucepan (or a microwave-safe bowl), thoroughly mix the water and cornstarch until completely smooth, ensuring no lumps remain. This step is crucial to prevent a grainy pudding.
- Stir in the sweetened condensed milk and the beaten egg yolks into the water-cornstarch mixture. Make sure everything is well combined before proceeding to the cooking stage.
- Cook the mixture until it thickens. You can do this either on the stovetop in a saucepan over medium heat, stirring constantly, or in the microwave, using 1-minute intervals and stirring well between each interval to prevent scorching. The cooking time will vary depending on your stovetop or microwave, but the pudding should be thick enough to coat the back of a spoon.
- Once the pudding has thickened, remove it from the heat (or the microwave) and stir in the 2 tablespoons of butter until it is completely melted and incorporated. This adds richness and a silky texture to the pudding.
- Add the 1 teaspoon of vanilla extract and stir to combine. The vanilla enhances the sweetness and adds that classic vanilla pudding flavor.
- Allow the pudding to cool slightly, stirring occasionally to prevent a skin from forming on the surface.
- Pour the slightly cooled pudding into the prepared pie crust. Ensure the pudding is evenly distributed within the crust.
- Prepare the meringue: In a clean, dry bowl, beat the 3 egg whites with the cream of tartar and 1/2 tablespoon of vanilla extract until soft peaks begin to form. The cream of tartar helps stabilize the egg whites and create a more voluminous meringue.
- Gradually add the 6 tablespoons of sugar, one tablespoon at a time, while continuing to beat the egg whites until stiff, glossy peaks form. Be careful not to overbeat, as this can cause the meringue to become dry and cracked.
- Spread the meringue evenly over the top of the pudding-filled pie crust, ensuring it reaches all the way to the edges of the crust to seal it. You can create decorative swirls with a spoon or spatula for a more visually appealing finish.
- Bake the pie in a moderate oven at 350 degrees F (175 degrees C) for 12 to 15 minutes, or until the meringue is lightly golden brown. Keep a close eye on it, as the meringue can burn quickly.
- Remove the pie from the oven and allow it to cool completely before refrigerating. This allows the pudding to set properly and the meringue to stabilize.
- Alternatively, if you prefer not to use meringue, you can top the chilled pie with whipped cream instead.
Expert Tips & Tricks
- To prevent a soggy crust, consider blind-baking the pie crust before filling it with the pudding. This involves baking the crust on its own, weighted down with pie weights or dried beans, to prevent it from puffing up or shrinking.
- If you are using a graham cracker crust, you can enhance its flavor by brushing it with melted butter and a sprinkle of sugar before filling it.
- For a richer vanilla flavor, use vanilla bean paste instead of vanilla extract. Add about 1 teaspoon of vanilla bean paste along with the vanilla extract.
- When making the meringue, ensure that your bowl and beaters are completely clean and free from any grease or oil, as this can prevent the egg whites from whipping up properly.
- To prevent the meringue from weeping (forming small droplets of liquid on the surface), make sure to cook the pudding completely before pouring it into the crust and ensure the meringue is spread evenly over the entire surface of the pie, sealing it to the crust.
Serving & Storage Suggestions
This creamy vanilla pudding pie is best served chilled. Cut into slices and enjoy! Leftovers should be stored in the refrigerator in an airtight container. The pie will last for up to 3 days in the refrigerator. While you can freeze the pie, the texture of the pudding and meringue may change upon thawing, becoming slightly watery. If you do freeze it, wrap it tightly in plastic wrap and then aluminum foil. Thaw it in the refrigerator overnight before serving. Do not leave the pie at room temperature for more than two hours.
Nutritional Information
Estimated nutritional information per serving (without meringue), based on standard ingredients.
| Nutrient | Amount per Serving | % Daily Value |
|---|---|---|
| Calories | 280 kcal | 14% |
| Total Fat | 12g | 18% |
| Saturated Fat | 7g | 35% |
| Cholesterol | 85mg | 28% |
| Sodium | 180mg | 8% |
| Total Carbohydrate | 38g | 13% |
| Dietary Fiber | 0g | 0% |
| Sugars | 25g | – |
| Protein | 5g | 10% |
Variations & Substitutions
- Gluten-Free: Use a gluten-free pie crust.
- Dairy-Free: Substitute the sweetened condensed milk with a dairy-free alternative, such as coconut condensed milk. Use a plant-based butter substitute.
- Chocolate Vanilla Swirl: After pouring the pudding into the crust, drizzle melted chocolate over the top and swirl it in with a knife or toothpick.
- Lemon Vanilla: Add 1-2 tablespoons of lemon juice to the pudding for a tangy twist.
- Coconut Cream Pie Variation: Substitute coconut extract for the vanilla extract in both the pudding and the meringue.
FAQs (Frequently Asked Questions)
Q: Can I use a store-bought pie crust?
A: Absolutely! Using a store-bought crust is a great time-saver. Just make sure it’s a 9-inch crust and that it’s pre-baked before you add the filling.
Q: My meringue is weeping. What did I do wrong?
A: Weeping can happen if the meringue isn’t properly sealed to the crust or if it’s overbaked. Make sure to spread the meringue evenly, touching the edges of the crust, and avoid overbaking. Adding a little cream of tartar also helps stabilize the meringue.
Q: Can I make this pie ahead of time?
A: Yes, you can make the pie a day in advance. Store it in the refrigerator until you’re ready to serve it. However, the meringue is best when freshly made, so consider adding it just before serving for optimal results.
Q: How can I prevent a skin from forming on the pudding while it cools?
A: Stirring the pudding occasionally as it cools will prevent a skin from forming. You can also press a piece of plastic wrap directly onto the surface of the pudding.
Q: My pudding is lumpy. How can I fix it?
A: If your pudding is lumpy, you can try using an immersion blender to smooth it out. Alternatively, you can strain the pudding through a fine-mesh sieve to remove any lumps.
Final Thoughts
This creamy vanilla pudding pie is more than just a dessert; it’s a trip down memory lane. The simple flavors and textures evoke feelings of comfort and nostalgia. Whether you’re looking for a classic dessert to share with family and friends or simply craving a taste of childhood, this recipe is sure to satisfy. So go ahead, bake a pie, and share a slice of happiness. Don’t hesitate to leave a comment and let me know how it turned out!