
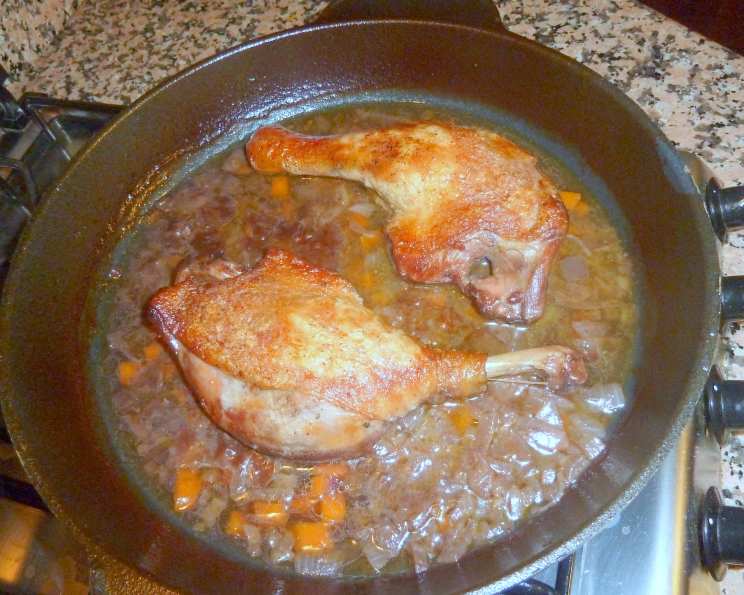
Crispy Braised Duck Legs: A Culinary Ode to Simplicity
My grandmother, a sturdy woman with hands that spoke of hard work and endless love, always had a way of making the simplest meals feel like a feast. I remember one particularly chilly autumn evening, the scent of roasting duck wafted through her tiny kitchen, mingling with the earthy aroma of root vegetables. The skin, crackling like autumn leaves underfoot, gave way to succulent, tender meat that practically melted in my mouth. It was a moment of pure, unadulterated comfort, a taste of home that I’ve chased ever since. This recipe, inspired by those cherished memories, captures the essence of that simple elegance.
Recipe Overview
- Prep Time: 20 minutes
- Cook Time: 1 hour 10 minutes
- Total Time: 1 hour 30 minutes
- Servings: 4
- Dietary Type: Pescatarian
Ingredients
- 4 duck legs, trimmed of excess fat
- 1 large onion (about 8 ounces)
- 1 large carrot
- 3 celery ribs
- Salt and freshly ground black pepper
- 2 cups chicken stock, preferably homemade
Equipment Needed
- Large oven-safe skillet
- Cutting board
- Chef’s knife
Instructions
-
Preheat your oven to 400 degrees Fahrenheit (200 degrees Celsius). Find a skillet that is large enough to accommodate all ingredients comfortably in a single layer.
-
Place the duck legs, skin side down, in the cold skillet. Turn the heat to medium.
-
Cook the duck legs, rotating them occasionally, so that the skin browns thoroughly and evenly. This process renders the fat and creates that beautiful crispy texture. Be patient; this may take some time. Avoid the temptation to turn them completely over at this stage. The goal is to deeply brown the skin without fully cooking the meat.
-
While the duck legs are browning, prepare the vegetables. Peel the onion and carrot. Trim the celery. Roughly chop all the vegetables. There’s no need for perfect precision here; rustic is perfectly fine.
-
Once the duck skins are nicely browned, turn the legs and sear the meat side for just 1 to 2 minutes. Season the duck legs generously with salt and freshly ground black pepper.
-
Remove the duck legs from the skillet and set them aside on a plate. Carefully pour off all but enough fat from the pan to lightly moisten the vegetables. Reserve the rendered duck fat for other culinary adventures – it’s liquid gold!
-
Add the chopped onion, carrot, and celery to the skillet. Season with salt and pepper. Cook, stirring occasionally, over medium-high heat until the vegetables begin to brown, approximately 10 to 15 minutes. Browning the vegetables adds depth of flavor to the braising liquid.
-
Return the duck legs to the pan, placing them skin side up on top of the bed of vegetables.
-
Pour in the chicken stock. The stock should come about halfway up the sides of the duck legs but should not cover them entirely.
-
Turn the heat to high and bring the liquid to a boil.
-
Transfer the skillet to the preheated oven.
-
Cook for 30 minutes.
-
Reduce the oven temperature to 350 degrees Fahrenheit (175 degrees Celsius).
-
Continue cooking undisturbed until the duck is tender and the braising liquid has reduced, at least 30 minutes or even a bit longer. The duck is done when the meat is easily pulled from the bone. The liquid should have thickened slightly into a rich sauce.
-
Serve the Crispy Braised Duck Legs immediately. Alternatively, you can let them rest in a 200-degree Fahrenheit (95 degrees Celsius) oven for up to an hour to keep them warm without further cooking.
Expert Tips & Tricks
- Achieving Maximum Crispiness: The key to truly crispy skin is rendering out as much fat as possible in the initial browning stage. Don’t rush this step.
- Don’t overcrowd the pan: If your skillet isn’t large enough to fit all the duck legs in a single layer without crowding, brown them in batches. Overcrowding the pan will steam the duck legs instead of browning them.
- Using Homemade Stock: Homemade chicken stock elevates the flavor of the braise considerably. If you don’t have any on hand, a good quality store-bought stock will work, but be mindful of the sodium content.
- Deglazing the Pan: For an even richer sauce, consider deglazing the pan with a splash of dry red wine after browning the vegetables. Allow the wine to reduce slightly before adding the chicken stock.
- Make Ahead: The duck legs can be braised a day in advance. Cool completely, then refrigerate in the braising liquid. Reheat gently in the oven before serving.
- Dealing with tough skin: If the duck skin isn’t crisping to your liking in the oven, you can broil it for the last few minutes of cooking. Watch it very carefully to prevent burning.
Serving & Storage Suggestions
Serve the Crispy Braised Duck Legs atop a bed of creamy mashed potatoes, polenta, or alongside roasted root vegetables. Spoon the rich braising sauce generously over the duck and accompaniments. Garnish with fresh herbs, such as parsley or thyme, for a touch of color and freshness.
Leftover duck can be stored in an airtight container in the refrigerator for up to 3 days. To reheat, place the duck legs in a baking dish with a little of the braising liquid and warm in a 350-degree Fahrenheit (175 degrees Celsius) oven until heated through. You can also shred the leftover duck and use it in sandwiches, salads, or tacos.
I would not recommend leaving the duck legs at room temperature for more than 2 hours due to food safety concerns.
Nutritional Information
| Nutrient | Amount per Serving | % Daily Value |
|---|---|---|
| Calories | 450 kcal | 23% |
| Total Fat | 30g | 46% |
| Saturated Fat | 10g | 50% |
| Cholesterol | 150mg | 50% |
| Sodium | 500mg | 22% |
| Total Carbohydrate | 15g | 5% |
| Dietary Fiber | 3g | 12% |
| Sugars | 5g | – |
| Protein | 30g | 60% |
Nutritional information is an estimate and may vary based on specific ingredients and cooking methods.
Variations & Substitutions
- Wine Variation: As mentioned, a splash of red wine adds a wonderful depth of flavor. Consider a Pinot Noir or a Merlot.
- Herb Infusion: Experiment with adding fresh herbs to the braising liquid. Thyme, rosemary, or sage would all complement the duck beautifully.
- Spice it Up: For a touch of heat, add a pinch of red pepper flakes to the vegetables while they are browning.
- Sweet and Savory: A drizzle of honey or maple syrup during the last few minutes of cooking can create a delightful sweet and savory glaze.
- Fruit Addition: Add dried apricots or cranberries to the braising liquid for a touch of sweetness and acidity.
FAQs (Frequently Asked Questions)
Q: Can I use duck fat instead of oil to brown the duck legs?
A: Absolutely! Duck fat will enhance the flavor and contribute to even crispier skin. You can use the reserved duck fat from a previous batch or purchase it from a specialty store.
Q: What if I don’t have chicken stock?
A: You can substitute vegetable stock or even water in a pinch. However, chicken stock will provide the best flavor.
Q: How do I know when the duck is done?
A: The duck is done when the meat is very tender and easily pulls away from the bone. You can also check the internal temperature with a meat thermometer; it should reach 165 degrees Fahrenheit (74 degrees Celsius).
Q: Can I use bone-in chicken thighs instead of duck legs?
A: Yes, bone-in chicken thighs can be used as a substitute, though the flavor will be slightly different. The cooking time may need to be adjusted; check for doneness after about 45 minutes.
Q: What can I do with the leftover braising liquid?
A: Don’t discard that liquid gold! Strain it and use it as a base for soups, stews, or sauces. You can also reduce it further to create a more concentrated glaze.
Final Thoughts
Crispy Braised Duck Legs are more than just a recipe; they’re an invitation to slow down, savor the simple pleasures, and create lasting memories in the kitchen. Don’t be intimidated by the seemingly complex techniques – this dish is surprisingly straightforward and forgiving. So, gather your ingredients, embrace the aromas, and embark on a culinary journey that will transport you to a place of warmth, comfort, and utter deliciousness. I encourage you to experiment with the variations, make it your own, and share your feedback! Pair with a crisp Sauvignon Blanc or a hearty Pinot Noir.