
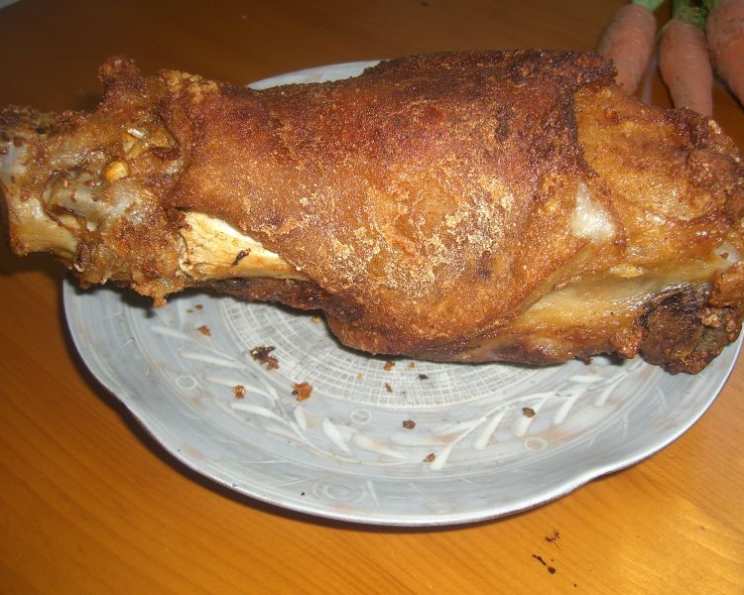
Crispy Pata: The Ultimate Filipino Indulgence
The scent of my Lola’s (grandmother’s) kitchen still fills my mind when I think of Crispy Pata. As a child, I remember the sheer excitement that rippled through our family gatherings whenever this glorious, golden-brown pork knuckle made its grand entrance. The crackling sound as the knife first broke through the impossibly crispy skin was pure culinary music, a prelude to the savory, melt-in-your-mouth meat beneath. It was more than just food; it was a symbol of celebration, family, and the rich tapestry of Filipino culture.
Recipe Overview
- Prep Time: 30 minutes
- Cook Time: 1 hour 20 minutes
- Total Time: 1 hour 50 minutes
- Servings: 5-10
- Dietary Type: Not Gluten-Free
Ingredients
- 3-5 lbs pork legs (front or hind including the knuckles)
- 1 (12 ounce) bottle Sprite (or 7-UP)
- 1 1/2 cups water
- 1 tablespoon salt
- 1/2 teaspoon baking soda
- 2 tablespoons fish sauce (patis)
- 2 tablespoons flour
- 1 teaspoon MSG (optional)
- Oil, for deep-frying
- 2-3 cups water (or enough to cover the pata for boiling)
Dipping Sauce:
- 3/4 cup vinegar
- 1/4 cup soy sauce
- 1 medium onion, diced
- 2 garlic cloves, crushed and chopped
- 1 small red chili pepper, chopped
- Salt and pepper
Equipment Needed
- Large, deep pan with a tight-fitting lid
- Deep fryer or large, heavy-bottomed pot
- Tongs
- Slotted spoon
- Cutting board
- Sharp knife
Instructions
-
Begin by thoroughly cleaning the pork legs. Use a sharp knife to make 3-4 slits on both sides of the skin, being careful not to cut into the bone. These slits will help the skin render and crisp up beautifully during frying.
-
Place the pata in a large, deep pan with a tight-fitting lid.
-
Add water (2-3 cups, enough to cover the pata), the entire bottle of Sprite (or 7-UP), and salt to the pan. The sweetness of the soda helps to tenderize the meat and adds a subtle flavor.
-
Bring the mixture to a boil over high heat. After approximately 15 minutes, add the baking soda. The baking soda will help to accelerate the softening of the pata‘s skin.
-
Continue cooking for another hour, or until the pork is fork-tender. Check the water level periodically; if the water dries up before the pata is tender, add another cup of water.
-
Once the pata is cooked through, carefully drain it and allow it to cool slightly.
-
Now comes a crucial step for achieving that ultimate crispiness: drying the skin. You can achieve this by hanging the pata in a cool, well-ventilated area for at least a day, or by placing it uncovered in the refrigerator overnight. The drier the skin, the crispier the final product.
-
Before frying, generously brush the entire surface of the dried pata with fish sauce (patis). Then, thoroughly sprinkle it with flour, ensuring an even coating. This will help the skin to brown beautifully and create that irresistible crunch.
-
Heat a generous amount of oil in a deep fryer or large, heavy-bottomed pot to approximately 350°F (175°C). The oil should be deep enough to fully submerge the pata.
-
Carefully deep-fry the pata until it is crispy and golden brown, turning it occasionally to ensure even cooking. This may take anywhere from 15-20 minutes, depending on the size of the pata and the temperature of the oil. Watch it closely to prevent burning.
-
Once the pata is beautifully crispy and golden brown, carefully remove it from the hot oil and place it on a wire rack to drain excess oil.
-
Here’s a chef’s secret for extra-crispy skin: after removing the pata from the heat, carefully pour 1/4 cup of water over the skin while it’s still hot. The rapid change in temperature will create even more delightful crackling. Stand back, as the oil will splatter!
-
While the pata is frying, prepare the dipping sauce. In a small bowl, combine the vinegar, soy sauce, diced onion, crushed and chopped garlic, and chopped red chili pepper. Season with salt and pepper to taste. Adjust the ingredients to your preference – more chili for a spicier kick, or more vinegar for a tangier flavor.
-
Carve or chop the Crispy Pata into serving pieces and serve immediately with the dipping sauce.
Expert Tips & Tricks
- Achieving Maximum Crispiness: The key to truly crispy pata lies in drying the skin properly. Don’t skip this step! If you’re short on time, you can use a hairdryer on a low setting to help speed up the drying process.
- Preventing Oil Splatter: Ensure the pata is as dry as possible before frying to minimize oil splatter.
- Flavor Infusion: For an extra layer of flavor, you can marinate the pork leg overnight in a mixture of soy sauce, garlic, black peppercorns, and bay leaves before boiling.
- Cooking in Batches: If your deep fryer or pot is not large enough to accommodate the entire pata, fry it in batches to avoid overcrowding and ensure even cooking.
- Reusing Frying Oil: After frying, allow the oil to cool completely. Strain it through a fine-mesh sieve lined with cheesecloth to remove any food particles. Store the strained oil in an airtight container in a cool, dark place.
Serving & Storage Suggestions
Crispy Pata is best served immediately, while the skin is still at its peak crispiness. Garnish with chopped green onions or cilantro for a pop of color. The traditional dipping sauce perfectly complements the richness of the pork.
Leftovers can be stored in an airtight container in the refrigerator for up to 3 days. To reheat, bake in a preheated oven at 350°F (175°C) until warmed through and the skin is crispy again. You can also reheat in an air fryer for a quicker and crispier result. Reheating via microwave is not recommended, as the skin will become soggy.
Nutritional Information
Please note that these are estimates and can vary based on specific ingredients and portion sizes.
| Nutrient | Amount per Serving | % Daily Value |
|---|---|---|
| Calories | 740 kcal | N/A |
| Total Fat | 52 g | 79% |
| Saturated Fat | 18 g | 89% |
| Cholesterol | 200 mg | 66% |
| Sodium | 3030 mg | 126% |
| Total Carbohydrate | 14 g | 4% |
| Dietary Fiber | 1 g | 2% |
| Sugars | 8 g | N/A |
| Protein | 50 g | 100% |
Variations & Substitutions
- Spicy Crispy Pata: Add a generous amount of chili flakes to the flour mixture before frying for a fiery kick.
- Herb-Infused Pata: Incorporate fresh herbs like rosemary, thyme, or bay leaves into the boiling liquid for an aromatic twist.
- Citrus Zest: Grate the zest of a lemon or orange into the dipping sauce for a bright and zesty flavor.
- Healthier Option: While not traditional, consider using an air fryer for a lower-fat version of Crispy Pata. Although the texture will be slightly different from deep-fried, it still offers a satisfyingly crispy result.
- Dipping Sauce Alternative: For a sweeter dipping sauce, try using a mixture of soy sauce, brown sugar, and calamansi juice.
FAQs (Frequently Asked Questions)
Q: How do I prevent the oil from splattering too much during frying?
A: Make sure the pork leg is thoroughly dried before frying. Pat it down with paper towels to remove any excess moisture.
Q: Can I use a different cut of pork for this recipe?
A: While Crispy Pata traditionally uses the leg, you could experiment with other cuts like pork belly, but the cooking time and results will vary.
Q: What if I don’t have Sprite or 7-Up?
A: You can substitute it with another lemon-lime soda or simply use water with a tablespoon of sugar.
Q: How do I know when the Crispy Pata is cooked through?
A: The internal temperature of the pork should reach 145°F (63°C). The skin should be golden brown and crispy.
Q: Can I prepare the dipping sauce ahead of time?
A: Absolutely! The dipping sauce can be made a day in advance and stored in the refrigerator. This allows the flavors to meld together beautifully.
Final Thoughts
Crispy Pata is more than just a dish; it’s an experience. It’s a testament to the art of transforming humble ingredients into a culinary masterpiece. Don’t be intimidated by the process; with a little patience and these tips, you can create a restaurant-quality Crispy Pata in your own kitchen. Gather your friends and family, and prepare to be amazed by the unforgettable flavors and textures of this iconic Filipino delicacy. I encourage you to try this recipe and share your creation! Serve it with a side of steamed rice and a refreshing Filipino salad like Ensaladang Mangga (Mango Salad) for a complete and satisfying meal. Kain na! (Let’s eat!)