
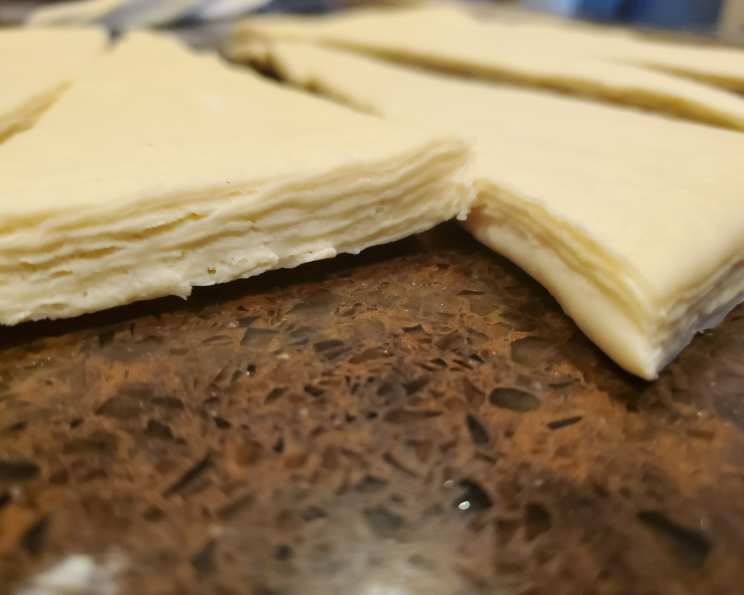
The Alchemy of Croissants: Mastering the Art of Lamination
I remember the first time I truly appreciated a croissant. It wasn’t just the buttery, flaky layers that captivated me, but the understanding of the sheer artistry involved. I was in a small Parisian patisserie, watching the baker meticulously fold and roll the dough, a silent ballet of precision and patience. Each fold was a whispered promise of the deliciousness to come, a testament to the magic that can happen when simple ingredients are treated with respect and skill. It sparked a fire in me, a desire to unlock the secrets of this seemingly simple yet incredibly complex pastry. This recipe, adapted from years of experience and countless attempts, brings that magic to your kitchen.
Recipe Overview
- Prep Time: 9 hours 12 minutes
- Cook Time: 20-24 minutes
- Total Time: At least 10 hours (can be spread over two days)
- Yields: 22 Croissants
- Serves: 22
- Dietary Type: Not Gluten-Free
Ingredients
- 3 tablespoons unsalted butter
- 24 tablespoons unsalted butter, European-style, very cold (3 sticks)
- 1 ¾ cups whole milk
- 4 teaspoons instant yeast or 4 teaspoons fast rise yeast
- 4 ¼ cups all-purpose flour (21 ¼ ounces), preferably high-protein, such as King Arthur
- ¼ cup sugar (1 ¾ ounces)
- Salt
- 1 large egg
- 1 teaspoon cold water
Equipment Needed
- Medium saucepan
- Stand mixer with dough hook
- Rimmed baking sheet
- Parchment paper
- Rolling pin
- Bench scraper
- Plastic wrap
- Ruler
- Pizza wheel or sharp knife
- Wire rack
Instructions
- Melt 3 tablespoons butter in a medium saucepan over low heat. Remove from heat and immediately stir in the milk (the milk temperature should be lower than 90 degrees Fahrenheit – lukewarm to the touch).
- Whisk in the yeast; transfer the milk mixture to the bowl of a stand mixer.
- Add the flour, sugar, and 2 teaspoons salt.
- Using the dough hook, knead on low speed until a cohesive dough forms, about 2 to 3 minutes.
- Increase the speed to medium-low and knead for 1 minute.
- Remove the bowl from the mixer and cover with plastic wrap. Let the dough rest at room temperature for 30 minutes. This initial rest allows the gluten to relax, making the dough easier to work with later.
- Transfer the dough to a parchment paper–lined rimmed baking sheet and shape it into a 10 by 7-inch rectangle about 1 inch thick. Wrap tightly with plastic and refrigerate for 2 hours. This chilling step is crucial for firming up the dough and making it manageable for lamination.
- BUTTER BLOCK: While the dough chills, fold a 24-inch length of parchment in half to create a 12-inch rectangle. Fold over 3 open sides of the rectangle to form an 8-inch square with enclosed sides. Crease the folds firmly.
- Place 24 tablespoons of cold butter directly on the counter and beat with a rolling pin for about 60 seconds until the butter is just pliable but not warm. It should still be cold to the touch. Then fold the butter in on itself using a bench scraper.
- Beat the butter into a rough 6-inch square. Unfold the parchment envelope.
- Using the bench scraper, transfer the butter to the center of the parchment, refolding at the creases to enclose. Turn the packet over so that the flaps are underneath and gently roll until the butter fills the parchment square, taking care to achieve an even thickness.
- Refrigerate the butter block for at least 45 minutes. The butter needs to be very cold and firm for successful lamination; otherwise, it will melt into the dough.
- LAMINATE: Transfer the dough to the freezer. After 30 minutes, transfer it to a lightly floured counter and roll into a 17 by 8-inch rectangle with the long side parallel to the edge of the counter.
- Unwrap the butter and place it in the center of the dough.
- Fold the sides of the dough over the butter so they meet in the center. Press the seam together with your fingertips.
- With a rolling pin, press firmly on each open end of the packet. Roll out lengthwise into a 24 by 8-inch rectangle.
- Starting at the bottom of the dough, fold it into thirds like a business letter into an 8-inch square.
- Turn the dough 90 degrees counterclockwise. Roll out lengthwise again into a 24 by 8-inch rectangle and fold into thirds. This is the second fold, and with each fold, the layers of butter and dough multiply.
- Place the dough on a sheet, wrap tightly with plastic, and return to the freezer for 30 minutes.
- Transfer the dough to a lightly floured counter so that the top flap opens on the right. Roll out the dough lengthwise into a 24 by 8-inch rectangle and fold into thirds.
- Place the dough on a sheet, wrap tightly with plastic, and refrigerate for 2 hours or up to 24 hours. This is the final resting period before shaping, allowing the gluten to relax again and the butter to firm up.
- SHAPE: Transfer the dough to the freezer. After 30 minutes, transfer to a lightly floured counter and roll into an 18 by 16-inch rectangle with the long side of the rectangle parallel to the edge of the counter.
- Fold the upper half of the dough over the lower half.
- Using a ruler, mark the dough at 3-inch intervals along the bottom edge with a bench scraper (you should have 5 marks). Move the ruler to the top edge of the dough, measure in 1 ½ inches from the left, then use this mark to measure out 3-inch intervals (you should have 6 marks).
- Starting at the lower left corner, use a sharp pizza wheel or knife to cut the dough from mark to mark. You will have 12 triangles and 5 diamonds; discard the scraps.
- Unfold the diamonds and cut them into 10 triangles (making 22 equal-size triangles in total).
- Position 1 triangle on the counter. (Keep the remaining triangles covered with plastic.) Cut a ½-inch slit in the center of the short side of the triangle.
- Grasp the triangle by the 2 corners on either side of the slit and stretch gently, then stretch the bottom point.
- Place the triangle on the counter so the point is facing you. Fold down both sides of the slit.
- Roll the top of the triangle partway toward the point. Gently grasp the point with 1 hand and stretch again. Resume rolling, tucking the point underneath. Curve the ends gently toward each other to create a crescent.
- Repeat with the remaining triangles.
- Place 12 croissants on 2 parchment-lined rimmed baking sheets at least 2 ½ inches apart. Lightly wrap with plastic. Let stand at room temperature until nearly doubled in size, 2 ½ to 3 hours. (Shaped croissants can be refrigerated for up to 18 hours. Remove from the refrigerator to rise and add at least 30 minutes to the rising time.).
- After the croissants have been rising for 2 hours, adjust oven racks to the upper-middle and lower-middle positions and heat the oven to 425 degrees Fahrenheit.
- In a small bowl, whisk together the egg, water, and a pinch of salt. Brush the croissants with the egg wash. The egg wash adds color and shine.
- Place the croissants in the oven and reduce the temperature to 400 degrees Fahrenheit.
- Bake for 12 minutes, then switch and rotate the baking sheets. Continue to bake until deep golden brown, 8 to 12 minutes longer. Keep a close eye on them; they can go from golden to burnt quickly.
- Transfer to a wire rack and cool for about 15 minutes. Serve warm or at room temperature.
- TO MAKE AHEAD: After shaping, place 10 croissants 1 inch apart on a parchment-lined sheet. Wrap with plastic and freeze until solid, about 2 hours. Transfer to a zipper-lock bag and freeze for up to 2 months. Bake the frozen croissants as directed from step 8, increasing the rising time by up to 2 hours.
Expert Tips & Tricks
- Temperature is Key: The success of croissants hinges on keeping the butter cold. If the butter starts to melt, the layers will meld together, resulting in a dense, less flaky croissant. If the dough retracts or softens at any point, fold it into thirds, wrap it in plastic, and freeze it for 15 minutes.
- Gentle Handling: Be gentle when rolling and folding the dough. Overworking the dough can develop too much gluten, resulting in a tough croissant.
- Proofing Perfection: Proper proofing is essential for achieving that light, airy texture. The croissants should almost double in size before baking.
- Oven Spring: A hot oven is crucial for creating steam, which helps the croissants puff up and create those beautiful layers. Don’t open the oven door too often during baking, as this can release the steam and lower the temperature.
- Using European-style butter, like Plugrá, with a higher fat content is preferable because it will create flakier layers.
Serving & Storage Suggestions
Serve your freshly baked croissants warm with butter and jam, or alongside your favorite breakfast beverage. They also make a delightful addition to a brunch spread. Leftover croissants can be stored at room temperature in an airtight container for up to 2 days, although they are best enjoyed fresh. For longer storage, freeze baked croissants in a freezer-safe bag for up to 2 months. To reheat, thaw at room temperature and then warm in a 350°F (175°C) oven for 5-10 minutes, or until heated through.
Nutritional Information
| Nutrient | Amount per Serving | % Daily Value |
|---|---|---|
| Calories | 239.1 kcal | N/A |
| Calories from Fat | N/A | 57% |
| Total Fat | 15.3 g | 23% |
| Saturated Fat | 9.4 g | 47% |
| Cholesterol | 47.9 mg | 15% |
| Sodium | 14.4 mg | 0% |
| Total Carbohydrate | 22 g | 7% |
| Dietary Fiber | 0.8 g | 3% |
| Sugars | 3.3 g | N/A |
| Protein | 3.8 g | 7% |
Note: These values are estimates and may vary depending on specific ingredients and preparation methods.
Variations & Substitutions
- Chocolate Croissants (Pain au Chocolat): Add a few chocolate batons to the dough before rolling up each croissant.
- Almond Croissants: Fill baked croissants with almond cream and top with sliced almonds before baking again.
- Savory Croissants: Experiment with savory fillings such as ham and cheese, spinach and feta, or pesto and sun-dried tomatoes.
- Gluten-Free Croissants: While challenging, you can attempt gluten-free croissants using a specialized gluten-free flour blend formulated for laminated doughs. Be aware that the texture and flakiness may differ.
FAQs (Frequently Asked Questions)
Q: Why is my croissant dough so sticky?
A: The dough may be too warm, or the flour may not have enough protein. Try chilling the dough for a longer period and using a high-protein all-purpose flour like King Arthur.
Q: Can I use salted butter instead of unsalted?
A: While you can, it’s best to use unsalted butter to control the overall salt level in the croissants. If you do use salted butter, reduce the amount of salt added to the dough.
Q: My croissants didn’t puff up very much. What went wrong?
A: This could be due to several factors, including butter that was too warm during lamination, insufficient proofing, or an oven that wasn’t hot enough. Double-check that the butter is cold and firm throughout the process and allow the croissants to proof fully before baking.
Q: How do I prevent the butter from leaking out during baking?
A: Ensuring the butter is very cold and the dough is properly sealed during shaping can help prevent leakage. Also, avoid overcrowding the baking sheets, as this can lower the oven temperature and cause the butter to melt more quickly.
Q: Can I freeze the unbaked, shaped croissants?
A: Yes, freezing unbaked, shaped croissants is a great way to prepare ahead. Place the shaped croissants on a parchment-lined sheet and freeze until solid, then transfer them to a freezer bag. When ready to bake, proof the frozen croissants for a longer period (up to 2 hours) before baking as directed.
Final Thoughts
Making croissants at home is undoubtedly a labor of love, a journey that demands patience and attention to detail. But the reward – a batch of golden, flaky, buttery croissants that melt in your mouth – is well worth the effort. Don’t be discouraged if your first attempt isn’t perfect. Each batch is a learning experience, a step closer to mastering this classic pastry. Share your creations with friends and family, and savor the satisfaction of creating something truly special. And perhaps, pair your freshly baked croissants with a strong cup of coffee or a glass of chilled orange juice for the ultimate indulgence. Enjoy the process, and happy baking!