
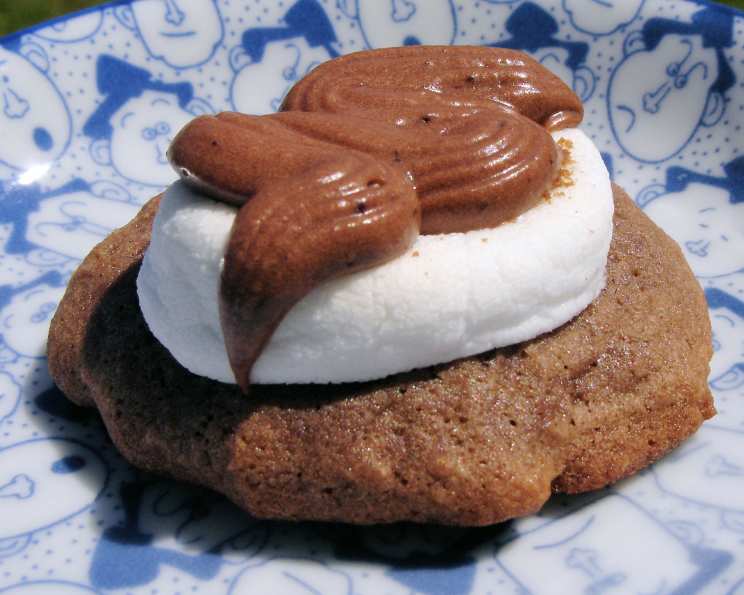
Cuckoo Cookies: A Childhood Memory, Reimagined
I remember the first time I tasted a Cuckoo Cookie. It was at a school bake sale, and amidst the pastel-frosted cupcakes and peanut butter blossoms, these slightly rustic, chocolatey cookies stood out. The puffy marshmallow perched on top, threatening to slide off, was irresistible. One bite of the fudgy cookie, followed by the gooey sweetness of the marshmallow, and I was hooked. They evoked a feeling of warmth and comfort. I’ve been chasing that flavor ever since, and this recipe brings me right back to that childhood moment.
Recipe Overview
- Prep Time: 15 minutes
- Cook Time: 9 minutes (6 minutes + 3 minutes)
- Total Time: 24 minutes (plus cooling and frosting time)
- Servings: 36 Cookies
- Yield: 3 Dozen
- Dietary Type: Not specified
Ingredients
For the Cookies:
- 1 cup shortening
- 2 cups sugar
- 2 eggs
- ½ cup cocoa
- 1 cup milk
- 3 ½ cups flour
- 1 teaspoon baking soda
- 1 teaspoon salt
- 1 teaspoon vanilla
- 36 marshmallows, cut in half
- 36 walnut halves (optional)
For the Frosting:
- 2 tablespoons butter, melted
- 3 tablespoons cocoa
- 4 tablespoons milk
- 1 teaspoon vanilla
- 2 cups powdered sugar
Equipment Needed
- Oven
- Cookie sheets
- Spraying oil
- Mixing bowls
- Measuring cups and spoons
- Electric mixer (optional, but helpful)
- Cookie rack
- Small spoon or fork for drizzling
Instructions
-
Preheat your oven to 350°F (175°C). Ensure your oven rack is positioned in the center of the oven for even baking.
-
In a large bowl, cream together the shortening and sugar until light and fluffy. This step is crucial for a tender cookie. An electric mixer makes this easier, but you can also do it by hand.
-
Add the eggs, one at a time, mixing well after each addition. Be sure to scrape down the sides of the bowl to ensure everything is incorporated.
-
Stir in the milk. Be prepared – the mixture will be very runny at this stage. Don’t be alarmed, this is normal.
-
In a separate bowl, whisk together the flour, baking soda, and salt. This ensures even distribution of the leavening agent and salt.
-
Add the cocoa, and the dry ingredients gradually to the wet ingredients, mixing well until just combined. Do not overmix, as this can result in tough cookies. Remember, this dough is very soft, almost sticky. Resist the urge to add more flour. It will firm up slightly as it chills and bakes.
-
Drop slightly heaping teaspoonfuls of dough onto a sprayed cookie sheet. Leave about 2 inches between each cookie to allow for spreading. I usually do 12 cookies to a sheet.
-
Bake for 6 minutes. The cookies will still look quite soft at this point.
-
Remove the cookie sheet from the oven and top each cookie with 1 marshmallow half, cut side down. Gently press the marshmallow into the dough.
-
Return the cookie sheet to the oven and bake for an additional 3 minutes. Keep a close eye on the marshmallows; you want them to be puffy and slightly golden, but not burnt.
-
If you wish to add a walnut half, now is the time. Gently press a walnut half into the soft marshmallow.
-
Let the cookies cool on the cookie sheet for 1 minute before transferring them to a cookie rack to cool completely. The marshmallows will be puffy initially but will settle down as they cool.
-
While the cookies are cooling, prepare the frosting. In a medium bowl, melt the butter.
-
Add the cocoa, milk, and vanilla to the melted butter and mix well.
-
Gradually add the powdered sugar, mixing until smooth. If the frosting is too thick, add a tiny bit more milk. If it’s too thin, add a little more powdered sugar.
-
Instead of spreading the frosting, I recommend drizzling it over the cookies using a small spoon or fork. The original recipe suggests spreading, but that can rip the marshmallow and make the cookies look messy. By adding a tiny bit more milk, you achieve a glaze-like consistency, making drizzling easy and creating a more visually appealing cookie.
Expert Tips & Tricks
- For a richer chocolate flavor, use Dutch-processed cocoa.
- Don’t skip creaming the shortening and sugar – it’s essential for a tender cookie.
- If you don’t have shortening, you can use softened butter.
- To prevent the cookies from spreading too much, chill the dough for 30 minutes before baking.
- For a neater appearance, use a piping bag to drizzle the frosting.
- If you want to add sprinkles, do so immediately after drizzling the frosting, before it sets.
Serving & Storage Suggestions
These Cuckoo Cookies are best served slightly warm, with a glass of cold milk. They’re also delicious with coffee or tea.
Store leftover cookies in an airtight container at room temperature for up to 3 days. For longer storage, you can freeze them for up to 2 months. To freeze, arrange the cooled cookies in a single layer on a baking sheet and freeze until solid. Then, transfer them to a freezer bag or container. Thaw at room temperature before serving.
Nutritional Information
Please note that these values are estimates and can vary based on specific ingredients and portion sizes.
| Nutrient | Amount per Serving | % Daily Value |
|---|---|---|
| Calories | 102.7 kcal | – |
| Calories from Fat | 32 g | 32% |
| Total Fat | 3.6 g | 5% |
| Saturated Fat | 1.1 g | 5% |
| Cholesterol | 7.3 mg | 2% |
| Sodium | 59.2 mg | 2% |
| Total Carbohydrate | 17 g | 5% |
| Dietary Fiber | 0.4 g | 1% |
| Sugars | 10.9 g | 43% |
| Protein | 1.2 g | 2% |
Variations & Substitutions
- Chocolate Chip Cuckoo Cookies: Add ½ cup of chocolate chips to the dough.
- Peanut Butter Cuckoo Cookies: Substitute ½ cup of the shortening with peanut butter.
- Mint Chocolate Cuckoo Cookies: Add ½ teaspoon of peppermint extract to the dough and use green food coloring for the frosting.
- Gluten-Free Cuckoo Cookies: Substitute the all-purpose flour with a gluten-free flour blend. You may need to adjust the amount of liquid slightly.
- Vegan Cuckoo Cookies: Substitute the eggs with flax eggs (1 tablespoon flaxseed meal mixed with 3 tablespoons water per egg), use vegan shortening, and vegan marshmallows. Also, use a non-dairy milk and vegan butter substitute for the frosting.
FAQs (Frequently Asked Questions)
Q: Why is the cookie dough so soft?
A: The high ratio of liquid to dry ingredients makes the dough soft. Don’t worry, the cookies will bake up nicely. Avoid adding extra flour, as this will result in dry cookies.
Q: Can I use a different type of nut instead of walnuts?
A: Absolutely! Pecans, almonds, or even chopped peanuts would work well.
Q: My marshmallows are burning. What can I do?
A: If your marshmallows are browning too quickly, lower the oven temperature slightly or move the cookie sheet to a lower rack.
Q: Can I make the dough ahead of time?
A: Yes, you can make the dough ahead of time and store it in the refrigerator for up to 24 hours. Let it come to room temperature slightly before scooping and baking.
Q: Why should I drizzle instead of spread the frosting?
A: Drizzling creates a cleaner look and prevents the frosting from tearing the marshmallow. It also provides a nice, even coating of sweetness.
Final Thoughts
These Cuckoo Cookies are more than just a sweet treat; they’re a nostalgic trip back to simpler times. Don’t be intimidated by the soft dough or the marshmallow topping. Follow the recipe, embrace the imperfections, and enjoy the process. I urge you to make these cookies for your family and friends, and share the joy that they bring. And be sure to let me know what you think of them! They’re sure to become a new favorite.