
Daifuku Cake: A Taste of Japanese Sweetness
My earliest memories of daifuku are intertwined with the vibrant colors and bustling sounds of the local Japanese market. As a child, I was always drawn to the display case filled with these pillowy, powdered sweets. Each bite was an adventure – the yielding mochi giving way to the smooth, sweet bean paste inside. It wasn’t just a treat; it was a comforting hug in the form of a delicate dessert, a cultural touchstone that sparked my lifelong fascination with Japanese cuisine.
Recipe Overview
- Prep Time: 30 minutes
- Cook Time: 1 hour 15 minutes
- Total Time: 1 hour 45 minutes
- Servings: 12
- Yield: 12 daifuku cakes
- Dietary Type: Vegetarian (easily adaptable to Vegan)
Ingredients
- 1 cup azuki beans
- 10 cups water (divided: 4 cups + 6 cups)
- 1/3 cup sugar
- 1 cup rice flour (also known as glutinous rice flour or mochiko)
- 1/4 cup sugar
- 1 1/4 cups water
Equipment Needed
- Large saucepan
- Strainer
- Mixing bowls
- Stirring spoon
- Floured surface
- Baking sheet (optional, for resting daifuku)
Instructions
- Begin by preparing the azuki bean filling. Place 4 cups of water in a large saucepan and add the 1 cup of azuki beans.
- Place the saucepan on high heat and bring the mixture to a boil.
- Once boiling, immediately remove the pan from the stove and carefully drain all the water using a strainer. This step helps remove any impurities and bitterness from the beans.
- Return the drained azuki beans to the pan. Add the remaining 6 cups of water.
- Place the pan back on the stove over low heat. Simmer gently for about one hour, or until the azuki beans are very soft and easily mashed. It’s crucial to maintain a low simmer to prevent the beans from scorching.
- Once the azuki beans are softened, carefully remove any excess water from the pan, leaving just enough moisture to create a thick paste.
- Add 1/3 cup of sugar to the cooked azuki beans.
- Stir the mixture continuously over low heat for a few minutes until the sugar is completely dissolved and the bean paste thickens. Be careful not to overcook, as the paste will continue to thicken as it cools. The consistency should be similar to a thick jam.
- Remove the azuki bean paste (also called anko) from the heat and set it aside to cool completely.
- Now, prepare the mochi dough. In a separate pan, combine 1 cup of rice flour, 1/4 cup of sugar, and 1 1/4 cups of water.
- Place the pan over low heat. It’s important to use low heat to prevent the dough from cooking too quickly and becoming lumpy.
- Stir the mixture constantly with a spoon or spatula. Continue stirring until the dough thickens and forms a smooth, sticky mass. This process usually takes about 10-15 minutes. The dough is ready when it pulls away from the sides of the pan and forms a cohesive ball.
- Lightly flour a clean work surface. Turn the sticky mochi dough out onto the floured surface. Be careful, as the dough will be hot.
- Divide the dough into 12 equal pieces. A bench scraper or knife can be helpful for this.
- Gently press each piece of dough into a small, flat round, about 3-4 inches in diameter.
- Take a tablespoon of the cooled anko (sweet azuki bean paste) and place it in the center of each dough round.
- Carefully stretch the edges of the dough to enclose the anko filling completely. Pinch the edges together to seal tightly, ensuring that no filling is exposed.
- Shape the filled dough into a smooth ball. Dust lightly with flour or cornstarch to prevent sticking.
- Repeat steps 15-18 with the remaining dough and anko filling.
- Place the finished daifuku cakes on a baking sheet lined with parchment paper or on a lightly floured surface to prevent sticking.
Expert Tips & Tricks
- Mochi Dough Consistency: The texture of the mochi dough is crucial. If it’s too dry, add a tablespoon of water at a time until it reaches the right consistency. If it’s too sticky, add a bit more rice flour.
- Preventing Sticking: Keeping your hands and work surface lightly floured is essential to prevent the mochi dough from sticking.
- Anko Variations: Feel free to experiment with different flavors of anko, such as white bean paste (shiro-an) or even incorporate a small piece of fruit in the center along with the anko.
- Even Cooking: Consistent stirring is key when cooking both the anko and the mochi dough to prevent burning and ensure even cooking.
- Make-Ahead Tip: The anko filling can be made a day or two in advance and stored in the refrigerator. This helps break up the workload.
Serving & Storage Suggestions
Daifuku is best enjoyed fresh, ideally within a day or two of making it, as the mochi tends to harden over time. Serve at room temperature. To store, place the daifuku in an airtight container. They can be kept at room temperature for a day or in the refrigerator for up to 3 days. Refrigeration will cause the mochi to harden, so allow the daifuku to come to room temperature before serving. Freezing is not recommended as it can significantly alter the texture of the mochi.
Nutritional Information
| Nutrient | Amount per Serving | % Daily Value |
|---|---|---|
| Calories | 86 kcal | 4% |
| Total Fat | 0.2 g | 0% |
| Saturated Fat | 0.1 g | 0% |
| Cholesterol | 0 mg | 0% |
| Sodium | 4.4 mg | 0% |
| Total Carbohydrate | 20.3 g | 7% |
| Dietary Fiber | 0.3 g | 1% |
| Sugars | 9.7 g | 20% |
| Protein | 0.8 g | 2% |
Note: Nutritional information is an estimate and may vary based on specific ingredients and portion sizes.
Variations & Substitutions
- Vegan Daifuku: This recipe is naturally vegetarian. To make it vegan, ensure that the sugar used is processed without bone char (check the packaging).
- Gluten-Free: This recipe is already gluten-free as it uses rice flour.
- Flavored Mochi: Experiment with adding a drop or two of food coloring to the mochi dough for a visually appealing treat. You can also infuse the dough with flavors like matcha (green tea powder) or strawberry powder.
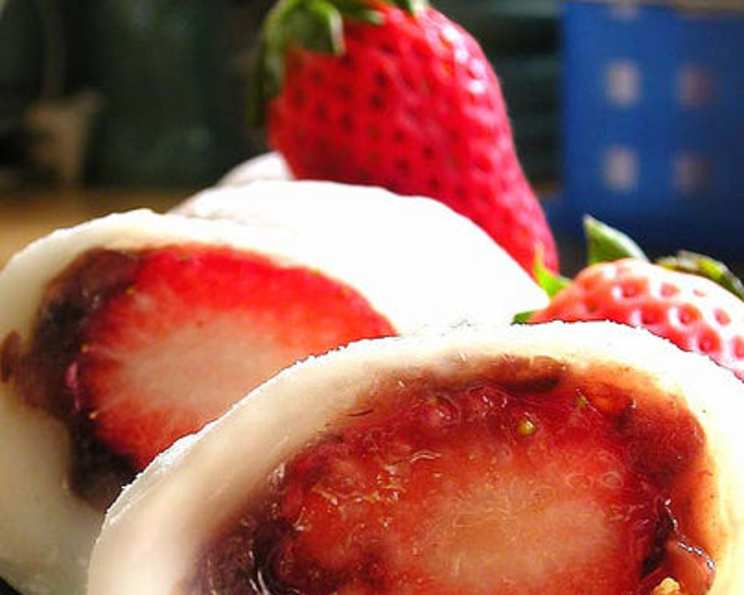
- Different Fillings: While anko is traditional, you can fill the daifuku with other sweet fillings such as custard, chocolate ganache, or even fresh fruit like strawberries.
FAQs (Frequently Asked Questions)
Q: Can I use regular rice flour instead of glutinous rice flour?
A: No, glutinous rice flour (mochiko) is essential for daifuku as it creates the characteristic chewy texture. Regular rice flour will not work.
Q: Why is my mochi dough so sticky?
A: Mochi dough is naturally sticky. Make sure to flour your hands and work surface well. You can also use a pastry scraper to help handle the dough.
Q: How do I prevent the anko from drying out?
A: To prevent the anko from drying out, cover it with plastic wrap while it cools, pressing the wrap directly onto the surface of the paste.
Q: Can I make daifuku without a microwave?
A: Yes! This recipe is designed to be made on the stovetop. The microwave method is faster, but the stovetop method provides more control over the cooking process.
Q: How long does daifuku last?
A: Daifuku is best enjoyed fresh, ideally within a day or two, as the mochi tends to harden over time.
Final Thoughts
Now that you’re armed with this recipe, I encourage you to step into the delightful world of daifuku making. Don’t be intimidated by the slightly lengthy process; the result is a truly rewarding and authentic Japanese treat. Experiment with different fillings, share your creations with loved ones, and most importantly, savor the unique texture and flavors of this delightful confection. I’m eager to hear about your daifuku adventures – feel free to share your feedback and any variations you discover along the way! Perhaps, pair your homemade daifuku with a cup of fragrant green tea for the ultimate Japanese dessert experience.