
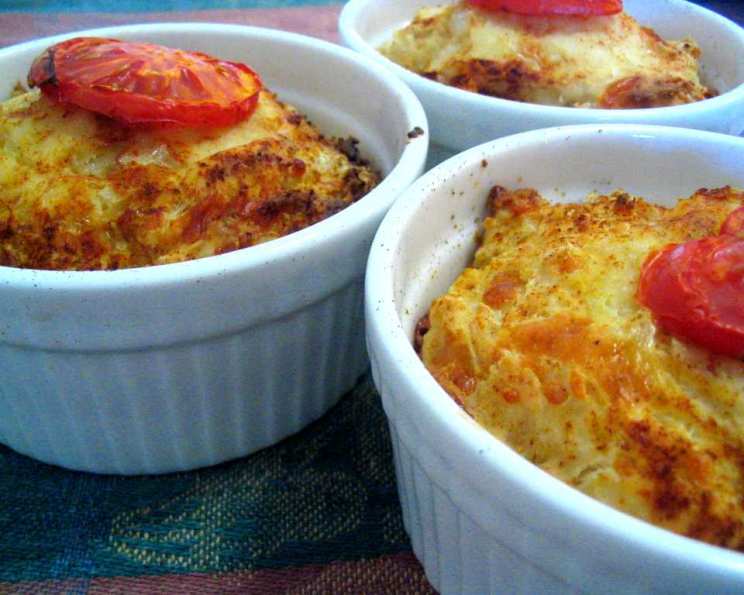
Damper: An Authentic Taste of the Australian Outback
The scent of eucalyptus hangs heavy in the air, the red dust swirling around my boots. My first taste of damper wasn’t in a gleaming restaurant, but nestled by a crackling campfire under the vast Australian sky. A grizzled stockman, his face etched with years of sun and wind, pulled a blackened pot from the embers, revealing a golden-brown loaf. The simple pleasure of tearing off a chunk of warm, slightly smoky bread, slathered with butter and golden syrup, remains one of my most cherished culinary memories, a true taste of the Australian outback. It’s a reminder that the best food is often the simplest, made with heart and shared with good company.
Recipe Overview
- Prep Time: 10 minutes
- Cook Time: 20-30 minutes
- Total Time: 30-40 minutes
- Servings: 4
- Dietary Type: Vegetarian (easily adaptable to vegan)
Ingredients
- 2 cups self-raising flour
- ½ teaspoon salt
- 1 cup milk (approximately)
Optional Additions:
- ½ cup grated cheese
- Pinch of cayenne pepper
- 2-3 rashers of cooked, chopped bacon
- ½ cup chopped fresh basil OR 1 teaspoon dried herbs
- ½ cup mixed dried fruit
- 1 tablespoon sugar
- Finely grated rind of one orange
- Thin slices of tomato
Equipment Needed
- Mixing bowl
- Knife or spatula
- 18cm (7 inch) sandwich cake tin OR four single serve ramekin dishes
- Oven
- Wire rack
Instructions
-
Preheat your oven to a hot 200°C (400°F). This high heat is key to achieving a lovely golden crust.
-
Prepare your baking vessel. Grease an 18cm (7 inch) sandwich cake tin. Alternatively, for individual portions, grease four single-serve ramekin dishes. Proper greasing ensures the damper releases easily after baking.
-
In a mixing bowl, sift together the self-raising flour and salt. Sifting is important to remove any lumps in the flour and ensure an even texture.
-
At this stage, if you’re making a flavored damper, add any optional ingredients such as cheese, bacon, herbs, dried fruit, or orange rind. Incorporate these additions evenly into the flour mixture.
-
Create a well in the center of the flour mixture. Gradually add most of the milk, reserving a small amount.
-
Using a knife or spatula, gently mix the ingredients together. Add more milk, a little at a time, if necessary, until a fairly moist, but not sloppy, dough forms. Be careful not to overmix, as this can result in a tough damper.
-
Turn the dough into the prepared cake tin or spoon it evenly into the ramekins.
-
Smooth the top of the dough with the back of a spoon. This creates a more uniform surface for even baking.
-
If making a savory damper, you can sprinkle the top with additional cheese and/or add a thin slice or slices of tomato.
-
Bake for 20-30 minutes, or until the damper is golden brown on top and a skewer inserted into the center comes out clean. Keep a close eye on the damper during the last few minutes of baking to prevent burning.
-
Once baked, turn the damper out onto a wire rack to cool slightly before serving. This prevents the bottom from becoming soggy.
-
Serve warm with butter. For an authentic Aussie experience, try it with golden syrup as well, or a generous dollop of your favourite jam.
Expert Tips & Tricks
- Don’t Overmix: The key to a light and tender damper is to avoid overmixing the dough. Mix just until the ingredients are combined.
- Adjust Moisture: The amount of milk needed may vary depending on the humidity and the type of flour used. Add the milk gradually until you achieve the desired consistency.
- Campfire Baking: If you want to truly embrace the traditional method, you can bake the damper in a Dutch oven directly in the embers of a campfire. Be sure to rotate the Dutch oven regularly to ensure even cooking.
- Herbed Butter: Elevate your damper experience by serving it with a flavorful herbed butter. Simply mix softened butter with chopped fresh herbs like parsley, chives, and thyme.
- Crispy Crust: For an extra crispy crust, brush the top of the damper with milk or melted butter before baking.
- Vegan Variation: Substitute the milk with almond, soy, or oat milk.
Serving & Storage Suggestions
Damper is best enjoyed warm, straight from the oven. The crust is at its crispiest and the inside is soft and fluffy. Serve it with generous lashings of butter, jam, honey, or golden syrup. It’s also a fantastic accompaniment to soups, stews, or grilled meats.
Damper doesn’t keep well due to its simple composition. It’s best eaten the day it’s made. However, if you have leftovers, you can store them in an airtight container at room temperature for up to 2 days. To revive the damper, you can reheat it in a moderate oven (180°C/350°F) for a few minutes, or toast individual slices.
For longer storage, you can freeze the damper. Wrap it tightly in plastic wrap and then in foil, or place it in a freezer bag. Frozen damper can be stored for up to 2 months. To reheat, thaw it overnight in the refrigerator, then warm it in the oven as described above.
Nutritional Information
Please note that these values are approximate and may vary based on specific ingredients and portion sizes.
| Nutrient | Amount per Serving | % Daily Value |
|---|---|---|
| Calories | 320 kcal | 16% |
| Total Fat | 8g | 12% |
| Saturated Fat | 4g | 20% |
| Cholesterol | 20mg | 7% |
| Sodium | 600mg | 25% |
| Total Carbohydrate | 55g | 18% |
| Dietary Fiber | 2g | 8% |
| Sugars | 3g | – |
| Protein | 8g | 16% |
Variations & Substitutions
- Gluten-Free Damper: Use a gluten-free self-raising flour blend. You may need to add a little xanthan gum to help bind the dough.
- Sweet Potato Damper: Incorporate ½ cup of mashed cooked sweet potato into the dough for a subtle sweetness and vibrant color.
- Rosemary and Garlic Damper: Add 1 tablespoon of chopped fresh rosemary and 2 cloves of minced garlic to the flour mixture for a savory and aromatic twist.
- Sundried Tomato and Olive Damper: Add ½ cup of chopped sundried tomatoes and ¼ cup of sliced olives to the dough for a Mediterranean-inspired flavor.
- Spiced Damper: Add ½ teaspoon of ground cinnamon, ¼ teaspoon of ground nutmeg, and a pinch of ground cloves to the flour mixture for a warm and comforting flavor.
FAQs (Frequently Asked Questions)
Q: Can I use plain flour instead of self-raising flour?
A: Yes, but you’ll need to add 2 teaspoons of baking powder per cup of plain flour to achieve the same rise.
Q: Can I make damper without milk?
A: Yes, you can substitute the milk with water or a non-dairy milk alternative like almond milk or soy milk.
Q: How do I know when the damper is cooked?
A: The damper is cooked when it’s golden brown on top and a skewer inserted into the center comes out clean.
Q: My damper is dry. What did I do wrong?
A: You may have overmixed the dough or baked it for too long. Be sure to mix just until the ingredients are combined and check the damper for doneness after 20 minutes.
Q: Can I add different types of cheese to the damper?
A: Absolutely! Experiment with different cheeses like cheddar, mozzarella, feta, or parmesan.
Final Thoughts
Damper is more than just bread; it’s a taste of Australian history, a connection to the land, and a symbol of simple pleasures. Whether you bake it in your oven or over a crackling campfire, I encourage you to give this recipe a try. It’s a fantastic way to bring a touch of the outback to your kitchen and share a truly authentic culinary experience with your friends and family. Don’t be afraid to experiment with different flavor combinations to create your own signature damper. Share your creations and feedback – I’d love to hear about your damper adventures! Pair it with a hearty stew or a cup of billy tea for the ultimate Aussie experience. Enjoy!