
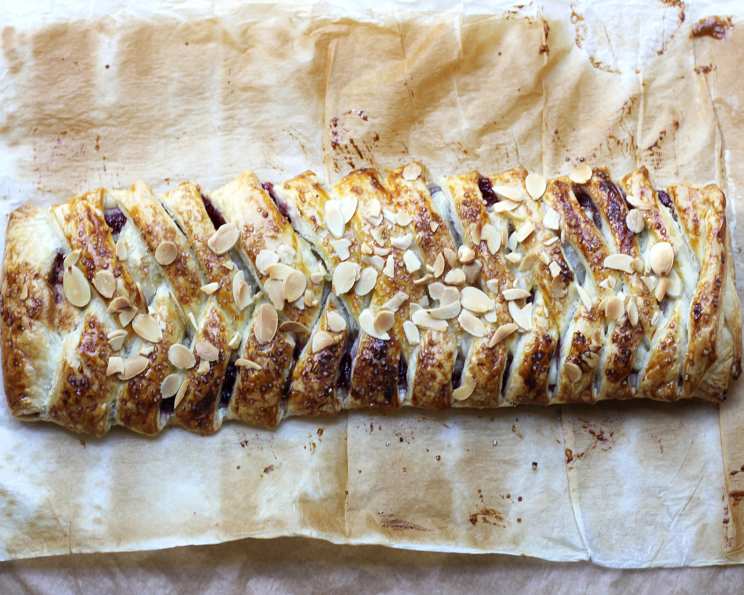
The Irresistible Allure of Homemade Danish Braid
I remember the first time I saw a Danish braid, its golden, intricately woven crust hiding a treasure of sweet filling. It was in a small bakery window on a trip to Solvang, a charming Danish village in California. The sight was so captivating, so… Hygge, that I had to go inside. The aroma of warm butter and almond filled the air, and that first bite was pure bliss. That experience inspired me to try baking my own, and while the first attempt wasn’t perfect, the journey was absolutely worth it. This recipe, adapted from a classic, brings that same bakery magic to your kitchen. With a little patience, you can create a show-stopping Danish braid that will impress your family and friends.
Recipe Overview
- Prep Time: 48 hours 20 minutes
- Cook Time: 15-20 minutes
- Total Time: 48 hours 35-40 minutes
- Yields: 2 Danish braids
- Dietary Type: Not specified
Ingredients
Danish Dough:
- 1/4 cup water, 110 degrees F
- 2 1/2 teaspoons dry yeast
- 1/2 cup milk, room temperature
- 1 large egg, room temperature
- 1/4 cup sugar
- 1 teaspoon salt
- 2 1/2 cups unbleached flour
- 8 ounces unsalted butter, cold, cut into 1/4 inch thick slices
Danish-Almond Filling:
- 1 cup blanched almonds
- 1/2 cup powdered sugar
- 2 tablespoons unsalted butter, room temperature
- 1/2 teaspoon almond extract
- 1 large egg white, lightly beaten
Danish-Berry Jam Filling:
- 2 cups fresh berries, crushed (mixed berries like strawberries, raspberries, blueberries work well)
- 1 cup sugar
- 1 tablespoon lemon juice (up to 2 tablespoons depending on sweetness)
Other Ingredients:
- 1 large egg white
- Raw sugar or crushed sugar cube
- Sliced almonds, for garnish
- 4-6 tablespoons strong coffee
- 1 cup powdered sugar
Equipment Needed
- Large bowl
- Whisk
- Food processor
- Rubber spatula
- Plastic wrap
- Rolling pin
- Parchment paper
- Half sheet pan
- Saucepan
- Small container
- Pizza cutter or sharp knife
- Kitchen towel
- Zip-loc bag
Instructions
- Prepare the Danish Dough: In a large bowl, pour the warm water and sprinkle the dry yeast over it. Let it soften for about a minute.
- Add the milk, egg, sugar, and salt to the bowl. Whisk to mix thoroughly. Set the mixture aside.
- In a food processor, put the flour, add the cold butter pieces. Pulse the mixture 8-10 times until the butter is cut into pieces about 1/2 inch in diameter – ensure the butter pieces remain relatively large.
- Empty the contents of the food processor into the bowl with the yeast mixture.
- Gently turn the mixture over with a rubber spatula until the dry ingredients are just moistened. Remember, the butter must remain in discrete pieces, which is crucial for creating flaky layers.
- Cover the bowl tightly and refrigerate overnight, or up to 4 days. This slow, cold fermentation is key to developing flavor and relax the gluten.
- The next day, lightly flour your work surface. Turn the dough out onto the floured surface and lightly flour the top of the dough.
- Pat the dough into a rough square shape. Note: If at any time the dough becomes too soft and difficult to handle, cover it with plastic wrap and chill it in the refrigerator for 15-20 minutes before proceeding.
- Roll out the dough to a 16″ x 16″ square.
- Fold the dough in thirds, like a business letter, and turn it so that the closed fold is on your left.
- Roll the dough again to a 10″ x 24″ rectangle.
- Fold it in thirds again, and turn it so the closed fold is on your left.
- Roll the dough into a 20″ x 20″ square.
- Fold the square in thirds and turn so that the closed fold is on your left.
- Roll the dough into a 10″ x 20′ rectangle, then fold it in thirds once more.
- Wrap the dough tightly in plastic wrap and chill in the refrigerator for at least 30 minutes, or up to 2 days. You can also freeze the dough for up to 1 month. Thaw it in the refrigerator overnight before using.
- Prepare the Danish-Almond Filling: In the food processor, combine the blanched almonds, powdered sugar, and room temperature butter.
- Process until the almonds are finely ground, scraping down the sides of the bowl as necessary.
- Add the almond extract and 2 tablespoons of the lightly beaten egg white.
- Process until the mixture is well combined and forms a paste.
- Store the almond filling in an airtight container in the refrigerator until needed, for up to 1 week. Bring it to room temperature before using it in the Danish braid.
- Prepare the Danish-Berry Jam Filling: In a saucepan, stir together the crushed fresh berries and sugar.
- Cook the mixture on low heat, stirring frequently, until most of the liquid is absorbed, and the filling becomes thick and glossy. This can also be done in the microwave in short bursts, stirring in between.
- Stir in the lemon juice, adjusting the amount to taste based on the sweetness of the berries.
- Scrape the berry filling into a small container and cool to room temperature.
- Seal the container and chill in the refrigerator. The berry filling will keep refrigerated for up to 1 week.
- Danish Braid Assembly: Divide the chilled Danish dough in half.
- Roll each half of the dough on a lightly floured surface to a 10″ x 16″ rectangle.
- Carefully lift each rectangle onto a parchment-lined half sheet pan.
- Spread some of the berry filling down the middle third of each dough rectangle.
- Top the berry filling with some of the almond filling. Note: You may not need the entire amount of either filling.
- Using a pizza cutter or a sharp knife, make 12-14 slanting cuts down each side of the filling. Angle the cuts from the center towards the edge, creating strips about 3/4 inch wide.
- Fold the strips of pastry into the center, crisscrossing over the filling by alternating strips from each side.
- Lightly press the ends to seal them and run your hands along the sides of the pastry to straighten it and give it a neat appearance.
- Brush the entire braid with the remaining egg white, sprinkle with raw sugar or crushed sugar cube, and then sprinkle with sliced almonds.
- Cover the braids loosely with a kitchen towel and let them rise at room temperature until they look and feel puffy, about 30 minutes.
- Preheat your oven to 400°F (200°C).
- Bake the Danish braids in the center of the preheated oven for 15-20 minutes, or until they are golden brown.
- Cool the braids slightly on the baking sheet before transferring them to a wire rack to cool completely.
- Prepare the Coffee Glaze: While the braids are cooling, stir together the strong coffee and powdered sugar until you have a smooth, shiny glaze.
- Spoon the glaze into a zip-loc bag, seal the top, and snip off a small corner with scissors to create a makeshift pastry bag.
- Squeeze squiggles of glaze over the cooled pastry and allow it to set before serving.
Expert Tips & Tricks
- Butter Temperature: Keep the butter cold throughout the dough-making process. This is crucial for creating the flaky layers that are characteristic of a good Danish pastry. If the butter gets too soft, the layers will meld together, resulting in a dense, rather than flaky, braid.
- Dough Handling: Be gentle when handling the dough. Overworking it will develop the gluten too much, resulting in a tough pastry.
- Filling Variations: Feel free to experiment with different fillings. Cream cheese, prune, confectioners cream, or apricot fillings all work wonderfully. You can also use different types of berries in the jam filling.
- Freezing the Dough: If you’re short on time, you can make the dough ahead of time and freeze it. Just make sure to thaw it in the refrigerator overnight before using it.
Serving & Storage Suggestions
Serve the Danish braid warm or at room temperature. It pairs beautifully with a cup of coffee or tea. Leftovers can be stored in an airtight container at room temperature for up to 2 days, or in the refrigerator for up to 4 days. To reheat, warm it gently in a low oven (300°F/150°C) for a few minutes, or microwave briefly. The glaze may soften upon reheating. The unglazed braid also freezes well; wrap tightly in plastic wrap and then foil.
Nutritional Information
| Nutrient | Amount per Serving | % Daily Value |
|---|---|---|
| Calories | 2858.5 kcal | N/A |
| Calories from Fat | 1333 g | 47% |
| Total Fat | 148.2 g | 227% |
| Saturated Fat | 70.9 g | 354% |
| Cholesterol | 375.9 mg | 125% |
| Sodium | 1321.1 mg | 55% |
| Total Carbohydrate | 353.6 g | 117% |
| Dietary Fiber | 12.8 g | 51% |
| Sugars | 217.3 g | 869% |
| Protein | 43.6 g | 87% |
Note: Nutritional information is an estimate and may vary based on specific ingredients and portion sizes.
Variations & Substitutions
- Gluten-Free: While traditionally made with wheat flour, you can experiment with gluten-free flour blends designed for baking. Be sure to follow the blend’s instructions for best results, as gluten-free dough can behave differently.
- Vegan: Substitute the butter with a vegan butter alternative that’s solid when cold. Use a flax egg (1 tbsp ground flaxseed mixed with 3 tbsp water, let sit for 5 minutes) for the egg and egg white. Use a non-dairy milk alternative (almond, soy, or oat) for the milk. Ensure the sugar is vegan, as some brands use bone char in the refining process.
- Seasonal Fruit: Swap out the berries for other seasonal fruits like apples, peaches, or pears. You may need to adjust the amount of sugar depending on the fruit’s sweetness.
FAQs (Frequently Asked Questions)
Q: Why is my Danish dough not flaky?
A: The most common reason is that the butter melted into the dough. Make sure to keep the butter cold throughout the process and work quickly.
Q: Can I use a stand mixer instead of a food processor for the dough?
A: While a food processor is recommended for the initial butter incorporation, you can use a stand mixer with the paddle attachment on low speed. Be careful not to overmix.
Q: How do I know when the Danish braid is properly risen before baking?
A: The dough should look puffy and feel light to the touch. If it’s still dense, let it rise for a bit longer.
Q: Can I make the fillings ahead of time?
A: Absolutely! Both the almond and berry fillings can be made up to a week in advance and stored in the refrigerator.
Q: My glaze is too thick/thin. How can I fix it?
A: If it’s too thick, add a little more coffee, one teaspoon at a time, until you reach the desired consistency. If it’s too thin, add a bit more powdered sugar.
Final Thoughts
Creating a homemade Danish braid might seem intimidating, but the result is well worth the effort. The flaky layers, the sweet fillings, and the beautiful presentation make it a truly special treat. So, gather your ingredients, embrace the process, and prepare to be amazed by the deliciousness you can create in your own kitchen. Don’t be afraid to experiment with different fillings and garnishes to make it your own. Share your creations with friends and family, and let them experience the joy of homemade pastry! And most importantly, don’t forget to savor every delicious bite!